System Requirements
We advise you have the following minimum system configuration in your web server theme.
- WordPress 6.4 or later
- PHP 8.2 or 8.3
- MySQL 5.6 (or greater) | MariaDB 10.0 (or greater)
- Need php ini file configration -
- post_max_size = 256M
- upload_max_filesize = 256M
- max_execution_time = 5000
- max_input_time = 5000
- memory_limit = 1000M
Introduction
Thank you for buying our WordPress Theme. The complete procedure to configure and manage a WordPress Website from the beginning is shown in this documentation in different portions.
What is WordPress CMS?
WordPress is an open source tool which is based on PHP and MySQL to create websites. It is a completely free content management system(CMS) and a strong blogging platform. With this CMS, you can develop websites and solid online apps. You hardly require any knowledge or technical capability to manage it. WordPress has become the most accepted website development software available because of it’s varied aspects like it’s easy usage and flexibility. Learn More
What is a Wordpress Template?
A WordPress template serves as a skin for websites built with the WordPress CMS. A WordPress Template is very simple to install. You can easily change the appearance of your WordPress website by installing a new template. A WordPress template includes all of the necessary source files, which you can freely edit and expand as you see fit.
Help and Support
Click here for support:
SupportFile Structure
The template package you downloaded is divided into several folders. Let's take a look at what's in each folder:
- Screenshots -contains template screenshot. Not for production.
- theme -contains wordpress theme files
- "vw-education-academy-pro" -this folder contains all the necessary files for the theme.
- "license.txt" -contains license details
- "readme.txt" -contain information about theme images path, font use and usage script
Template Installation
The installation of a template is a simple process.
All installation steps can be completed through the WordPress interface. It makes the process more comfortable and faster.
There are two methods for installing the system.
1-Using WordPress admin, install a theme.
The first step is to log into your WordPress admin area. Then, click on
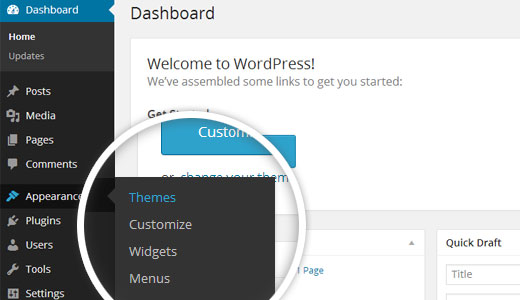
1.Go to the menu Appearance >> Themes

2. Once on the themes page, click the Add New button at the top.

3. Select the Upload Theme button.
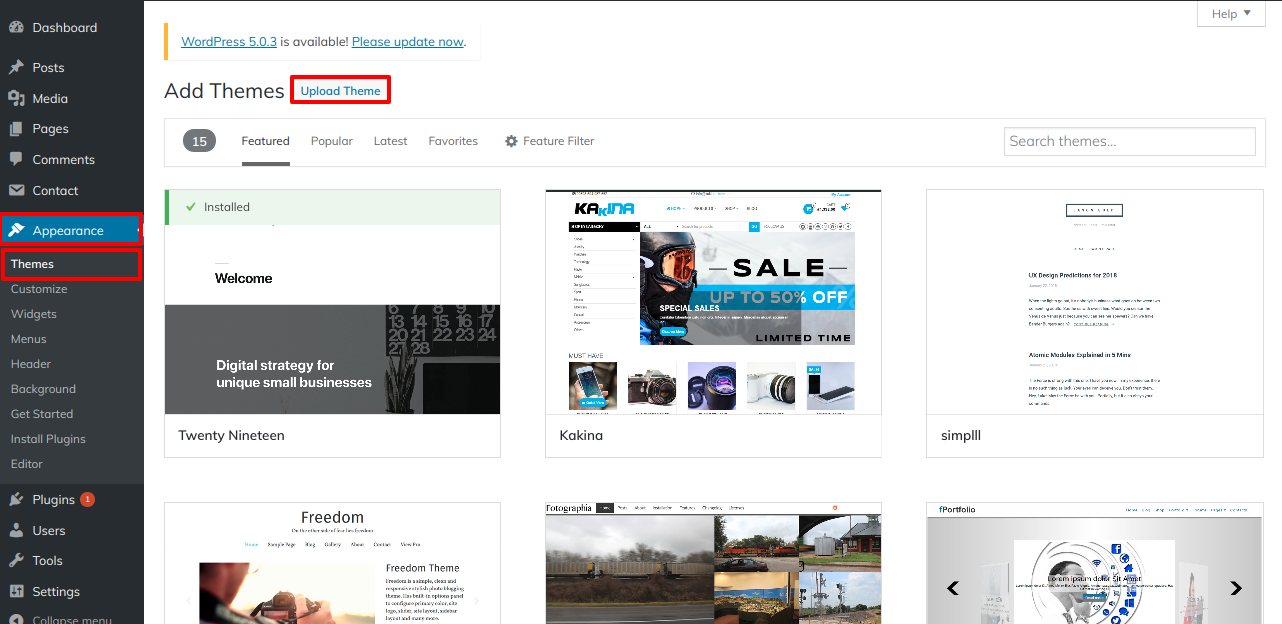
4. Click the Browse Button, then choose your vw-education-academy-pro theme, and then click the Install Now button.

5.WordPress will now install your theme and display a success message, as well as a link to activate or view the live preview.
Congratulations!! Your theme has been installed successfully.
2-Using FTP, install a theme.
The second method of installation is to upload the theme via FTP. To use this method, first connect to your site via FTP and navigate to the wp-content/themes folder. Unzip the downloaded theme file and upload only the extracted Total folder to your server.

After that, log in to your WordPress site and go toAppearance >> Themes to activate Total.
Plugin Installation.
To manually install a WordPress Plugin, download the.zip archive and follow the steps below for Upload plugin.
Install Required Plugins:
vw education academy pro posttype Plugin , contact-form-7.
Go to Dashboard >> plugin >> Add New >> Upload plugin.

Install and activate by clicking the Install Now button.

Section Color/Font Pallette
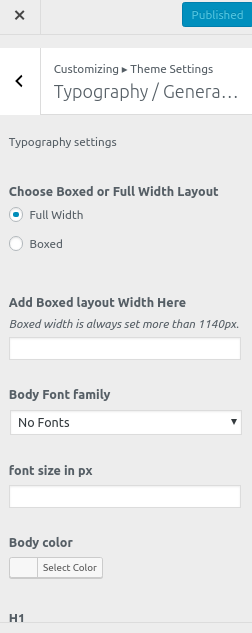
Color/font selection is a simple process. These options are available in all sections of the customizer. It is a complete image that demonstrates the colour and font palette. You can change the colour and fonts of the headings, paragraph, and buttons with a single click.
Depending on the number of options available in that section, each individual section has the option to set the colour palette for Headings, Title/Text, Paragraph, Button Text, and Button Background.
Default Color/Font settings

Theme Wizard
* This is a new feature that has been added to the version. (1.0.1)
To import content using Theme Wizard, follow the steps below.
1) Go to Dashboard >> Getstarted

2) Insert your key.

Licence key activation is demonstrated in the following video:
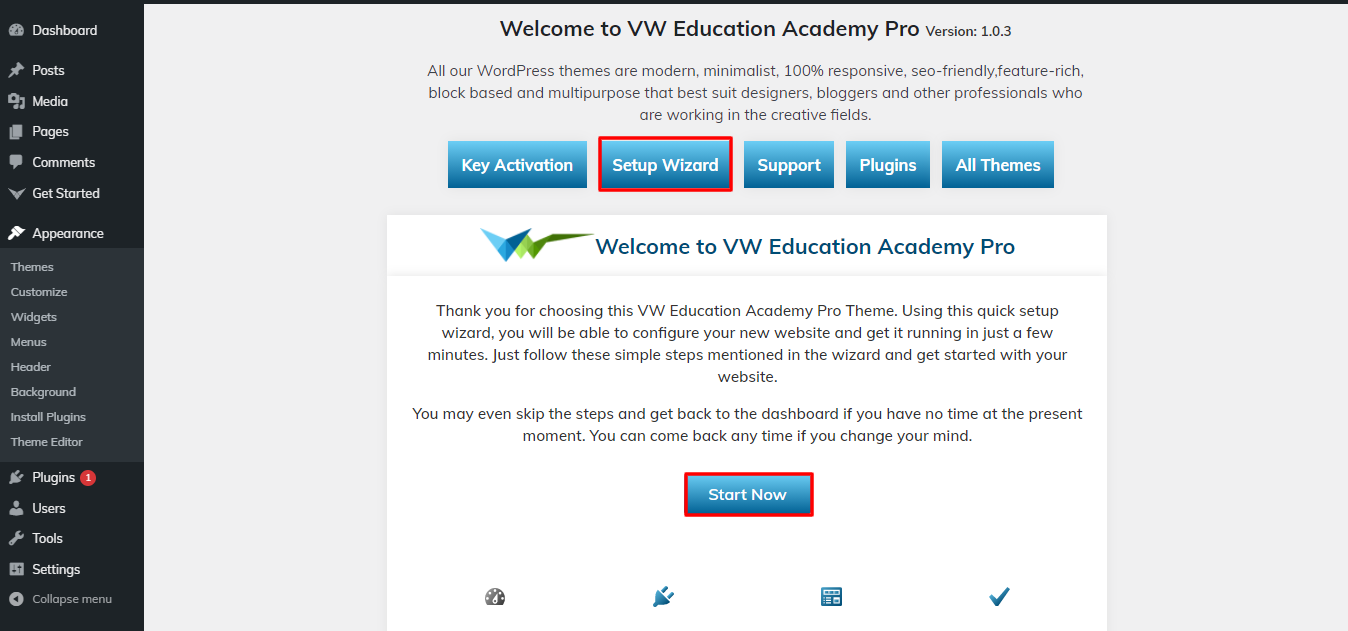
3) CLick on Wizard and then start now.
4) Install Plugins.

5) Import your Customizer and Gutenberg-based demo content.

You can use this video to configure your demo content.
Setup Homepage Template
To configure the Home page, follow these steps.
- 1. Make a Page to Set the Template: Go to Dashboard >> Pages >> Add New Page.
Label it "home" or whatever you want. Then, from the template dropdown, select "home-page."

- 2. Set the front page: Go to Setting >> Reading >> Set the front page display static page to home page

When you're finished, you'll be able to see all of the demo content on the front page.
Theme Setup
After activating the theme, you will see the index page with the most recent post. Now you must configure the home page template to display all of the demo sections on your front page.
Section Ordering
Section Arranging and Reordering
Section reordering essentially means rearranging the section to meet our needs. To proceed with this section, drag the section to the top or bottom of the page where you want it. When you drag any section top or bottom, the front view changes based on the customizer values.
Section re-ordering is as simple as dragging and dropping options into any order you desire.
To continue with Section Ordering.
Go to Appearance >> Customize >> Theme Settings >>Section Ordering

Setup Site Identity
To proceed with the slider.
Go to Appearance >> Customize >> Theme Settings >>site identity

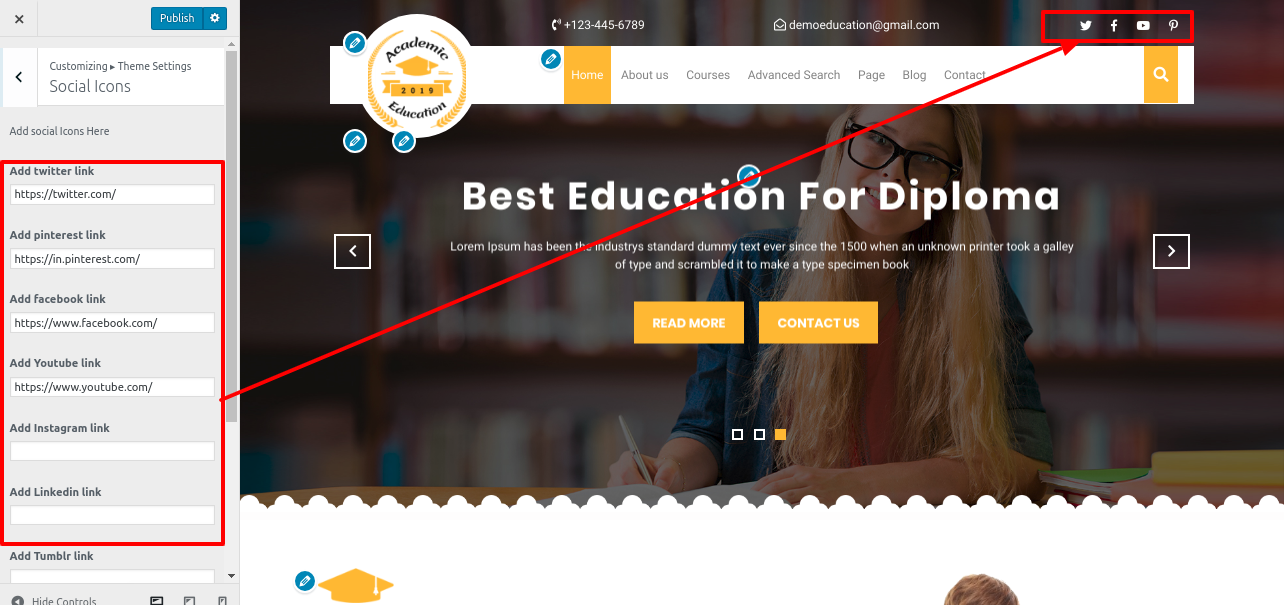
Setup Social Icons
To proceed with the Setup Social Icons.
Go to Appearance >> Customize >> Theme Settings >>Social Icons
8.1. Setup Top Bar Section
Follow the steps below to configure the Top Bar Section.
1. Go to Go to >> Appearance >> Customize >> Theme setting >>Top Bar.
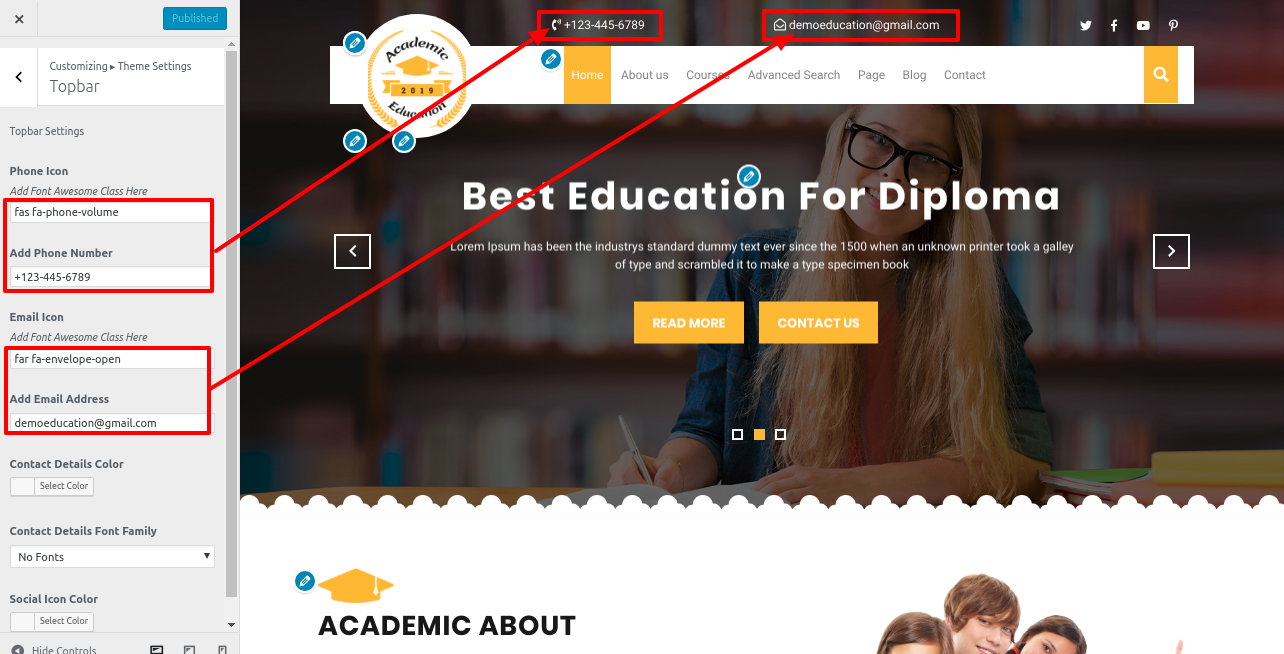
This is how you add the Top Bar section.

8.2. Setup Header Section
Follow the steps below to set up the Header Section.
1. Go to Go to >> Appearance >> Customize >> Header.

2. Go to Dashboard >> Pages >> Add new page with image if desired, and assign the page to that section. You can repeat this process to create multiple pages in the same section.

You must first add pages to the menu.
Go to >> Appearance >> Menus >> Add menu

If you want to add more pages, follow the same procedure.
You can add the menu section this way.

8.3. Setup Slider Settings
To proceed with the slider.
Go to Appearance >> Customize >> Theme Settings >>Slider Settings


This is how you add the Slider Settings.

8.4. Setup About Section
To proceed with the About Us Section,
Go to Appearance >> Customizer >> Theme Settings >> About Us

You can add the About Us Section this way.

8.5. Section Search Settings
First, create the page and choose the Advanced Search option from the template dropdown.
Go to Dashboard >> page >> Add New. .

Go to Appearance >> Customize >> Theme Settings >> About Us .

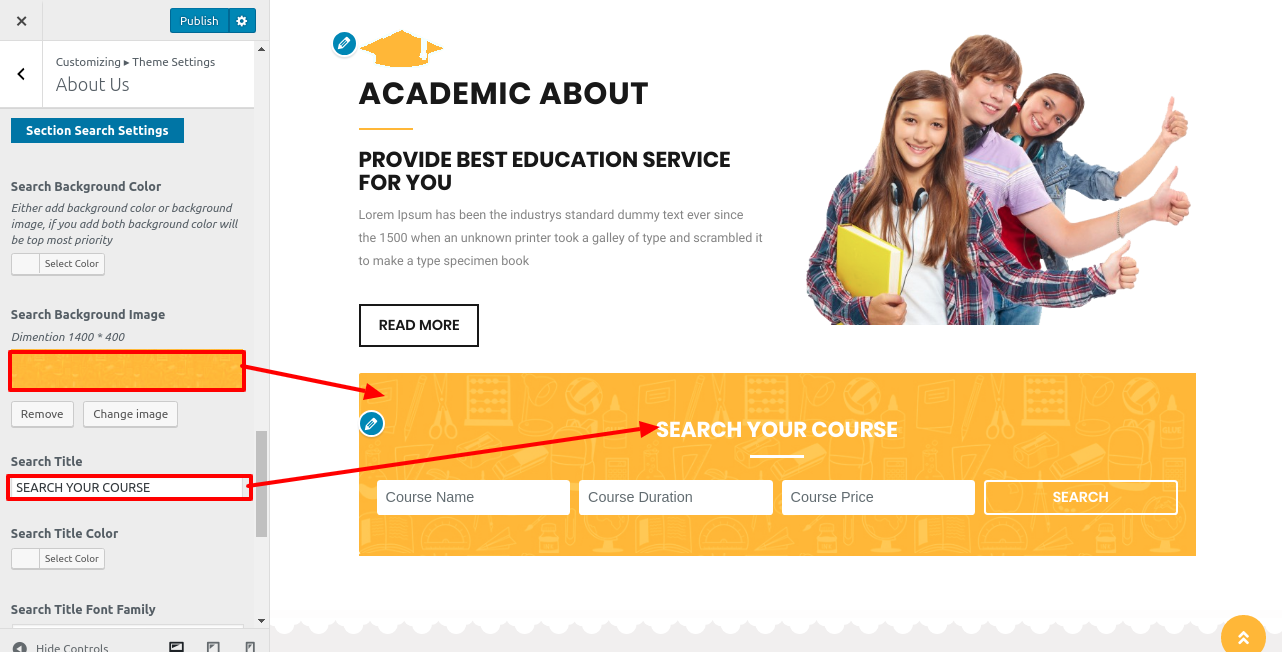
You must select a page, which is advanced search.
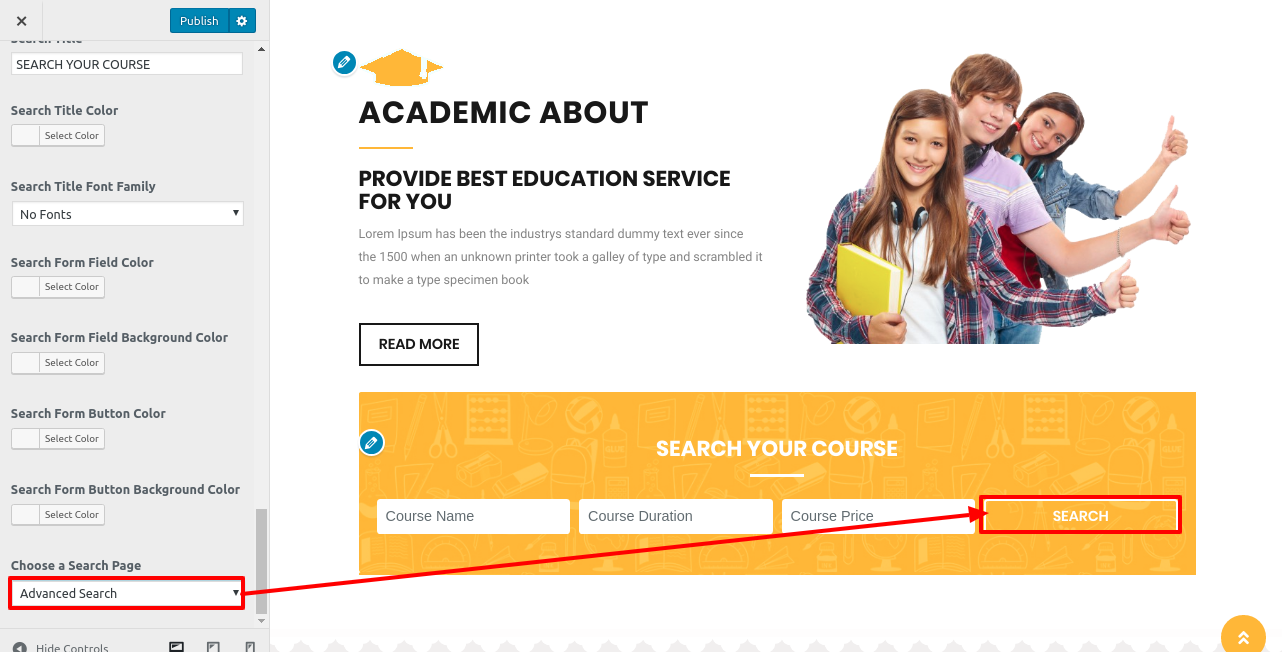
This is how you add the Search Settings.

8.6. Setup Popular Courses sections
To proceed with the Popular Courses Section.
To set up the Popular Courses Section, first download and install the "vw education academy pro posttype" plugin.
Go to Dashboard >> Courses >>Add new
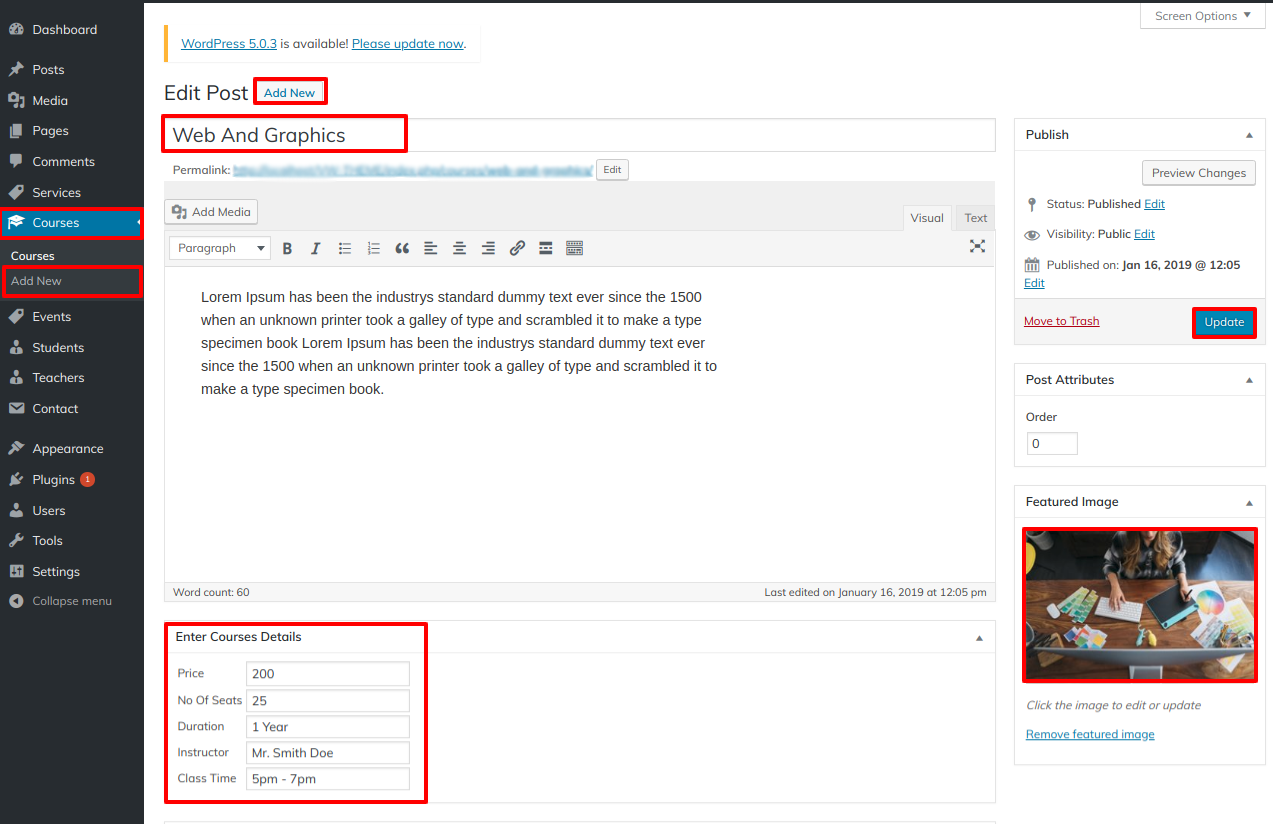
Go to Appearance >> Customize >> Theme Settings >> Popular Courses .

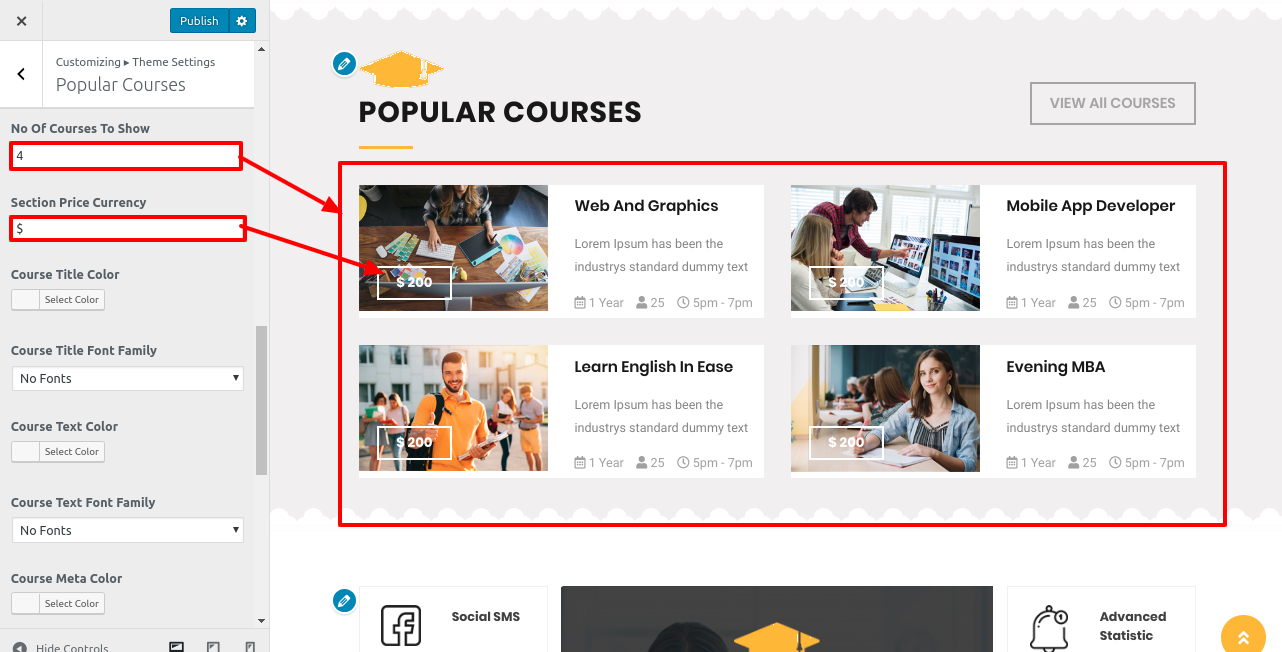
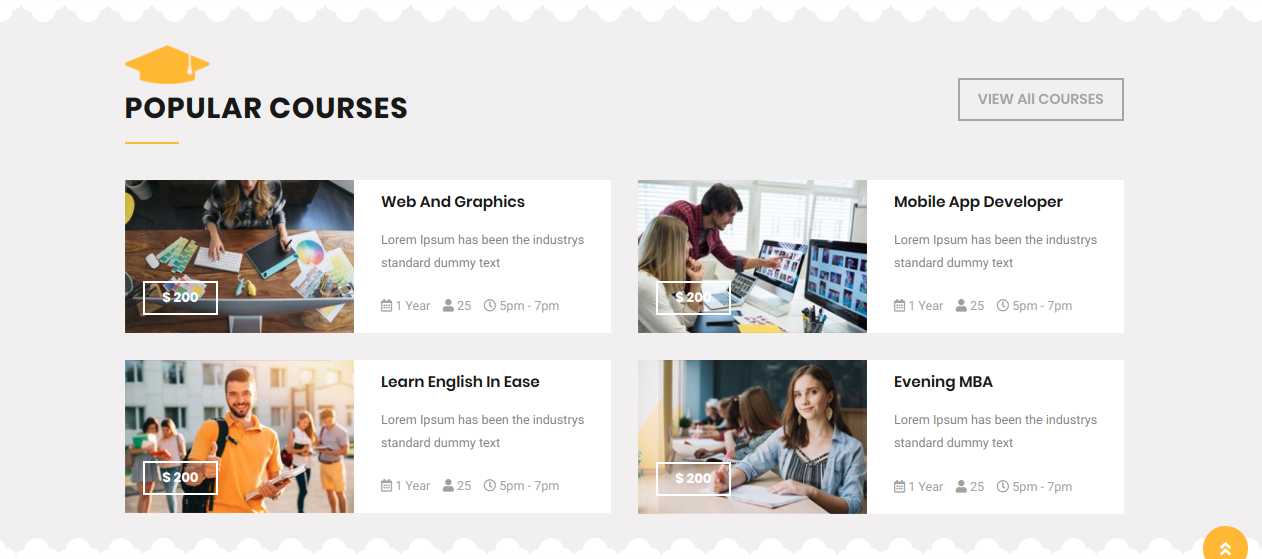
This is how you set up the Popular Courses Section.
8.7. Academic Services
To proceed with the Academic Services Section.
You must first install and activate the "vw education academy pro posttype" plugin.
Go to Dashboard >> Services >>Add new
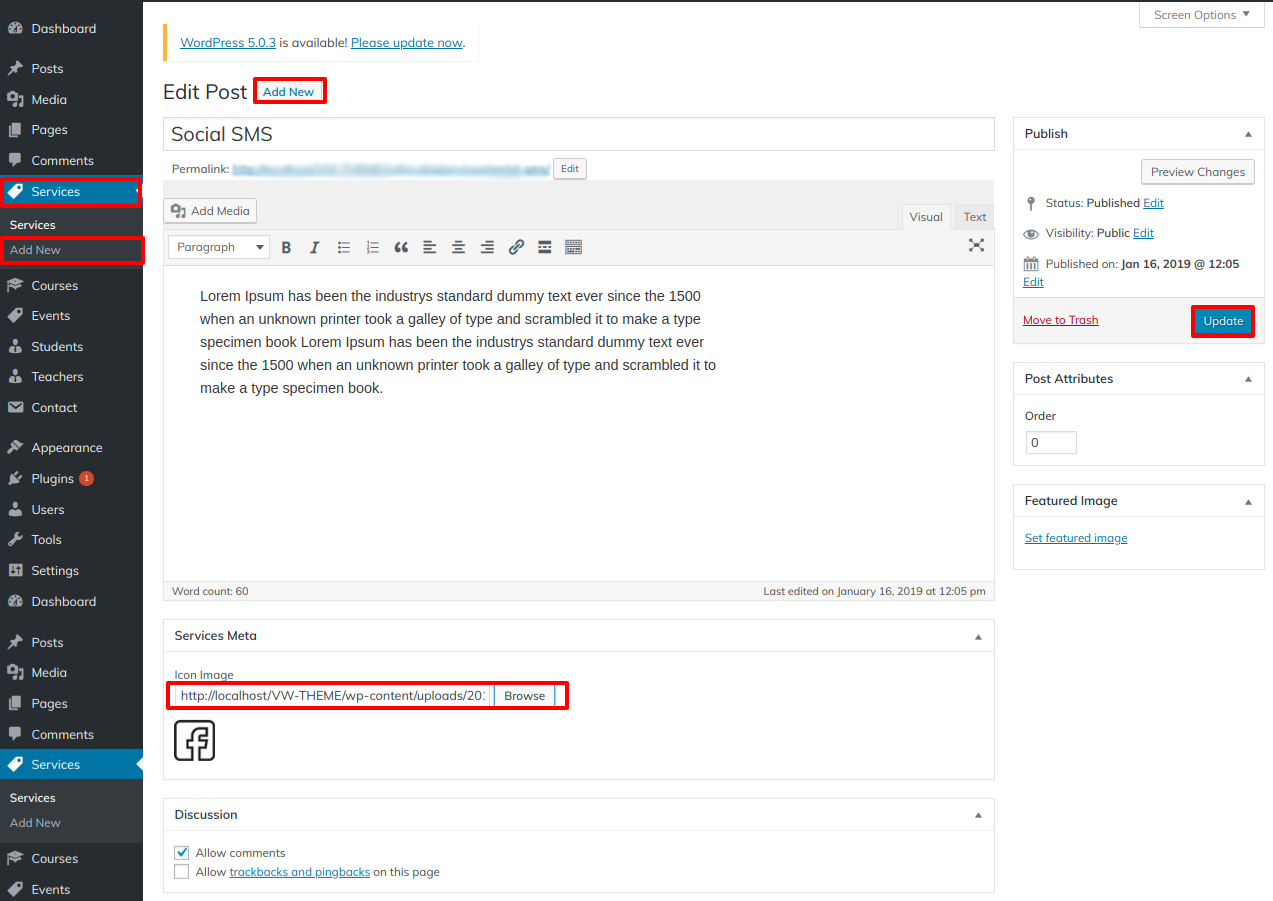
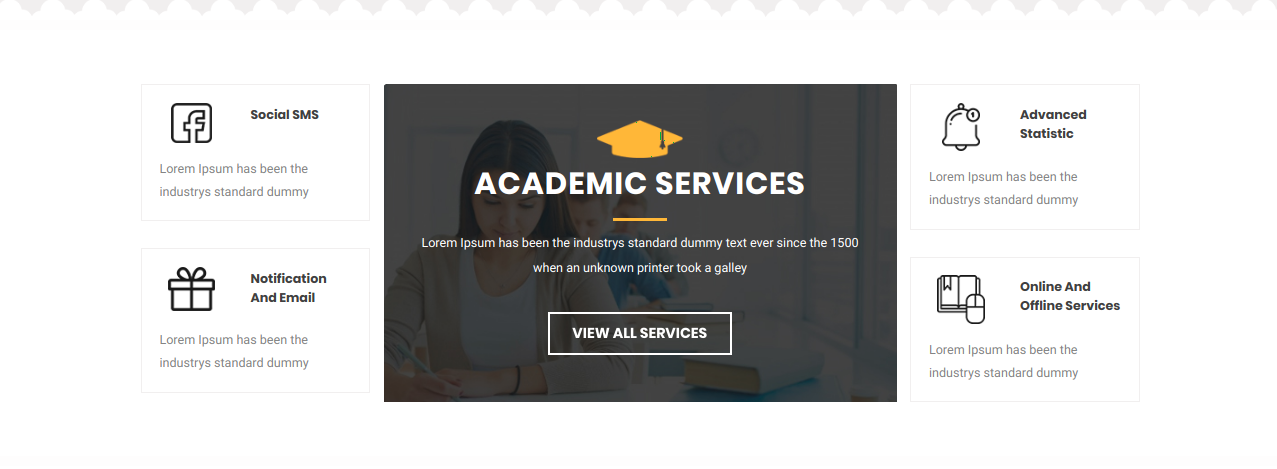
Go to Customizer >> Theme Settings >> Academic Services


You can set up the Academic Services Section in this manner.
8.8. Set Academic Gallery
To configure the Gallery Section, follow the steps below.
You must first install the "vw-gallery-images" plugin before you can configure this section.
The gallery option will appear on the dashboard after installation.
Go to Dashboard >> Gallery >>Add New Gallery

Go to Appearance >> Customize >> Theme Settings >>Academic Gallery


This is how you add the Gallery Section.

8.9. Set Academic Events
To proceed with the Academic Events Section.
You must first install and activate the "vw education academy pro posttype"plugin.
The Events option will appear on the dashboard after installation.
Go to Dashboard >> Events >> Add New

Go to Appearance >> Customize >> Theme Settings >> Academic Events

You can add the Academic Events Section this way.

8.10. Setup Why Choose Us Section
Go to Appearance >> Customize >> Theme Setting >>Why Choose Us

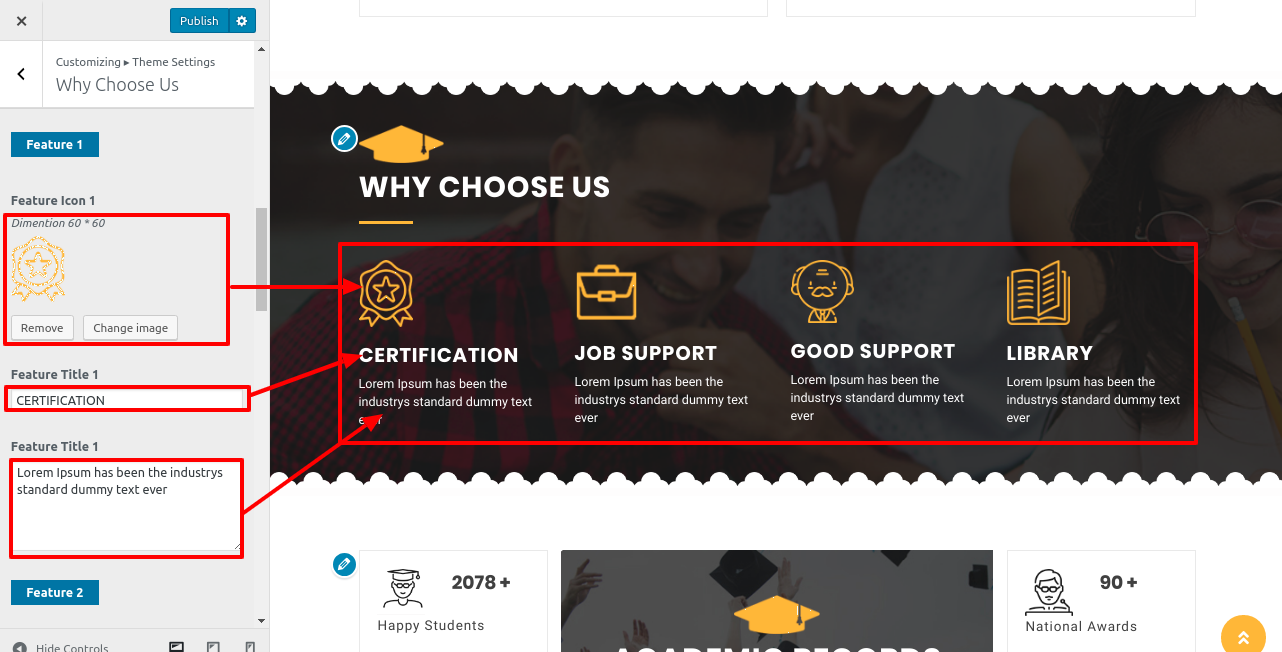
This is how you set up the Why Choose Us Section.

8.11. Academic Records Sections
To continue with Our Academic Records Section.
Go to Appearance >> Customizer >> Theme Settings >> Academic Records


You can add an Academic Records Section this way.

8.12.Setup Register Now Sections
To proceed to the Register Now Section,
First, you must activate the Contact Form 7 plugin.
The contact option will appear on the dashboard after installation.
Go to Dashboard >>Contact >>Add New

Go to Appearance >> Customize >> Theme Settings >> Register Now

Video setting
To configure the Video setting, follow these steps.
Go to Appearance >> Customize >> Theme Settings >> Register Now
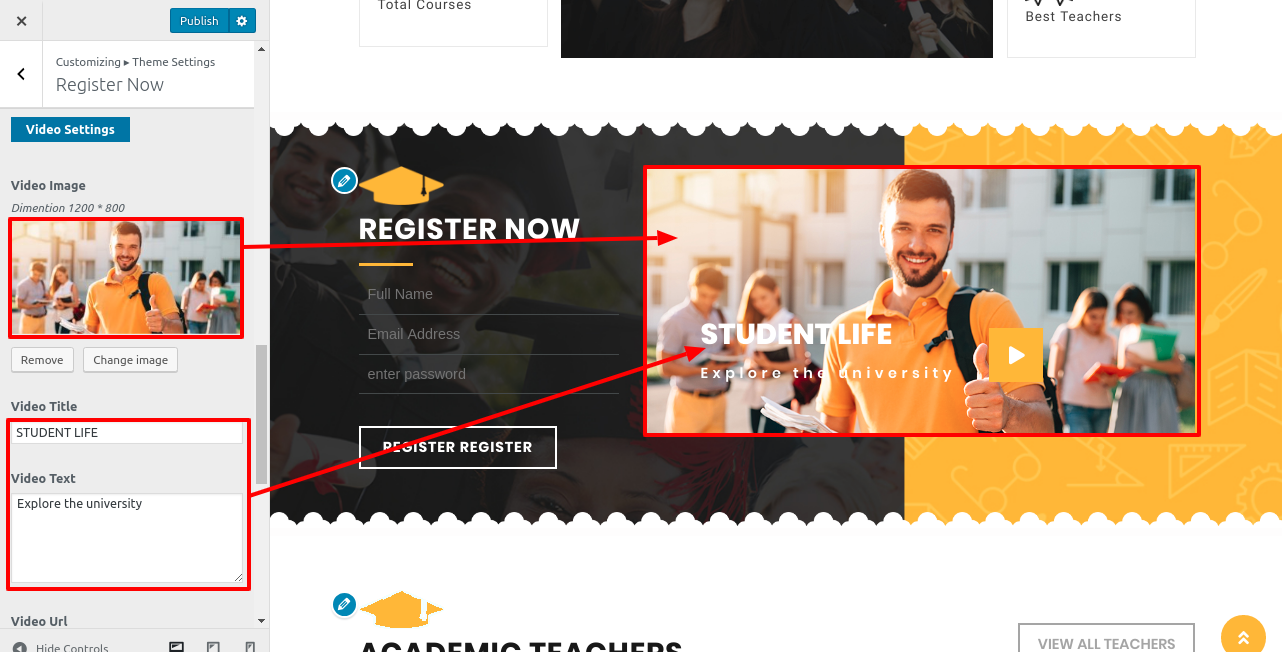

You must copy the embed source code from the YouTube video for this video.
You must replace the URL in the video Section with the URL for your specific video.
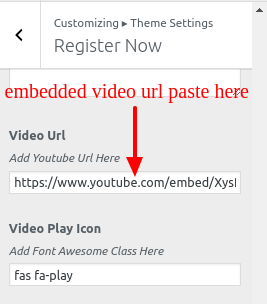
You can set up video in this manner.

8.13.Setup Academic Teachers Section
To access the Academic Teachers section, first download and install the "vw education academy pro posttype" plugin.
The Teachers option will appear on the dashboard after installation.
To proceed to the Academic Teachers section,
Go to Dashboard >> Teachers >> add new

Go to Appearance >> Customize >> Theme Settings >>Academic Teachers.
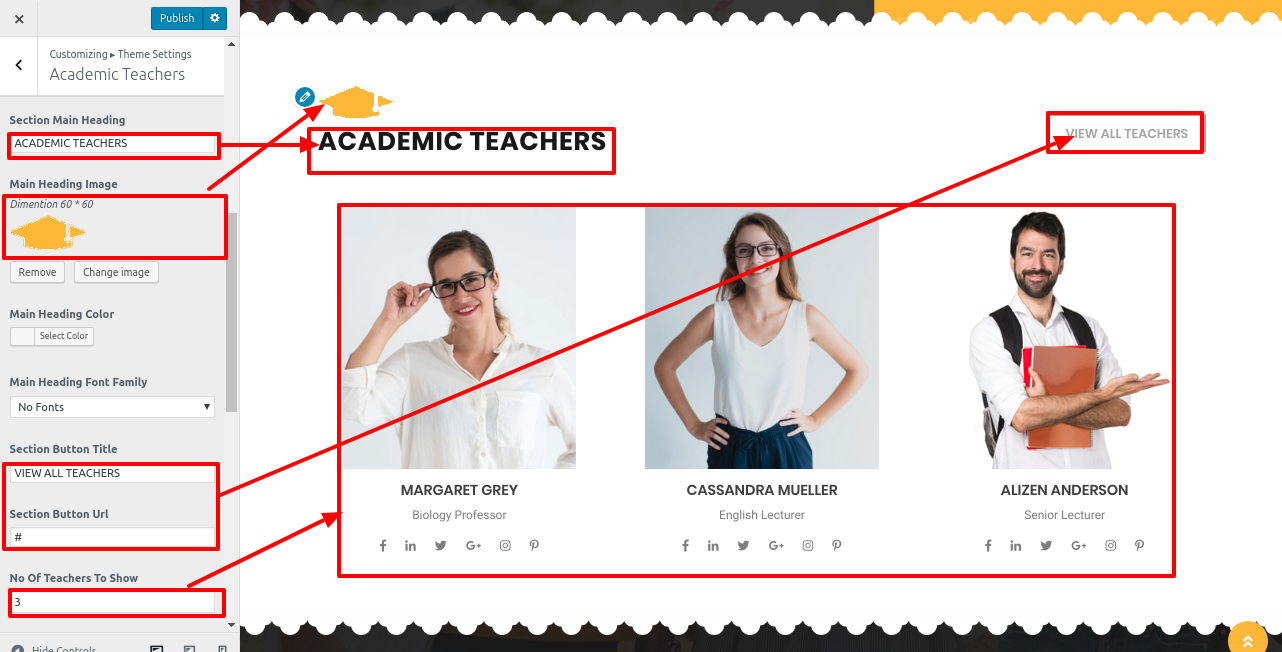
This is what the output will look like.

8.14.Happy Students
To access the Happy Students section, first download and install the vw education academy pro posttype plugin.
The Students option will appear on the dashboard after installation.
To proceed to the section on Happy Students,
Go to Dashboard >> Students >> add new

Go to Appearance >> Customize >> Theme Settings >>Happy Students

This is what the output will look like.

8.15. Setup Academic News Section
Go to Dashboard >> Post >> Add New

Go to Appearance >> Customize >> Theme Settings >> Academic News
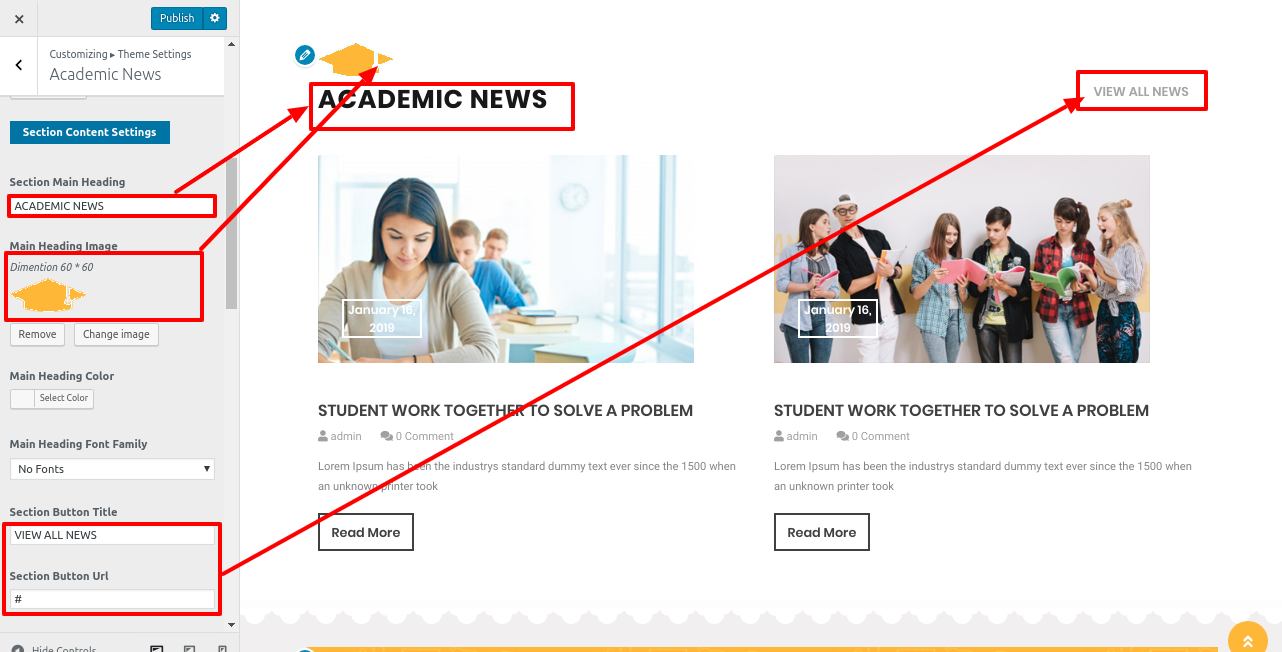
You can add an Academic News section this way.

8.16. Newsletter Section
To access the Newsletter section, first download and install the Contact Form 7 plugin. It will make the contact section of your WordPress navigation panel available.
In order to highlight Newsletter on Section.
Go to Dashboard >> contact >> Add New

Go to Appearance >> Customize >> Theme Settings >> Newsletter .

You can add a Newsletter section this way.

8.17. Partners section
Go to Appearance >> Customize >> Theme Settings >> Partners
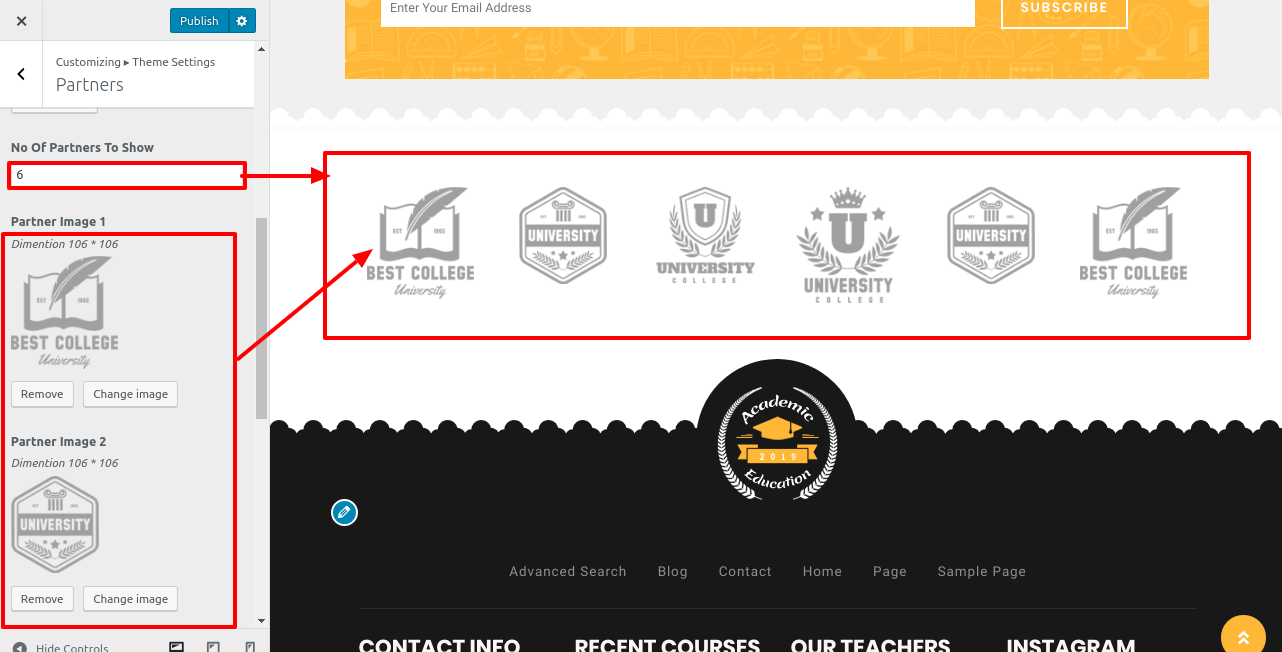
You can add a Partners section this way.

8.18. Setup Single Post Settings
To continue with Single Post Settings.
Appearance >> Customize >>Theme Setting>> Single Post Settings.
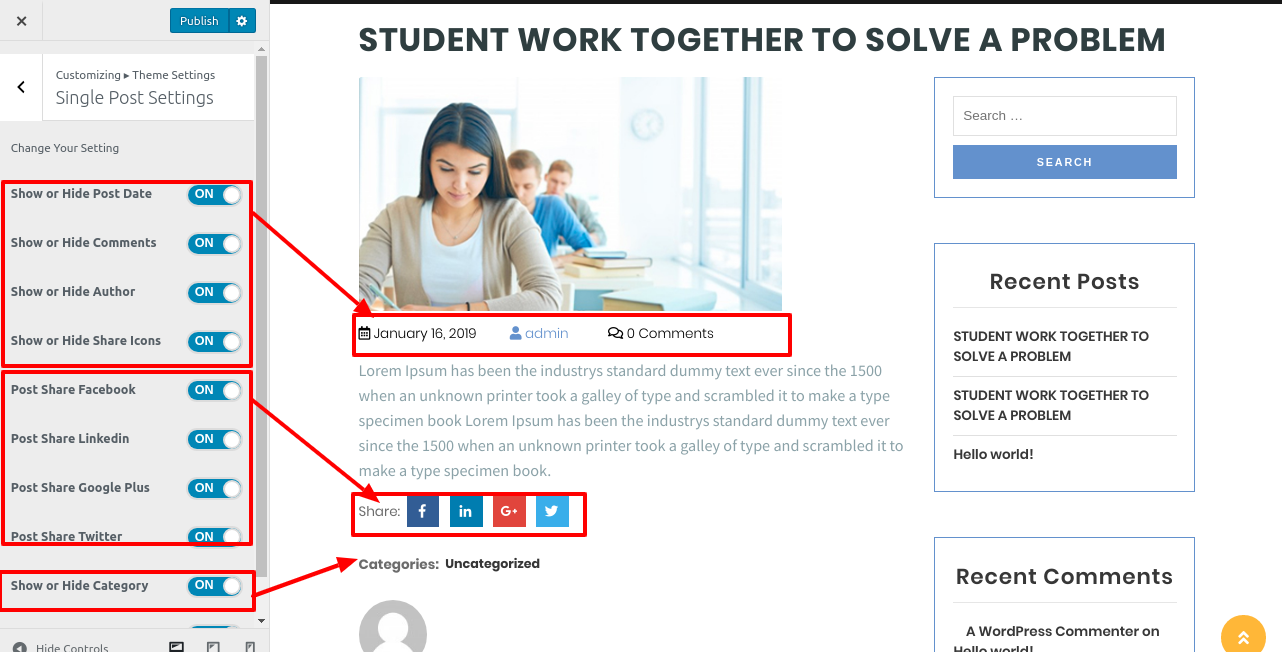
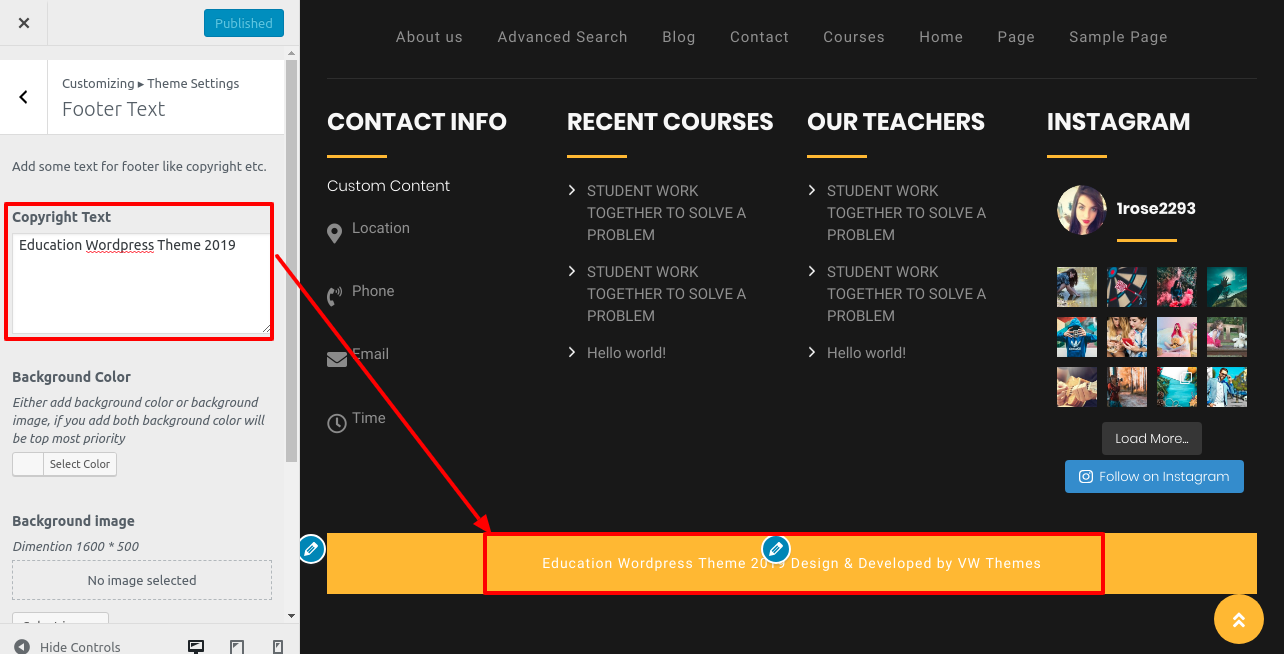
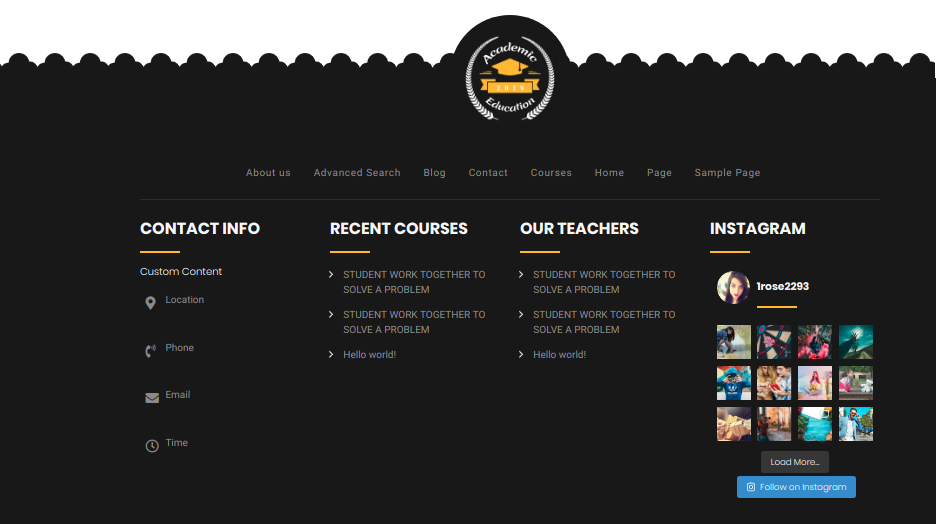
8.19. Setup Footer Widgets
To proceed with the Footer Widgets Section.
Go to Dashboard >>Appearance >> Widgets

Appearance >> Customize >>Theme Setting>>Footer Widgets.
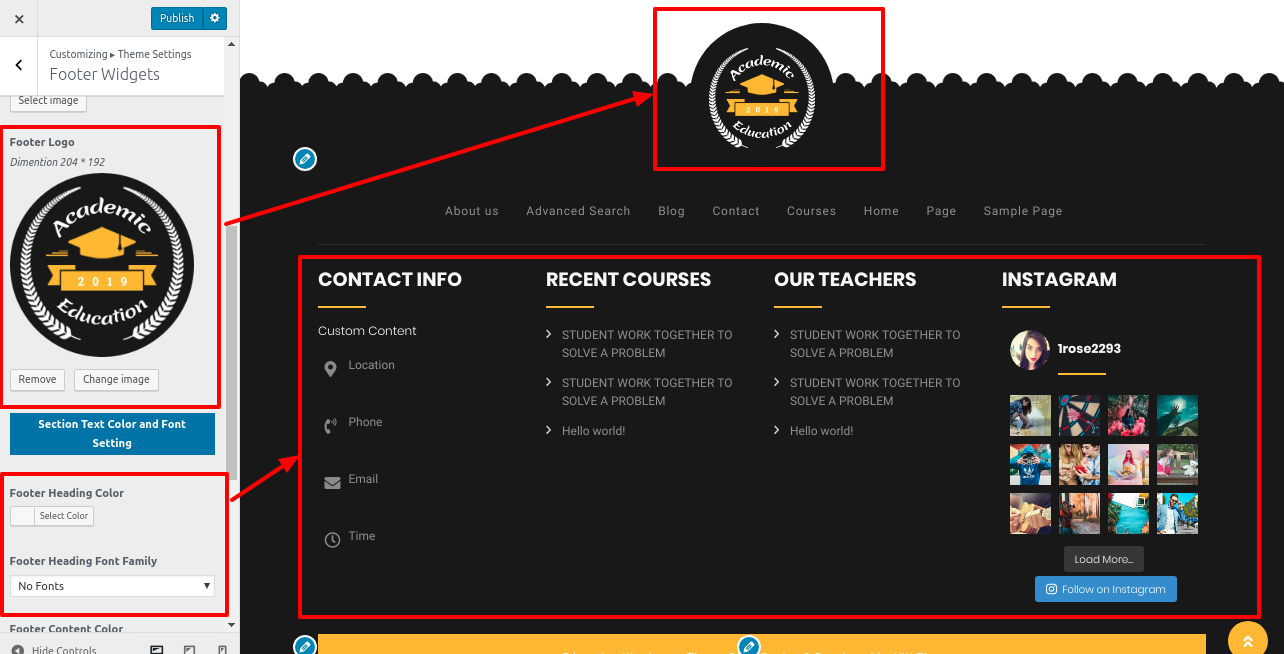
To set up this section, follow the steps below.

- Do you want this section : Enable and Disable options are provided here, so if you don't want this section, you can disable it here, and if you do, simply leave it enabled.
- Background Color:You can change the background colour of this section using this option.
- Background Image:If you want to set a background image instead of a background colour, you can do so with the help of this option.
- Footer Heading Color: You can change the colour of this section's title with this option.
- Footer Heading Font Family: You can change the font family of this section's title using this option.
- Footer Content Color: You can change the colour of this section's content with this option.
- Footer Content Font Family: You can change the font family of this section using this option.
This is how you add the Footer Widgets.
8.21. Setup Contact
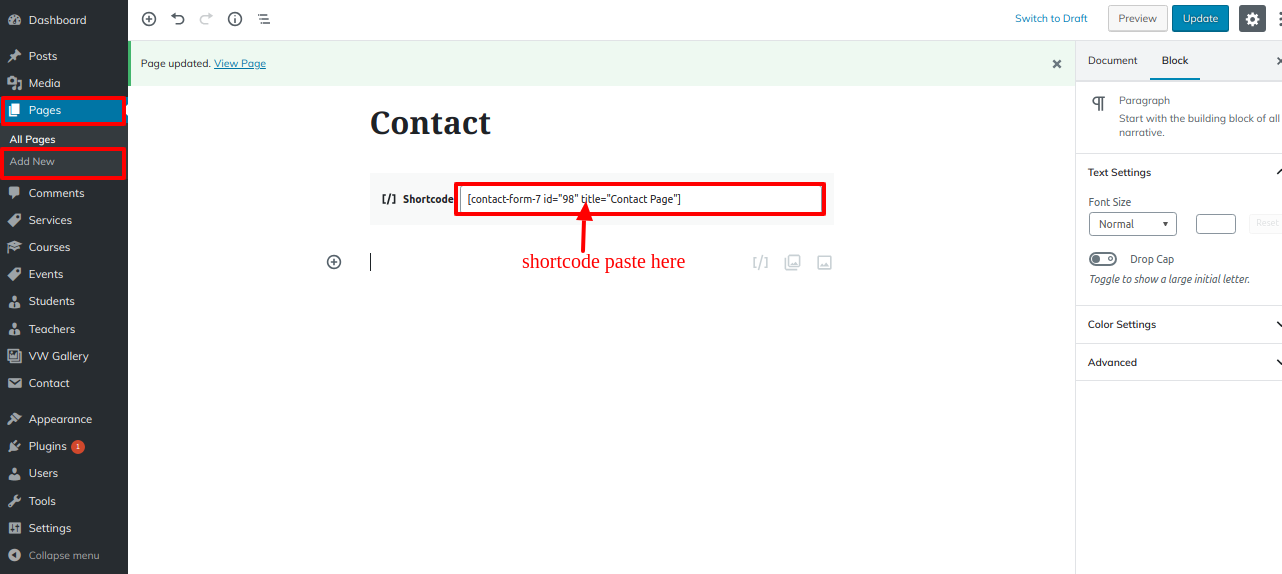
To Setup Contact, you must first upload and activate the Contact Form 7 plugin.
The contact option will appear on the dashboard after installation.
In order to continue with Contact.
Go to Dashboard >> contact >> Add new

Go to Dashboard >> pages >> Add new
Go to Appearance >> Customize >> Theme Settings >>Contact page
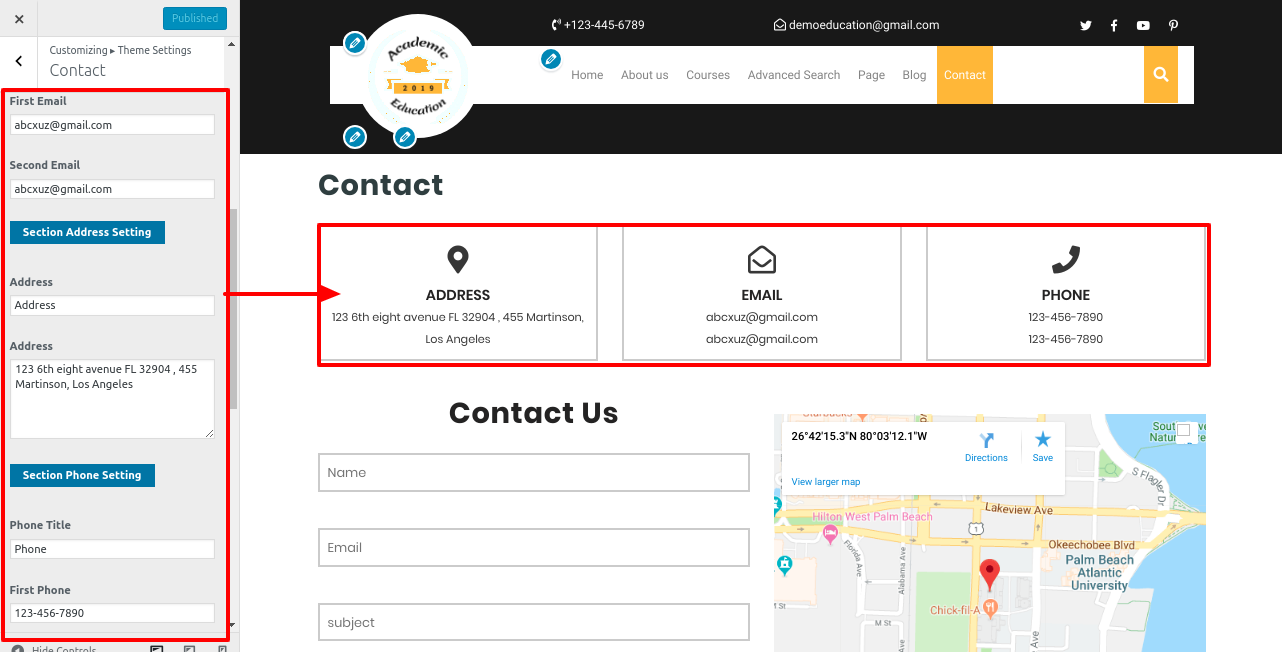

You can add a Contact page in this manner.

Theme Plugins
Plugins are ways to extend and enhance the functionality already present in WordPress.
How to Enable Plugins If you want these features in your theme, you must activate the plugin. To activate the plugin in your theme, follow these steps.
To begin, download the vw education academy pro posttype plugin.zip file from the source.


Setup VW Education Academy Pro Posttype Plugins
When you activate this plugin, you will see the following options: Services, Courses, Events, Students, Teachers, and so on.

Go to Dashboard >> Services >>Add new

Setup Popular Courses Section
When you activate this plugin, you will see the following option on the inside page.

Go to Dashboard >> Courses >>Add new

Academic Events
When you activate this plugin, you will see the following option inside the page.

Go to Dashboard >> Events >> Add New

Happy Students
When you activate this plugin, the following option will appear on the inside page.

Go to Dashboard >> Students >> add new

Sidebars and page templates
Page Templates
- Default Template (the default page template with a right sidebar position)
- Page with Left Sidebar (a page templates with left sidebar position)
- Page with Right Sidebar (a page template with right sidebar position)
- Blog with Full Width (a blog templates with one column without sidebar)
- Blog with Left Sidebar (a blog templates with left sidebar position)
- Blog with Right Sidebar (a blog template with right sidebar position)
- Contact (the default Contact template with no sidebar position)
- Home Page (Template to show home page content)
- Advanced search (Add Advanced search page template)
Post Formats, Categories, and Posts
Adding category
For more information on adding categories, see the following article: http://codex.wordpress.org/Manage_Categories_SubPanel

- Log in to your WordPress Administration Panel (Dashboard).
- Click the Posts tab.
- With that done, click Categories for blog posts.
- Enter the name of your new category here.
- After that, click the Add New Category button.
Creating a Blog post

- Log in to your WordPress Administration Panel (Dashboard).
- Click the Posts tab.
- Click the Add New tab.
- Enter your post's content. Please visit the following link for more information on adding posts. http://codex.wordpress.org/Posts_Add_New_SubPanel.
Shortcodes
A shortcode is a useful tool for creating content. http://codex.wordpress.org/Shortcode. Shortcodes are simple to implement. To begin, ensure that the editing mode is set to Visual.
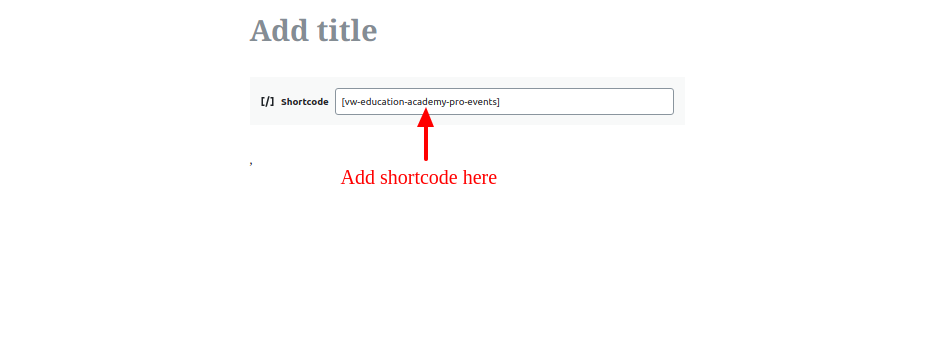
All available shortcodes are conditionally classified into the following groups:
- events- [vw-education-academy-events],
- services- [vw-education-academy-services],
- courses- [vw-education-academy-courses],
- students- [vw-education-academy-students],
- teachers- [vw-education-academy-teachers],
Custom Widgets


