System Requirements
We advise you have the following minimum system configuration in your web server theme.
- WordPress 6.4 or later
- PHP 8.2 or 8.3
- MySQL 5.6 (or greater) | MariaDB 10.0 (or greater)
- Need php ini file configration -
- post_max_size = 256M
- upload_max_filesize = 256M
- max_execution_time = 5000
- max_input_time = 5000
- memory_limit = 1000M
Introduction
We appreciate you purchasing our WordPress theme. This article demonstrates several steps of the full configuration and management process for a WordPress website.
What is WordPress CMS?
WordPress is an open source website creation tool that uses PHP and MySQL as its foundation. It is a robust blogging platform and a totally free content management system (CMS). Using this CMS, you may create reliable online applications and websites. To manage it, you scarcely need any technological expertise or understanding. Because of its many benefits, including ease of use and flexibility, WordPress has emerged as the most popular website construction tool on the market. Learn More
A WordPress template: What is it?
A WordPress template serves as the skin for websites built using the WordPress content management system. A WordPress template is incredibly simple to setup. You may quickly modify the appearance of your WordPress website by installing a new template. A WordPress template comes complete with all the necessary source files, and you are free to change and expand it anyway you see fit.
Help and Support
Click here for support:
SupportFile Structure
The template bundle that you downloaded is divided into various directories. Let's examine the contents of each folder:
- Screenshots -contains template screenshot. Not for production.
- theme -contains wordpress theme files
- "hover-boards-pro_0.0.1.zip" -this folder contains all the necessary files for the theme.
- "license.txt" -contains license details
- "readme.txt" -contain information about theme images path, font use and usage script
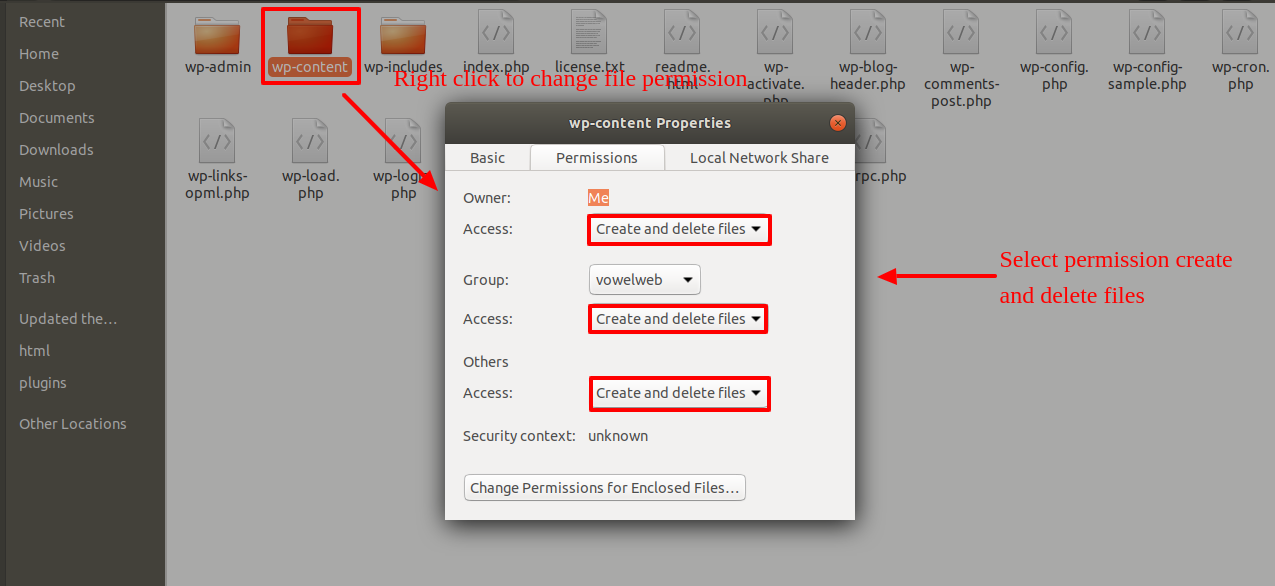
My website was operating normally before? Who altered the permissions on the file?
WordPress may be unable to create directories, upload photos, or execute some scripts if file permissions are set incorrectly.
To manage files and create directories on the server, WordPress needs permissions.
- After that select all folders in root directory and then right click to select ‘File Permissions’.
- wp-config >> permissions dialog box >> click on checkbox read and write >> Click on the OK button to continue
- same process repeated for wp-content folder
Template Installation
The process of installing a template is very straightforward and easy.
Within the WordPress interface, all installation procedures may be completed. It facilitates a quick and comfortable process.
There are two ways to complete the installation process.
1-To install a theme using WordPress admin, follow these steps:
To begin, sign into your WordPress admin dashboard and select
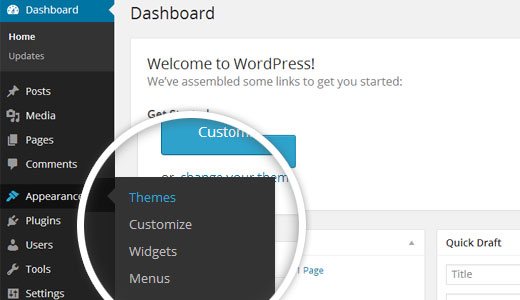
1.Visit the Appearance >> Themes.
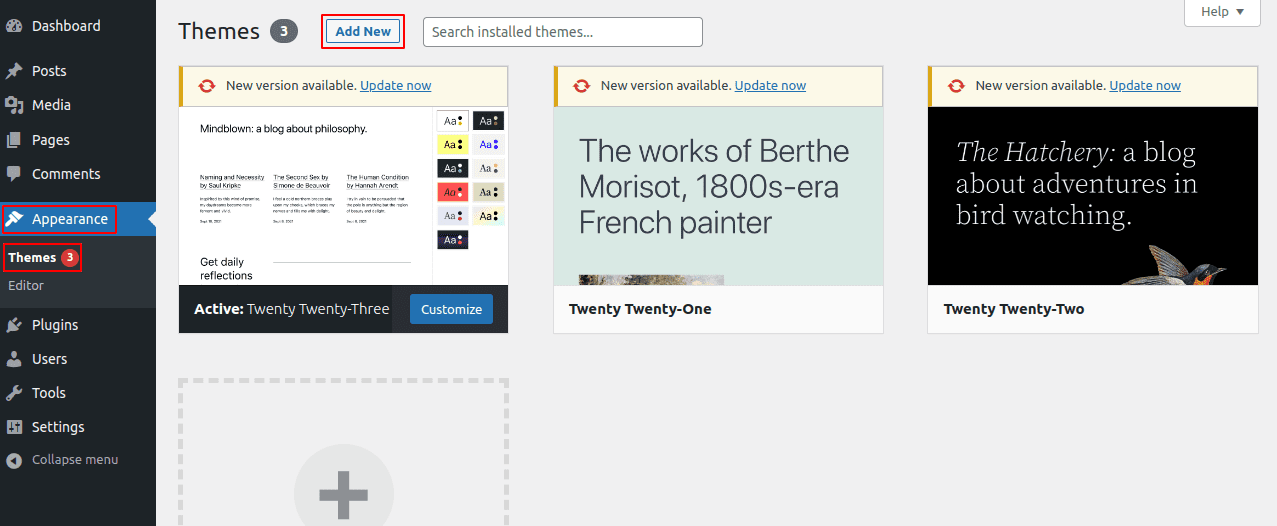
2. Once you are on the themes page, click on the Add New button located at the top of the page.
3. When arriving at the themes page, click on the Upload Theme button at the top and upload zip file.
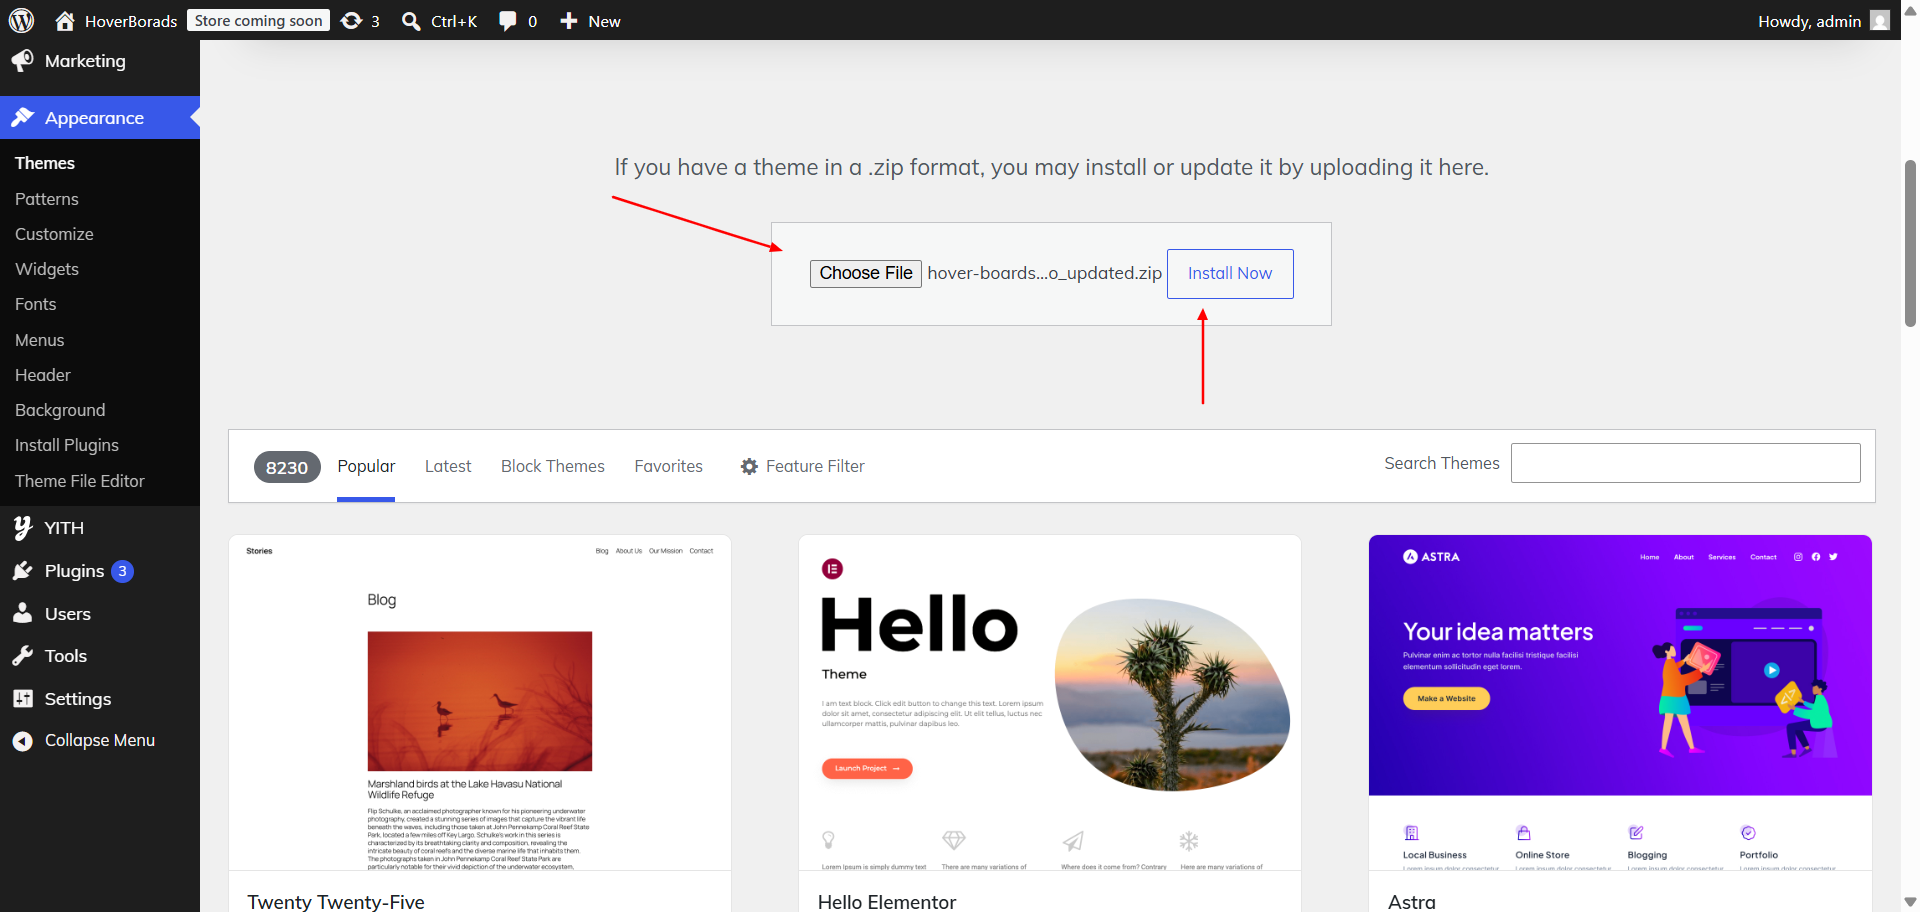
4. WordPress will now proceed with installing your selected theme, and upon completion, you will see a success message that includes options to activate the theme or preview it live.
Congratulations! Your theme has been successfully installed and set up.
2-Theme installation using FTP
The theme can be uploaded using FTP, which is your second installation option. To use this method, first log into your website using FTP and navigate to the wp-content/themes folder. Just extract the Total folder from the theme file you got and upload it to your server.
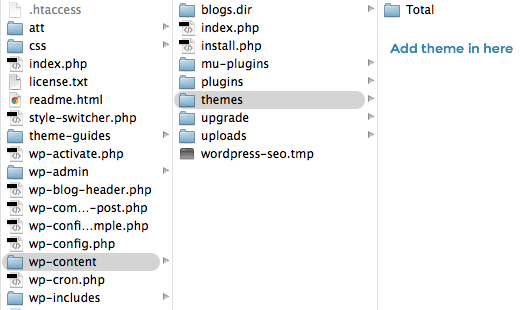
Next log into your WordPress site and navigate toAppearance >> Themes to activate Total.
Section Ordering
How to Reorder and Organize Section
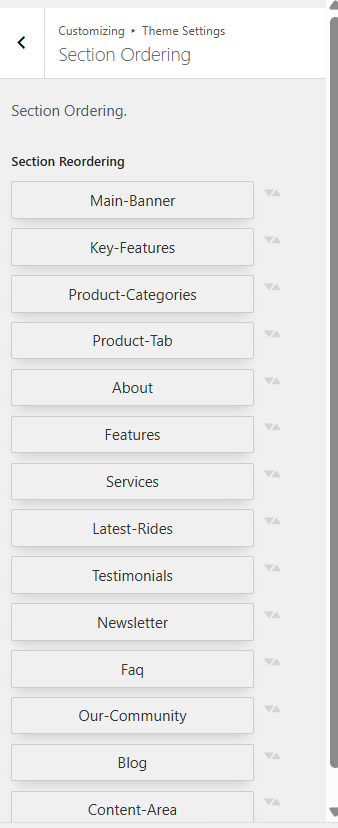
To reorder a part simply means to arrange it according to our needs. Drag the segment to the top or bottom as necessary to continue with this section. Your front view will change in accordance with customizer options when you drag any portion to the top or bottom.
You can reorder sections by simply dragging and dropping the options into the desired order.
To proceed with the Section Ordering.
Step 1 Go to Dashboard >> Appearance >> Customizing >> VW Theme Settings >> Section Ordering
Click on "Demo Content Importer" and then "Run Importer".
Section Color and Font Scheme
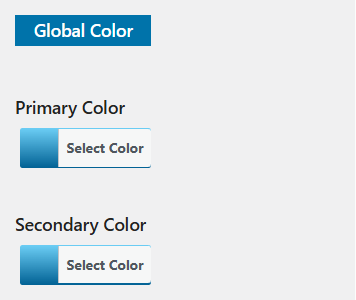
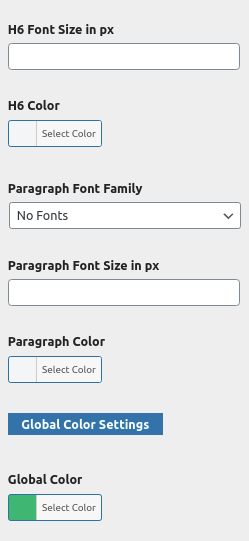
The method of changing the colour or font is quite simple. These choices are available in all customizer areas. It is a comprehensive graphic that demonstrates the typeface and colour palette. You can change the colour and font of the headings, paragraphs, and buttons with a single glance or click.
Depending on how many options are accessible in a given part, each individual section has the ability to choose the colour scheme for the headings, title/text, paragraph, button text, and button background.
Standard Color and Font settings
Theme Wizard
* Theme Wizard is a new addition to the version (1.1.2)
To import content using Theme Wizard, ad here to these procedures.
1) Go to Dashboard >> Getstarted
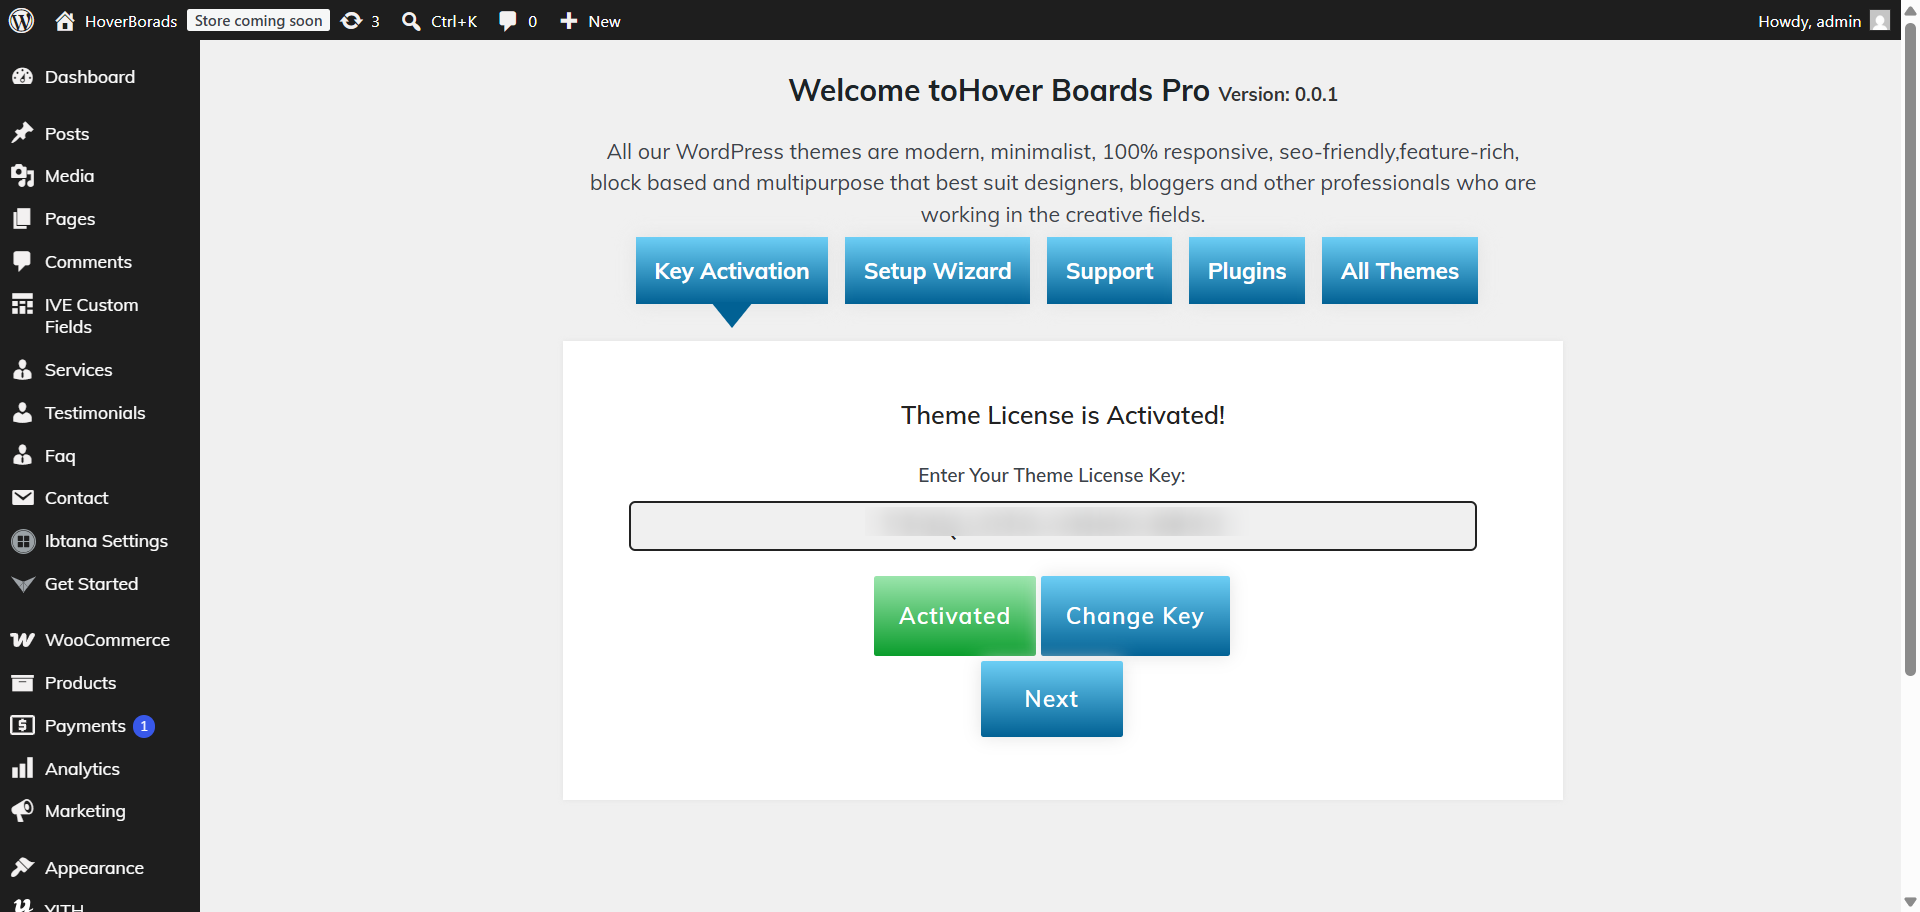
Refer video for Licence key activation:
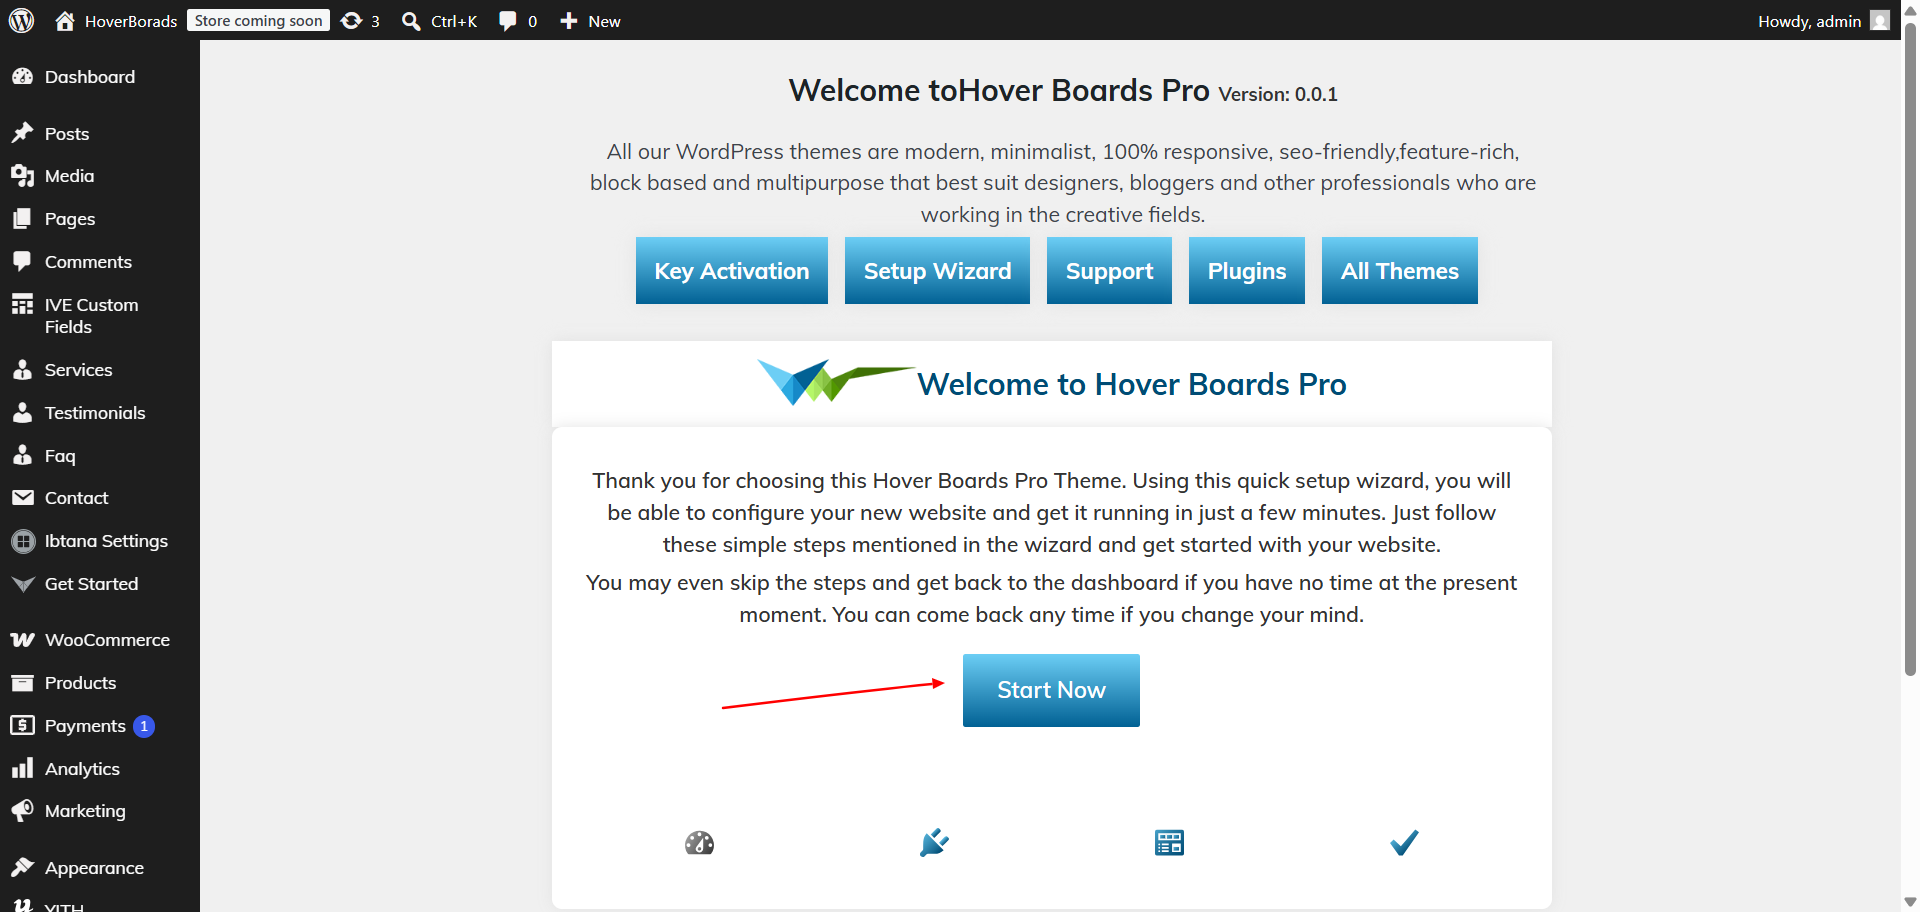
3) After selecting Setup Wizard, click Start Now.
4) install Plugins.
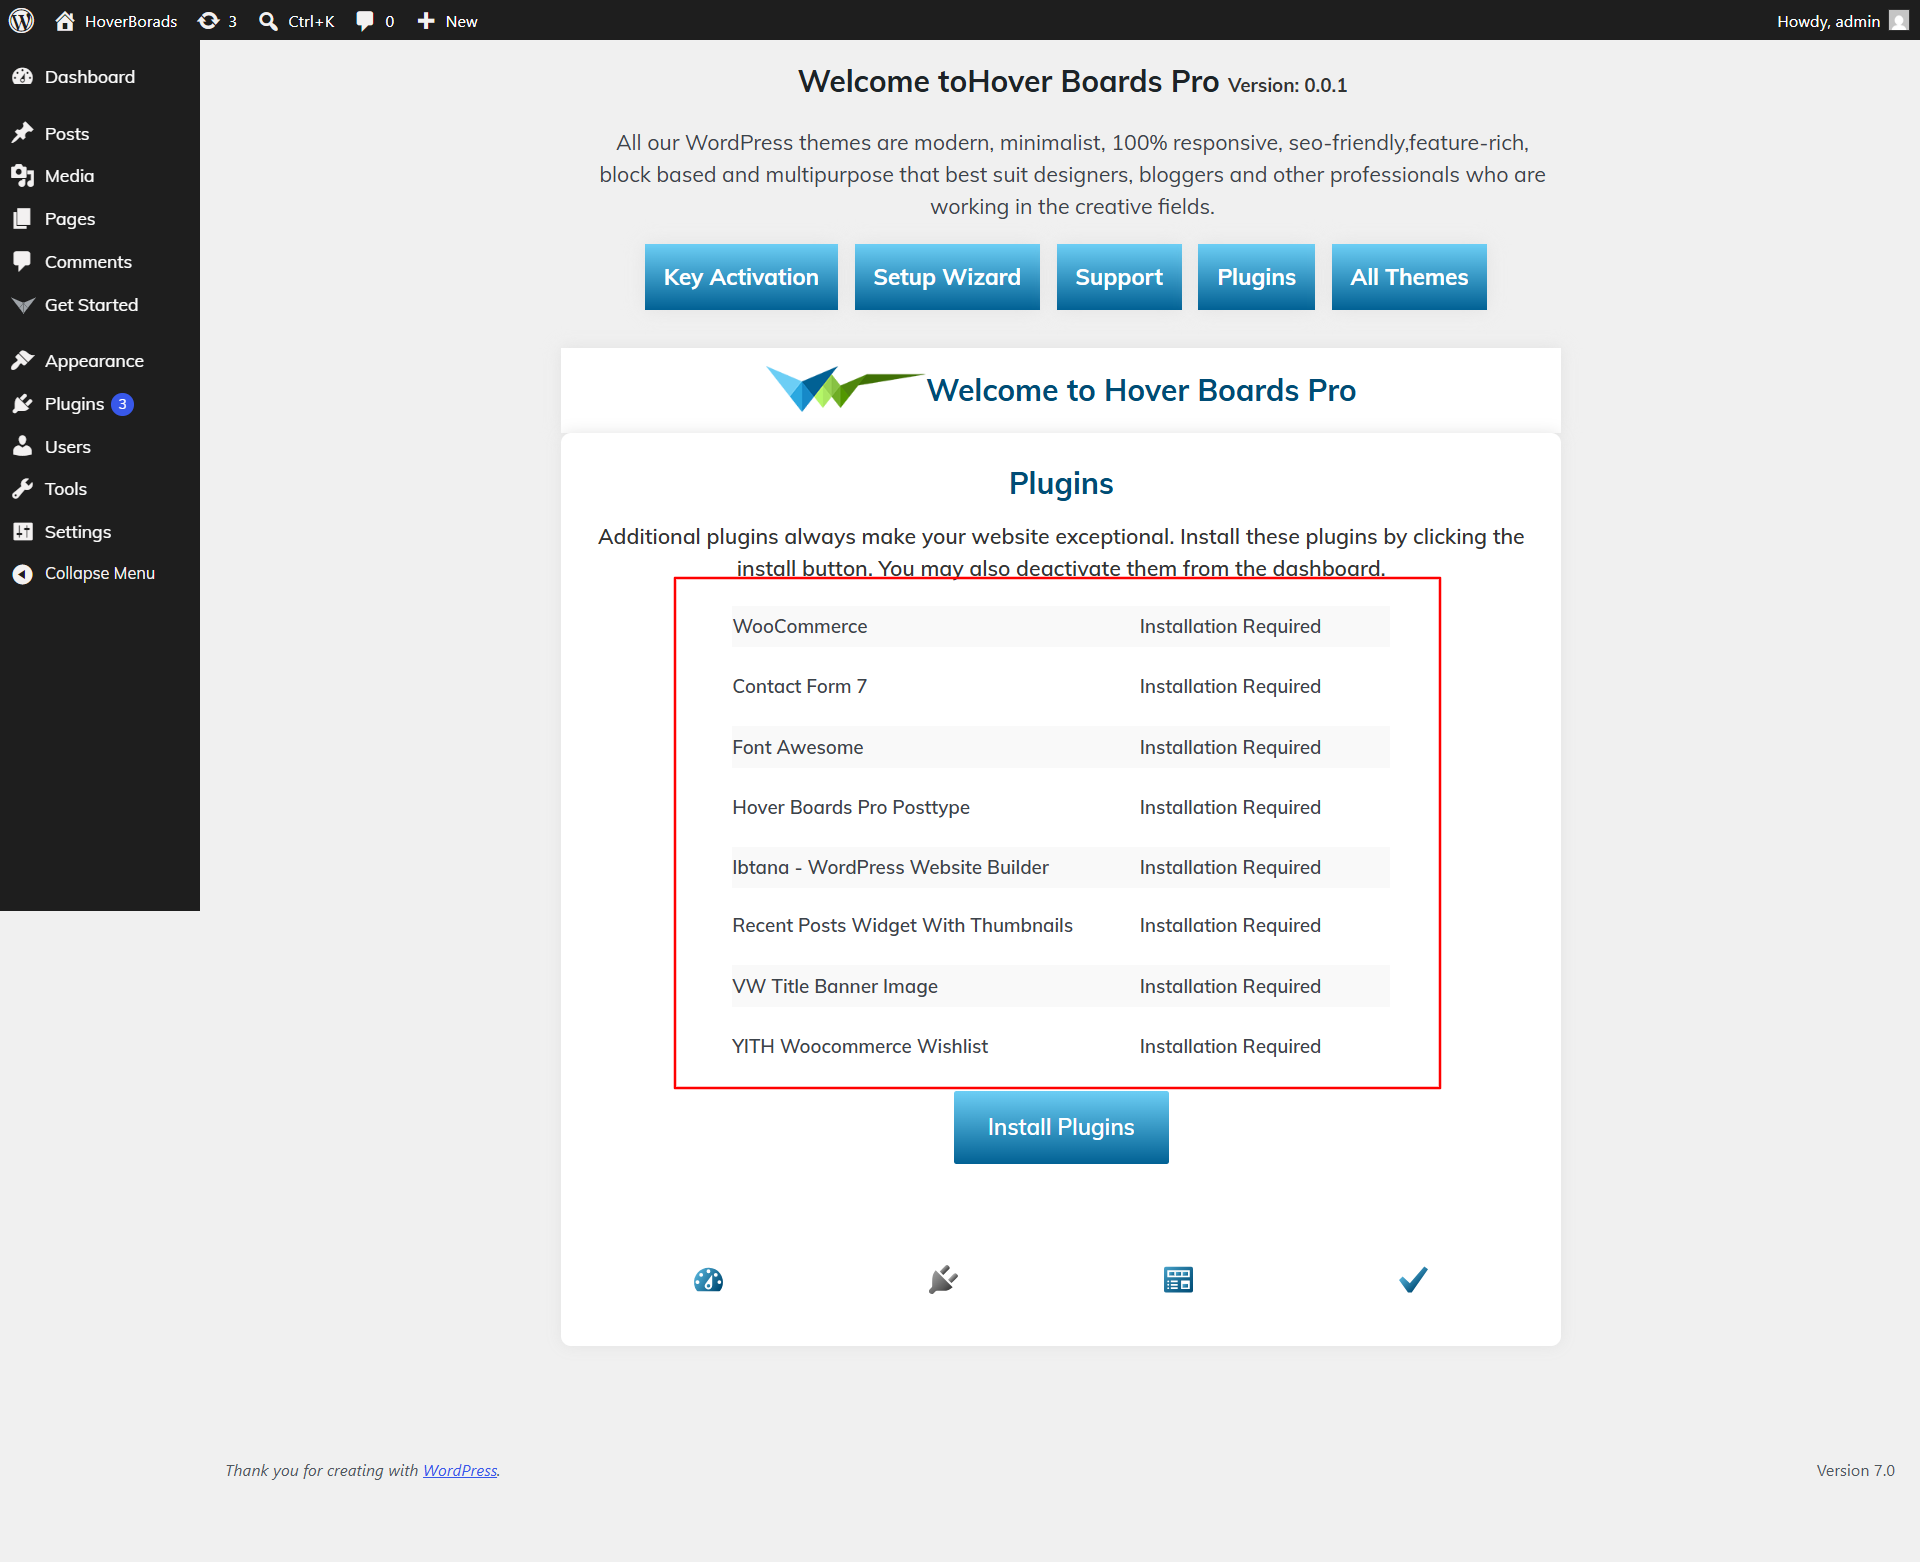
5) Import the material from your Customizer, Gutenberg, and Elementor-based demo.
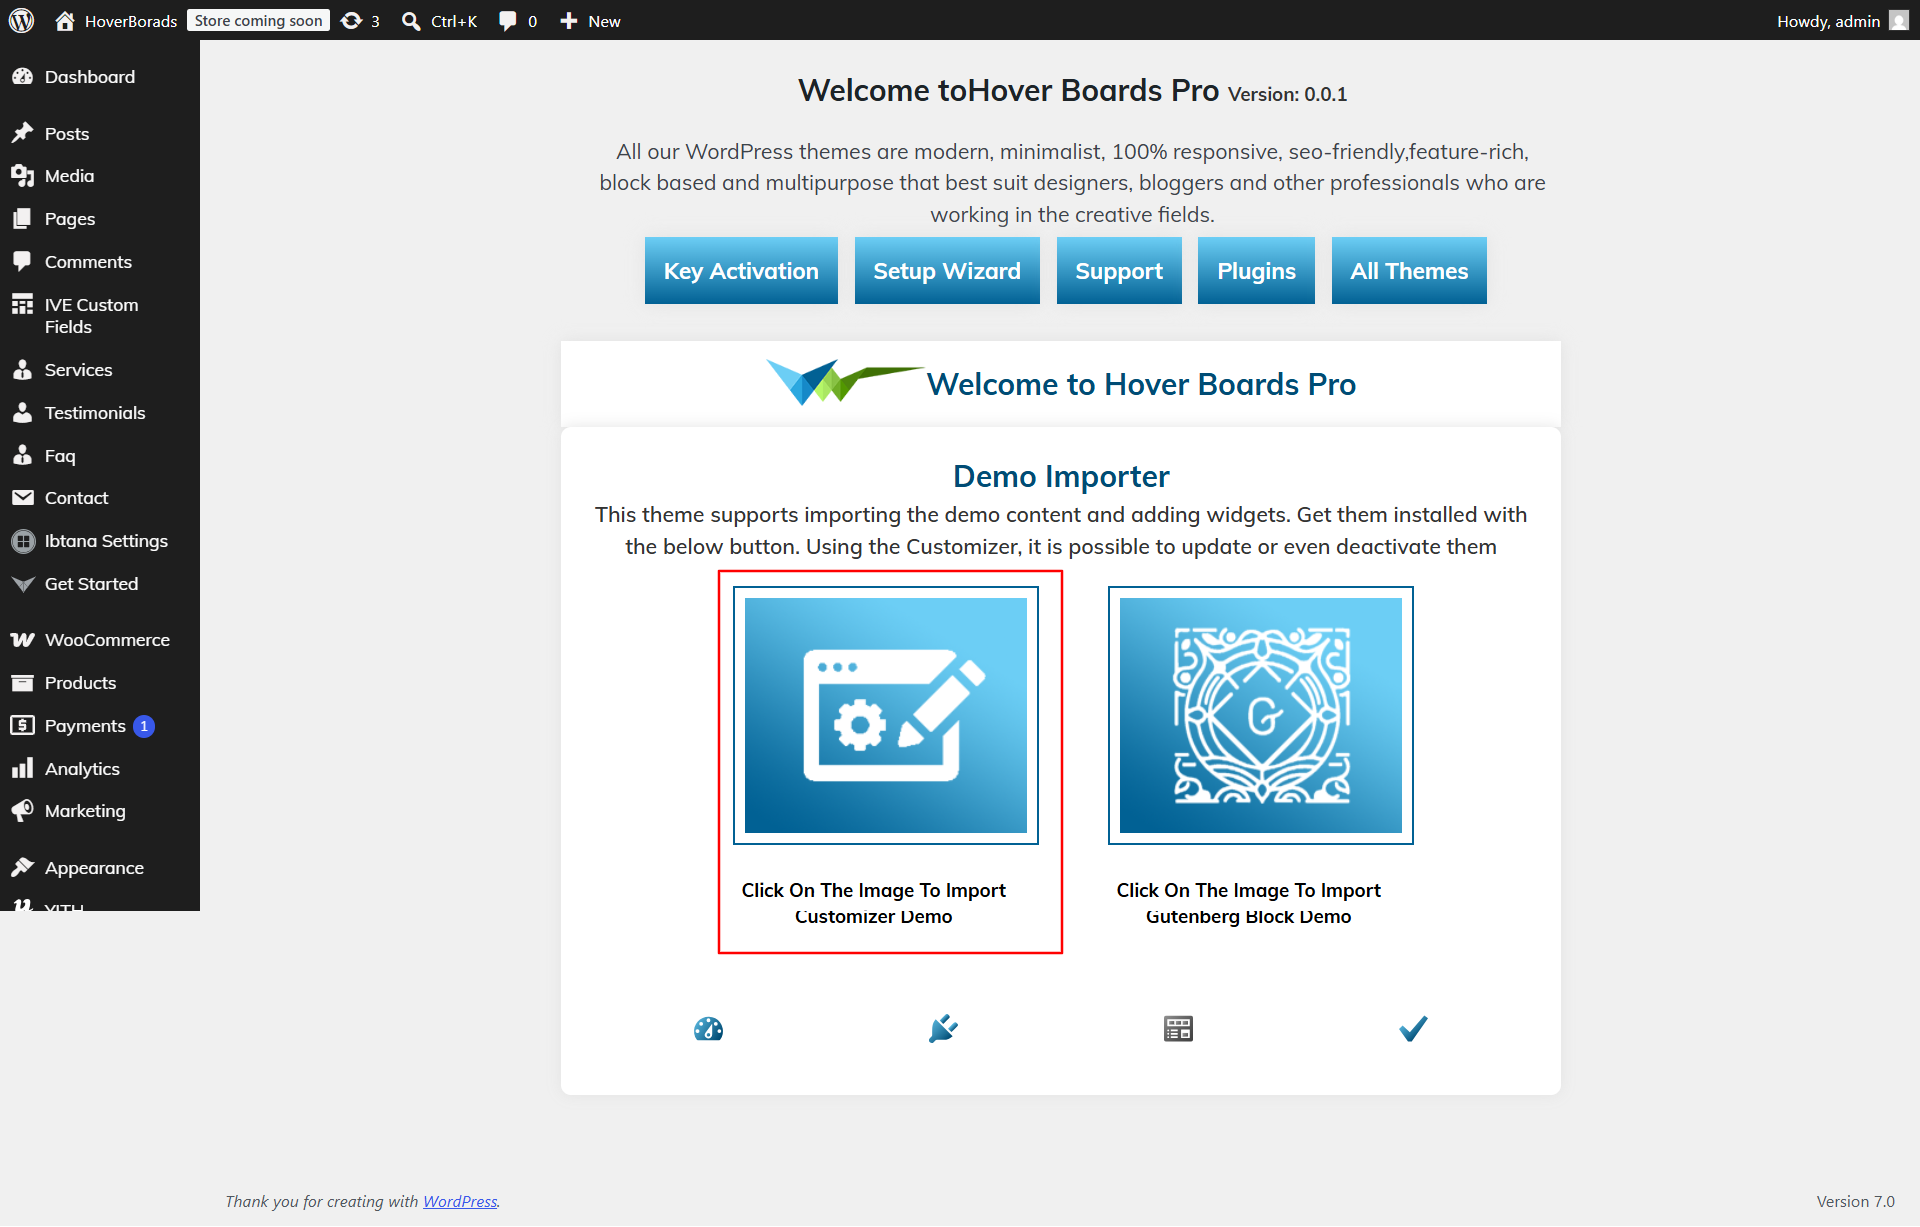
For setting up your demo content based on, you can refer to this video.
Configure a homepage template
Build a home page using the video here:
Theme Configuration
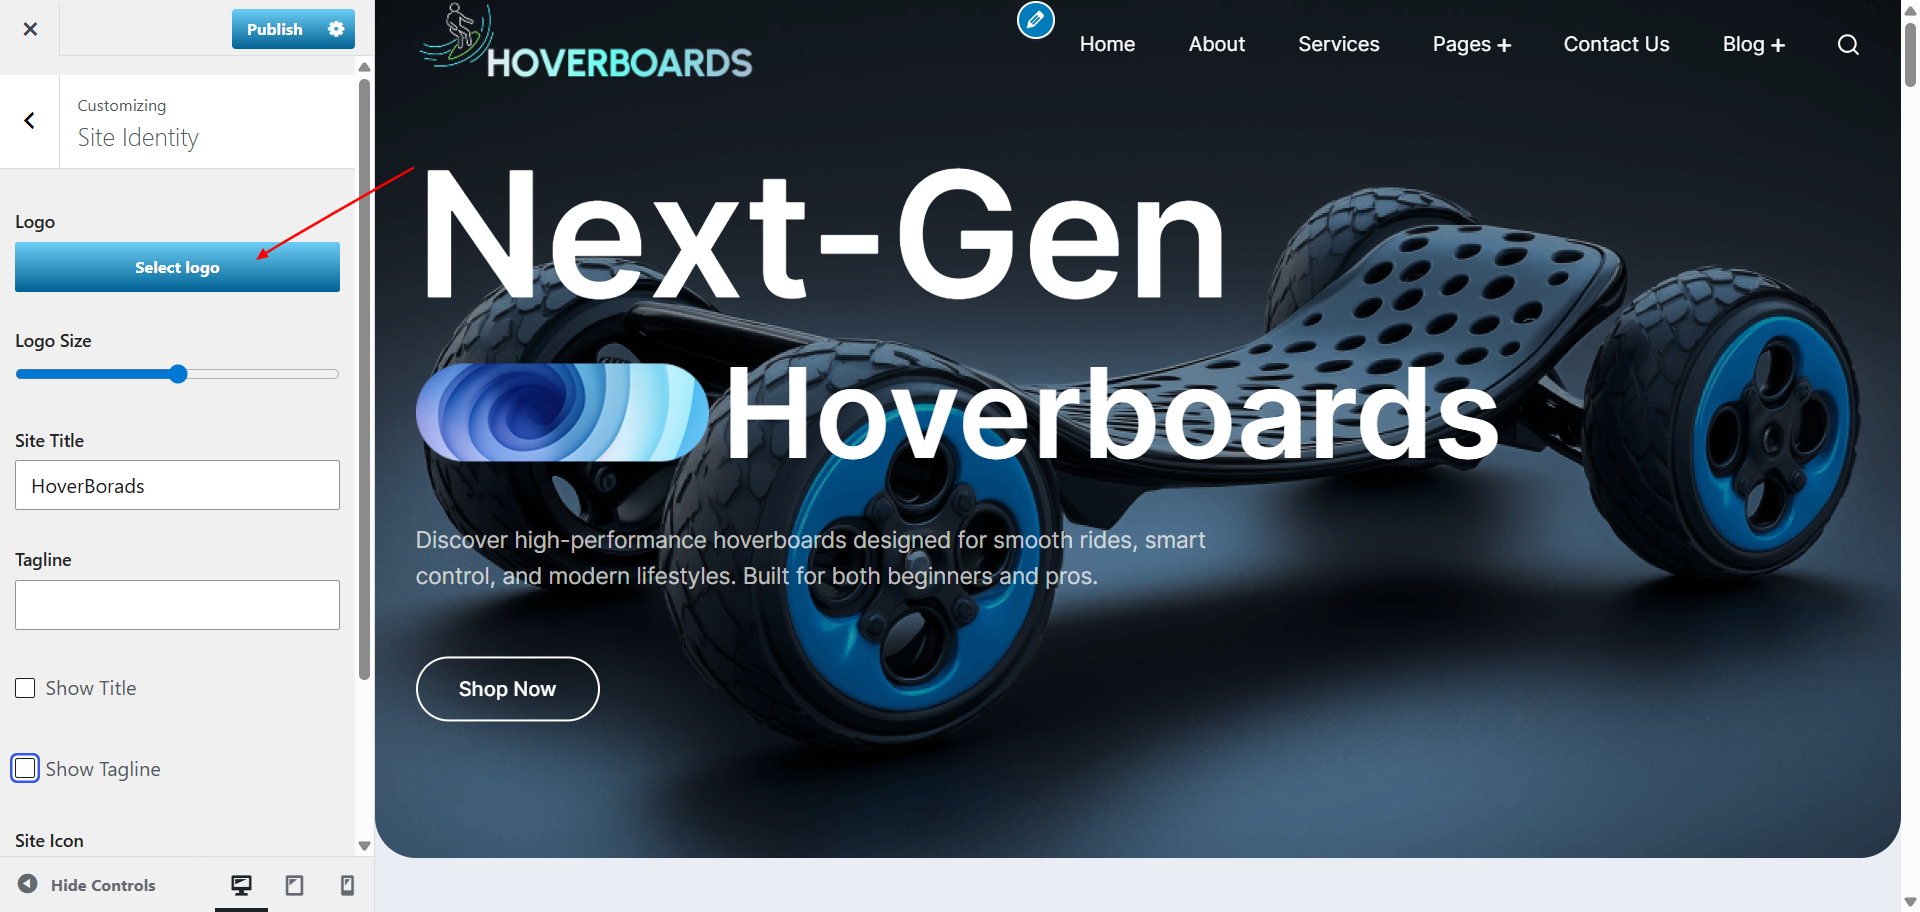
9.2. Setup Header Section
To proceed with the Header Section.
Go to Appearance >> Customize >> Site Identity >>Header Section
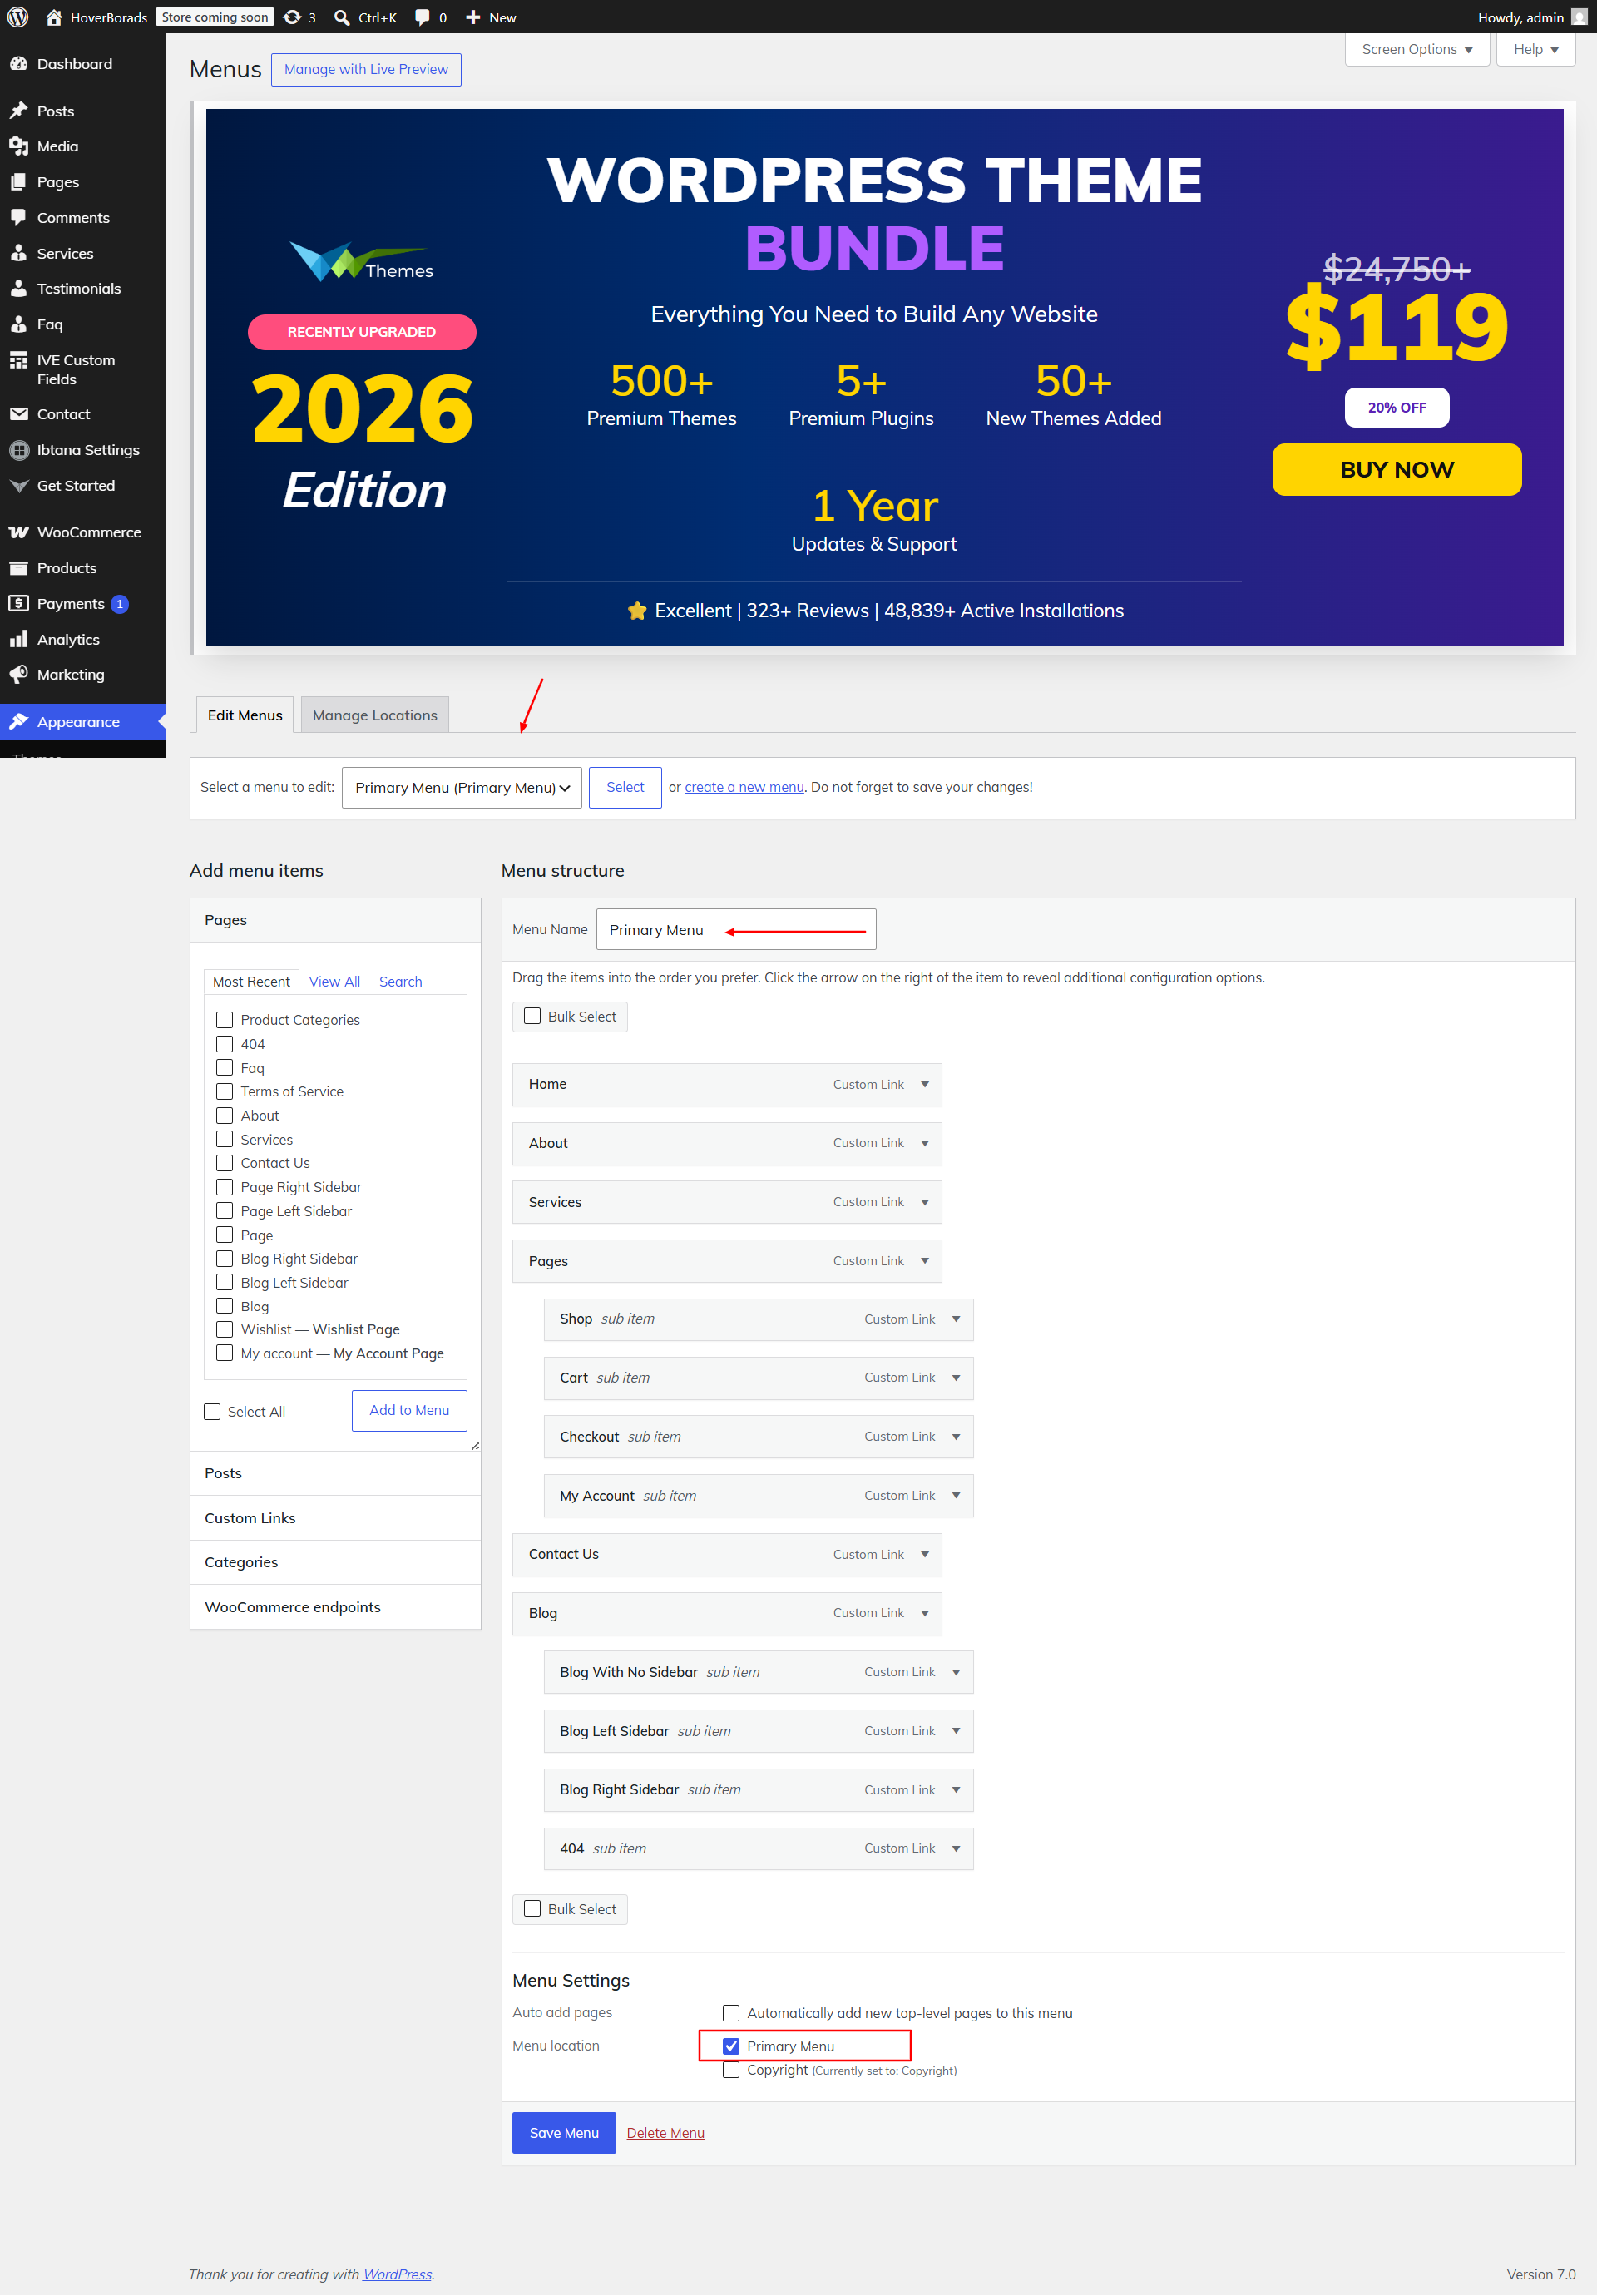
Update navigation from Appearance >> Menus
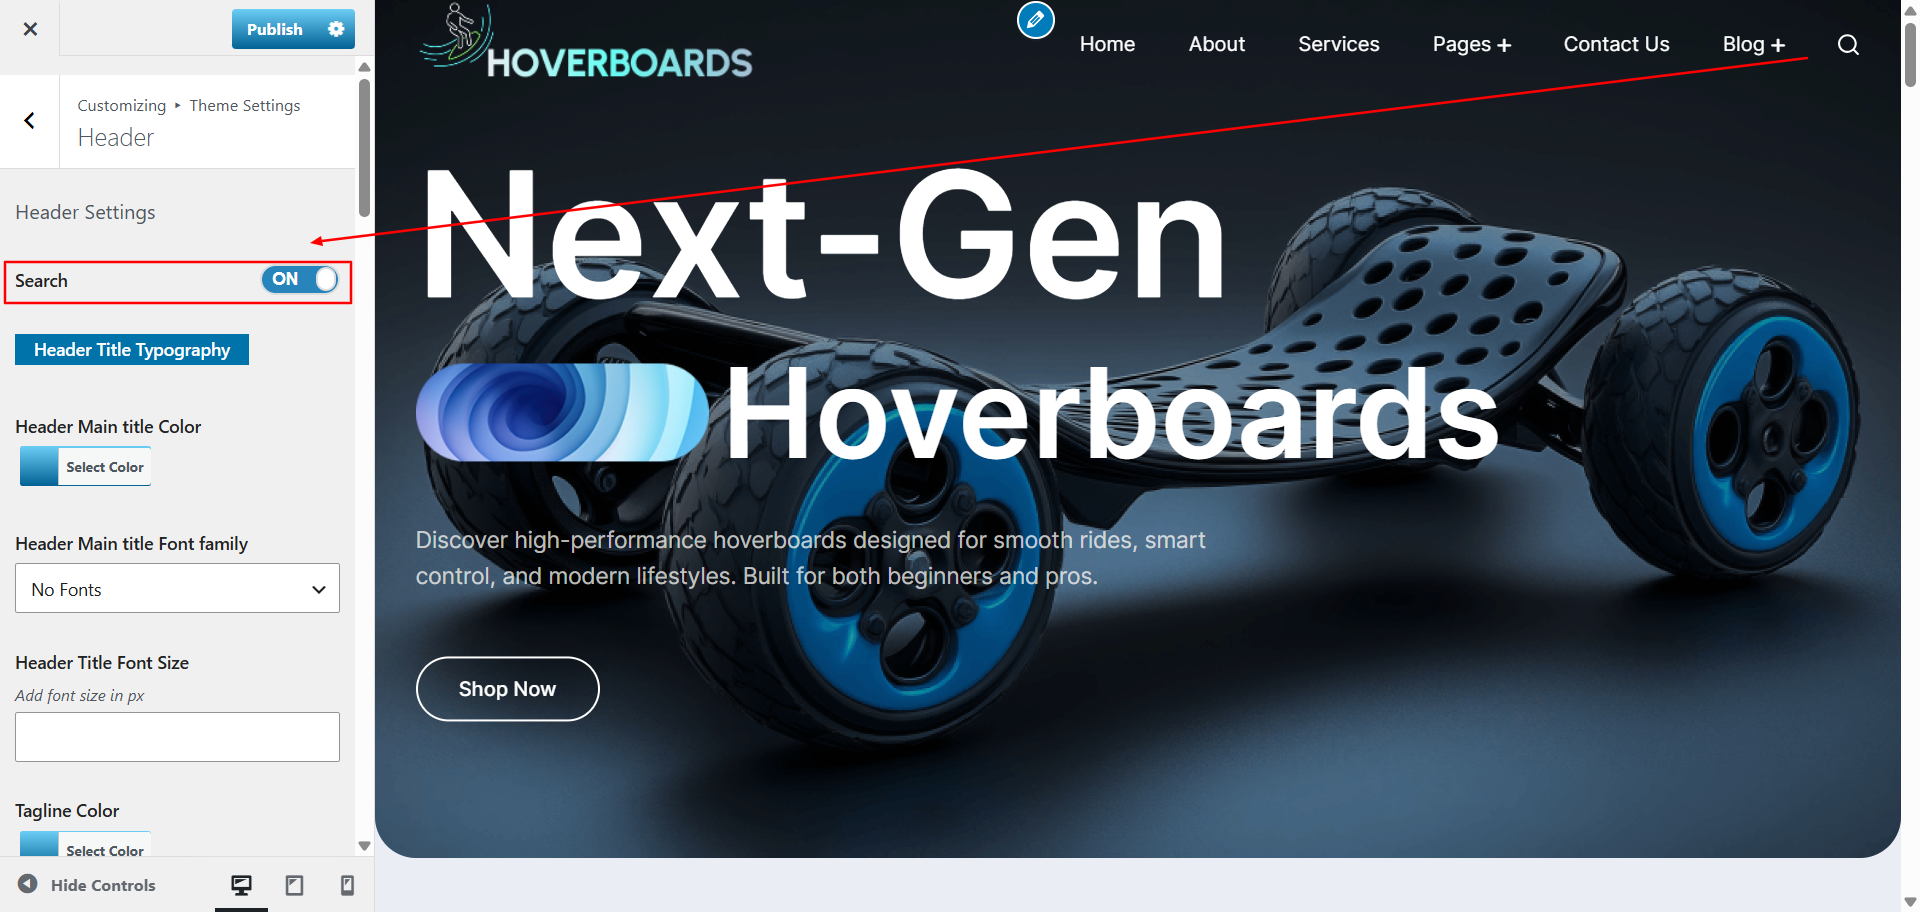
Go to Appearance >> Customize >> Theme Settings >>Header and update the button text and link.
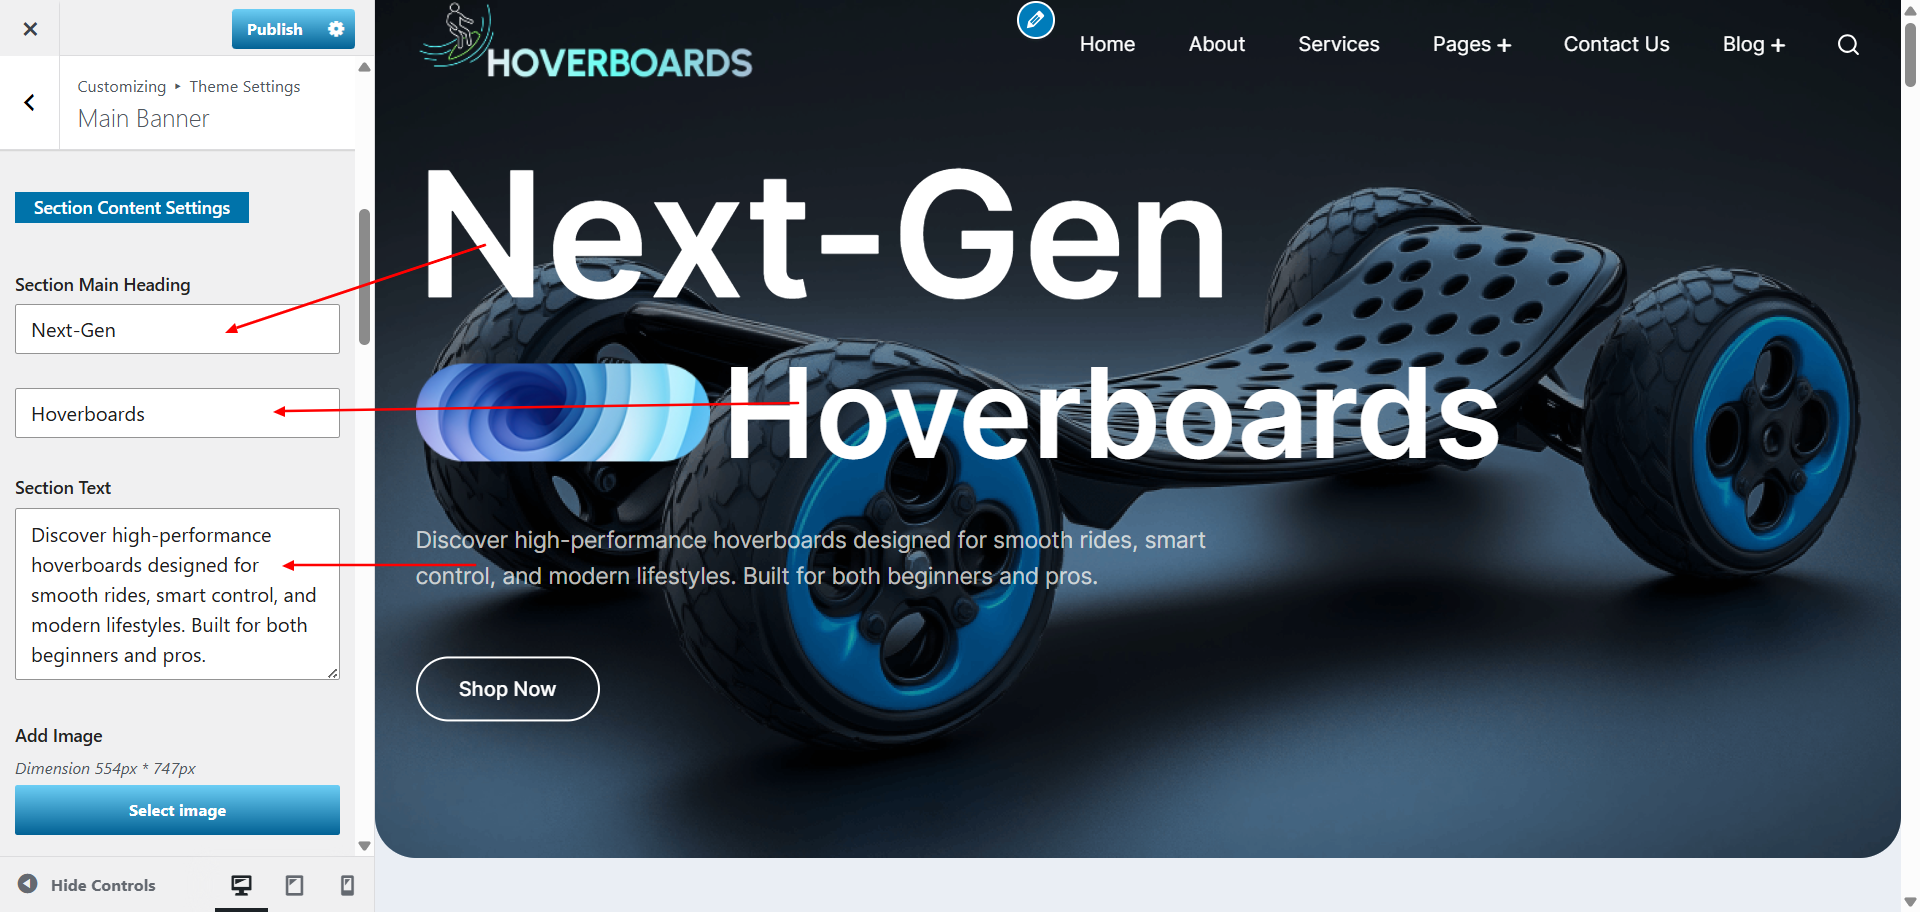
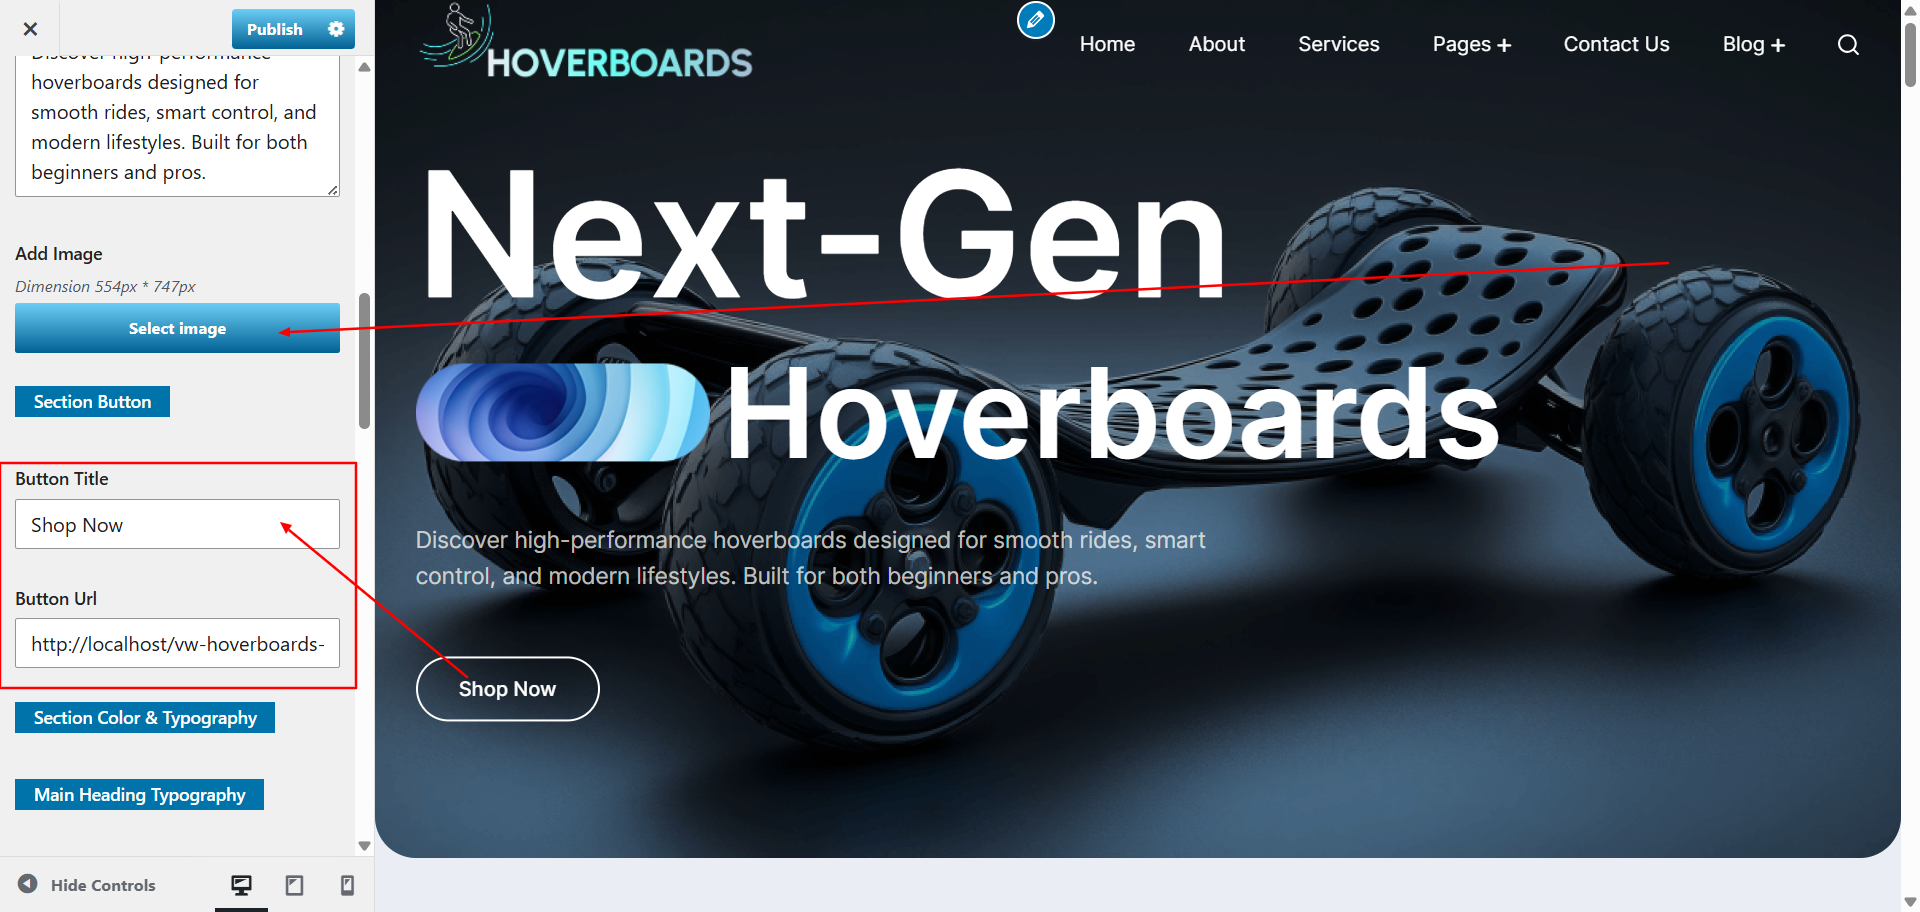
9.3. Setup Main Banner
To proceed with the section setup Go to Appearance >> Customize >> Theme Settings >> Main Banner Section and update the content.
9.4. Setup Key features section
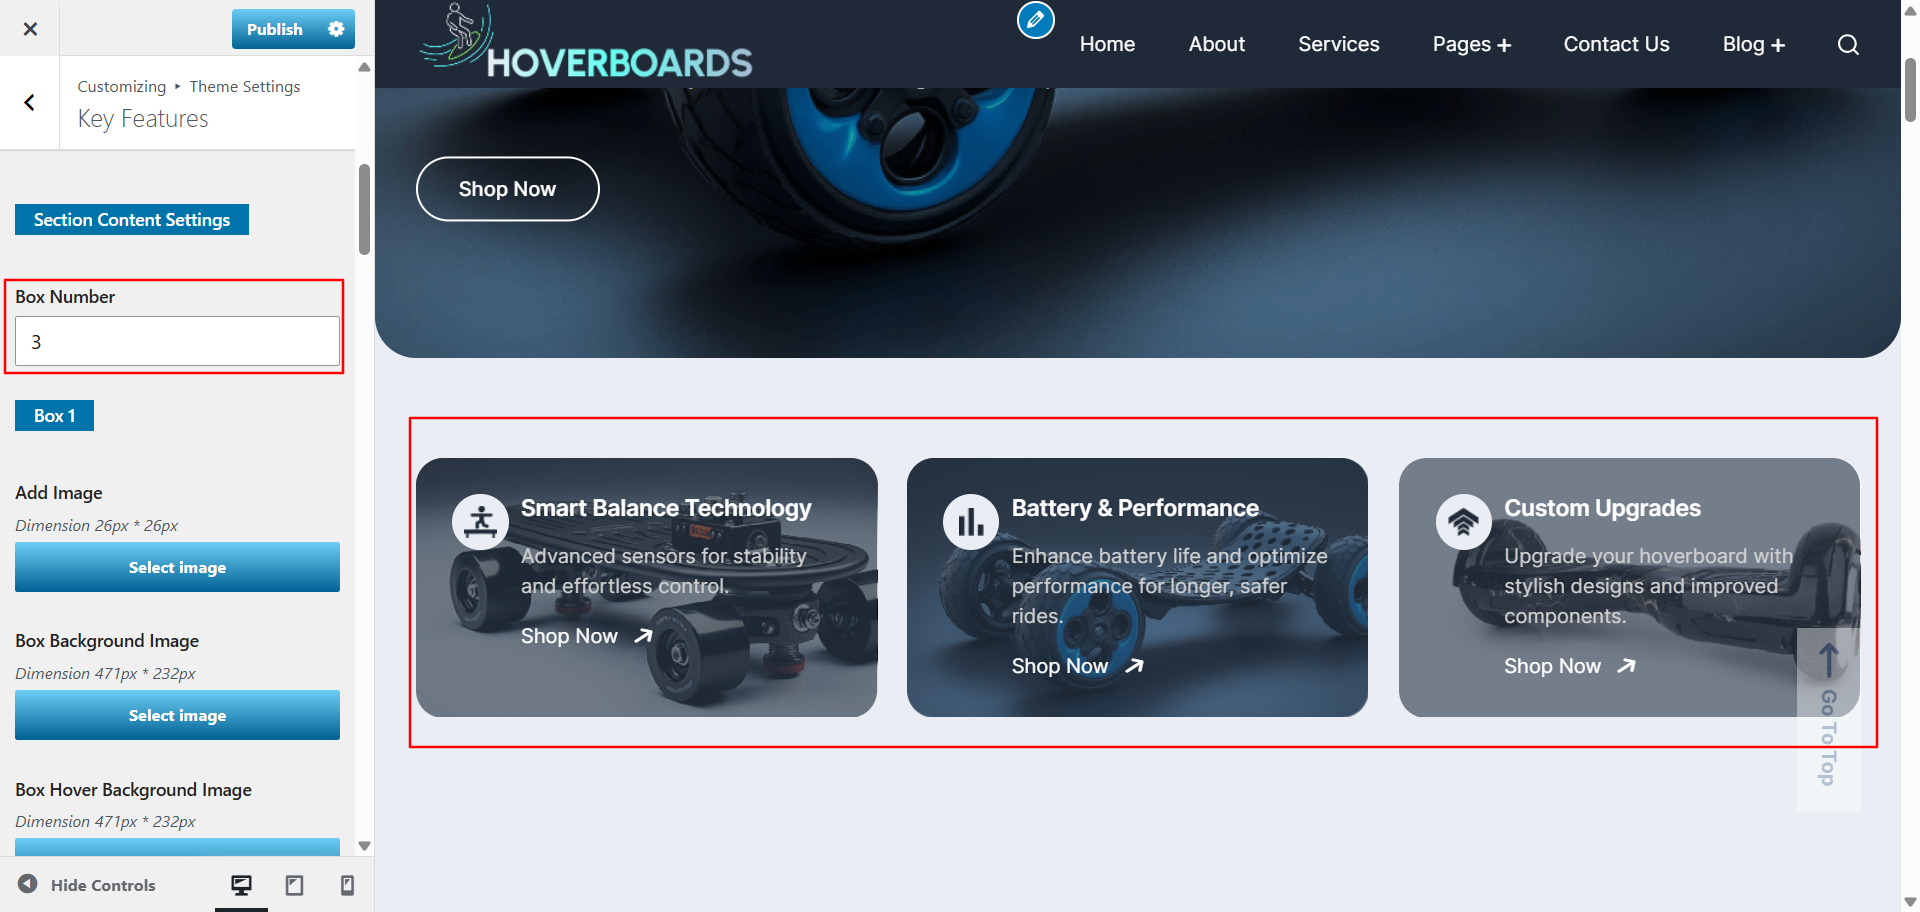
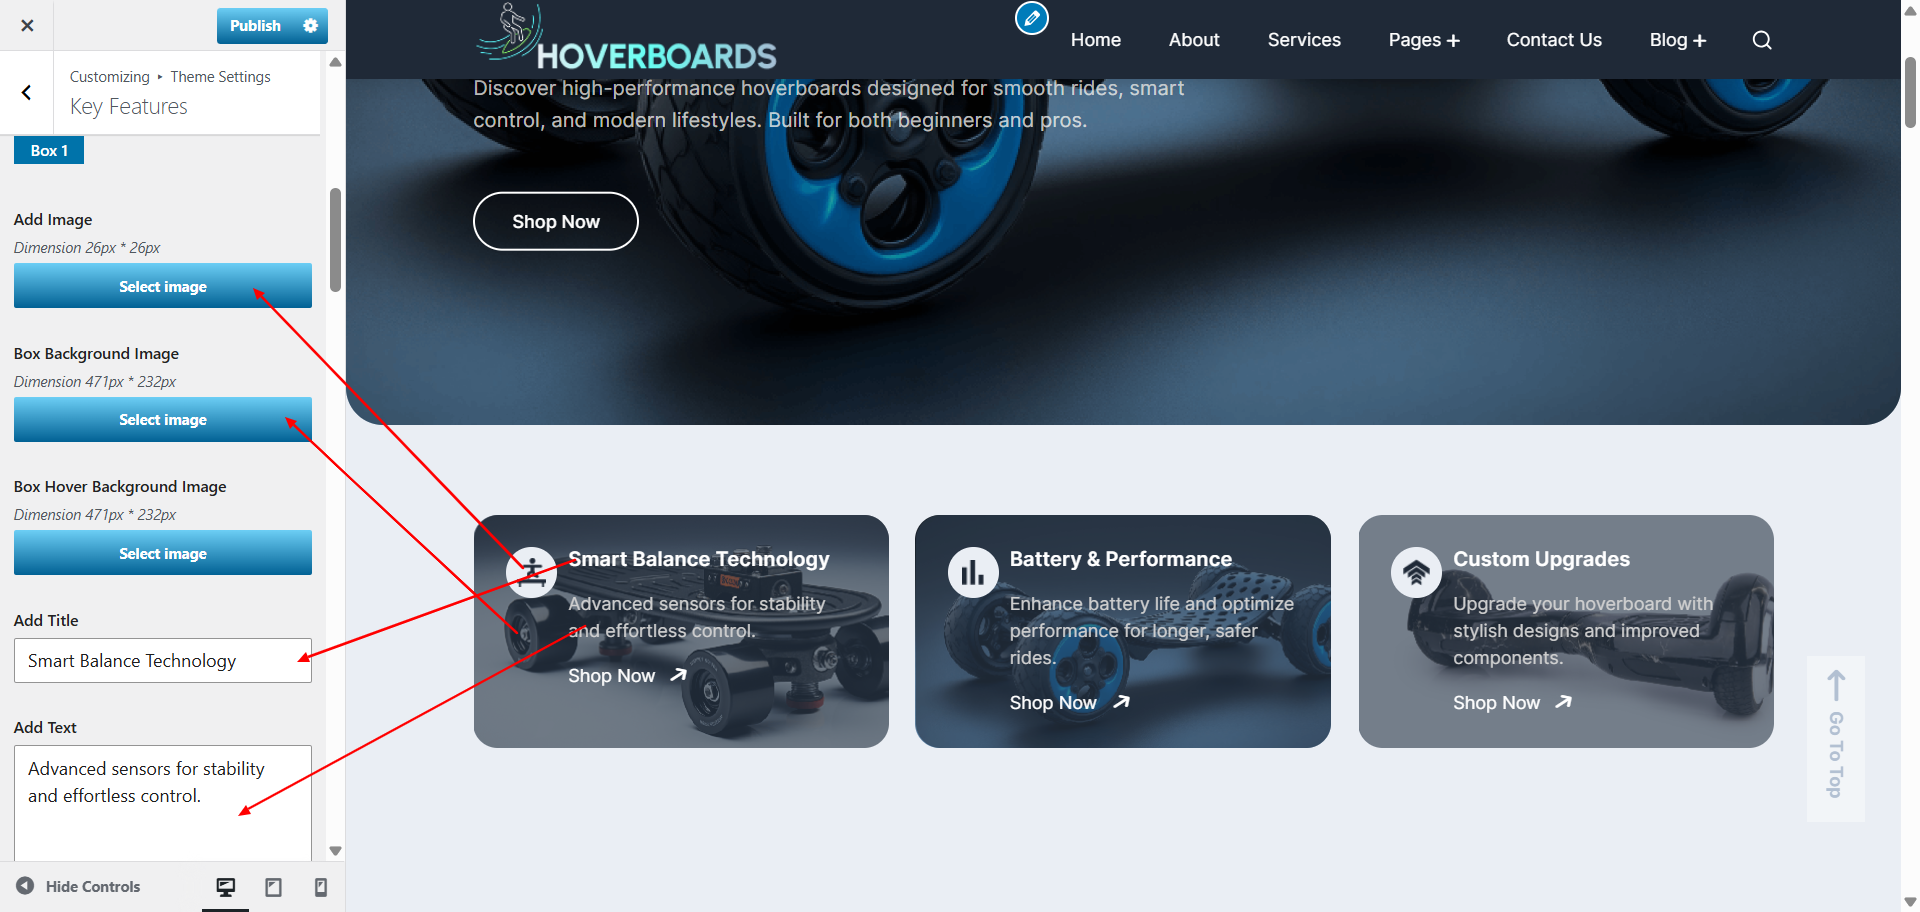
To proceed with the Key features section.
Go to Appearance >> Customize >> Theme Settings >> Key features and update the content. You can create new one as well.
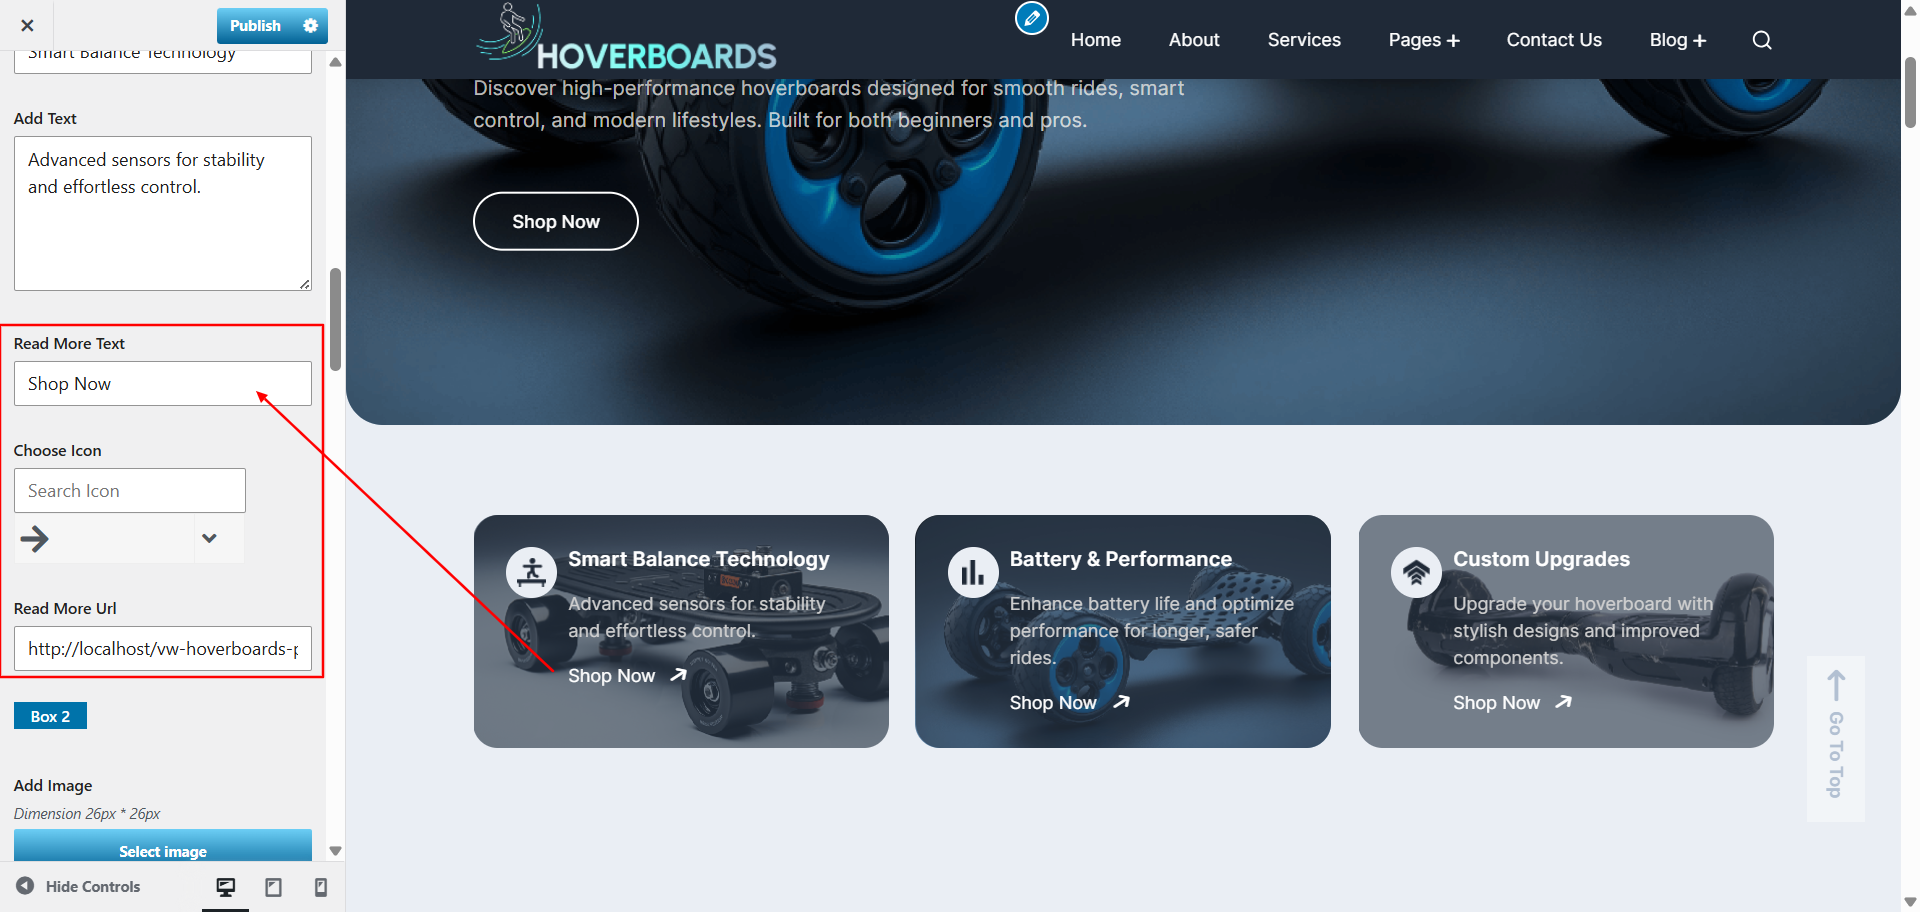
9.4. Configure Product Categories
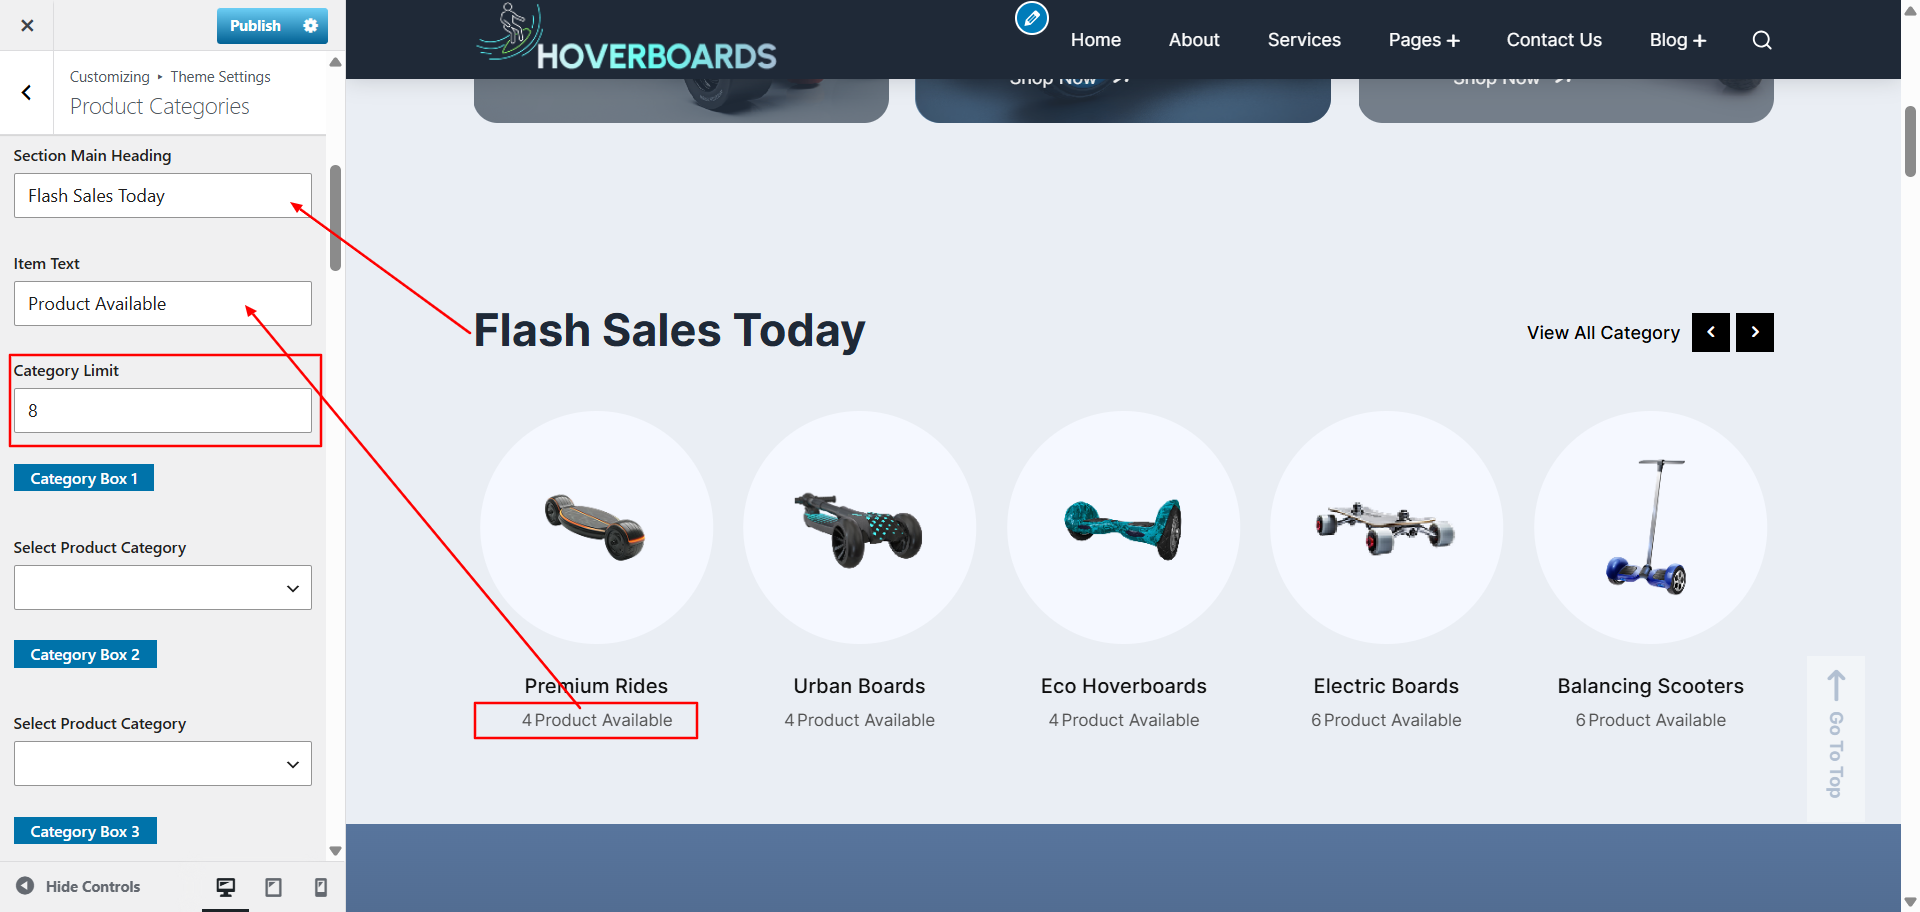
Use product categories to organize your items and make browsing easier for customers. Follow these steps to create and manage categories:
- Open WooCommerce → Products → Categories from your WordPress dashboard.
- On the left panel, fill in the Category Name (e.g., “Accessories”).
- Optionally, add a Slug for cleaner URLs.
- If needed, choose a Parent Category to build a hierarchy .
- Upload a Category Image to display in your shop layout.
- Click Add New Category to save your changes.
- Repeat the process until all required categories are created.
After categories are set up, assign products to them under Products → All Products by editing each product and ticking the relevant category box.
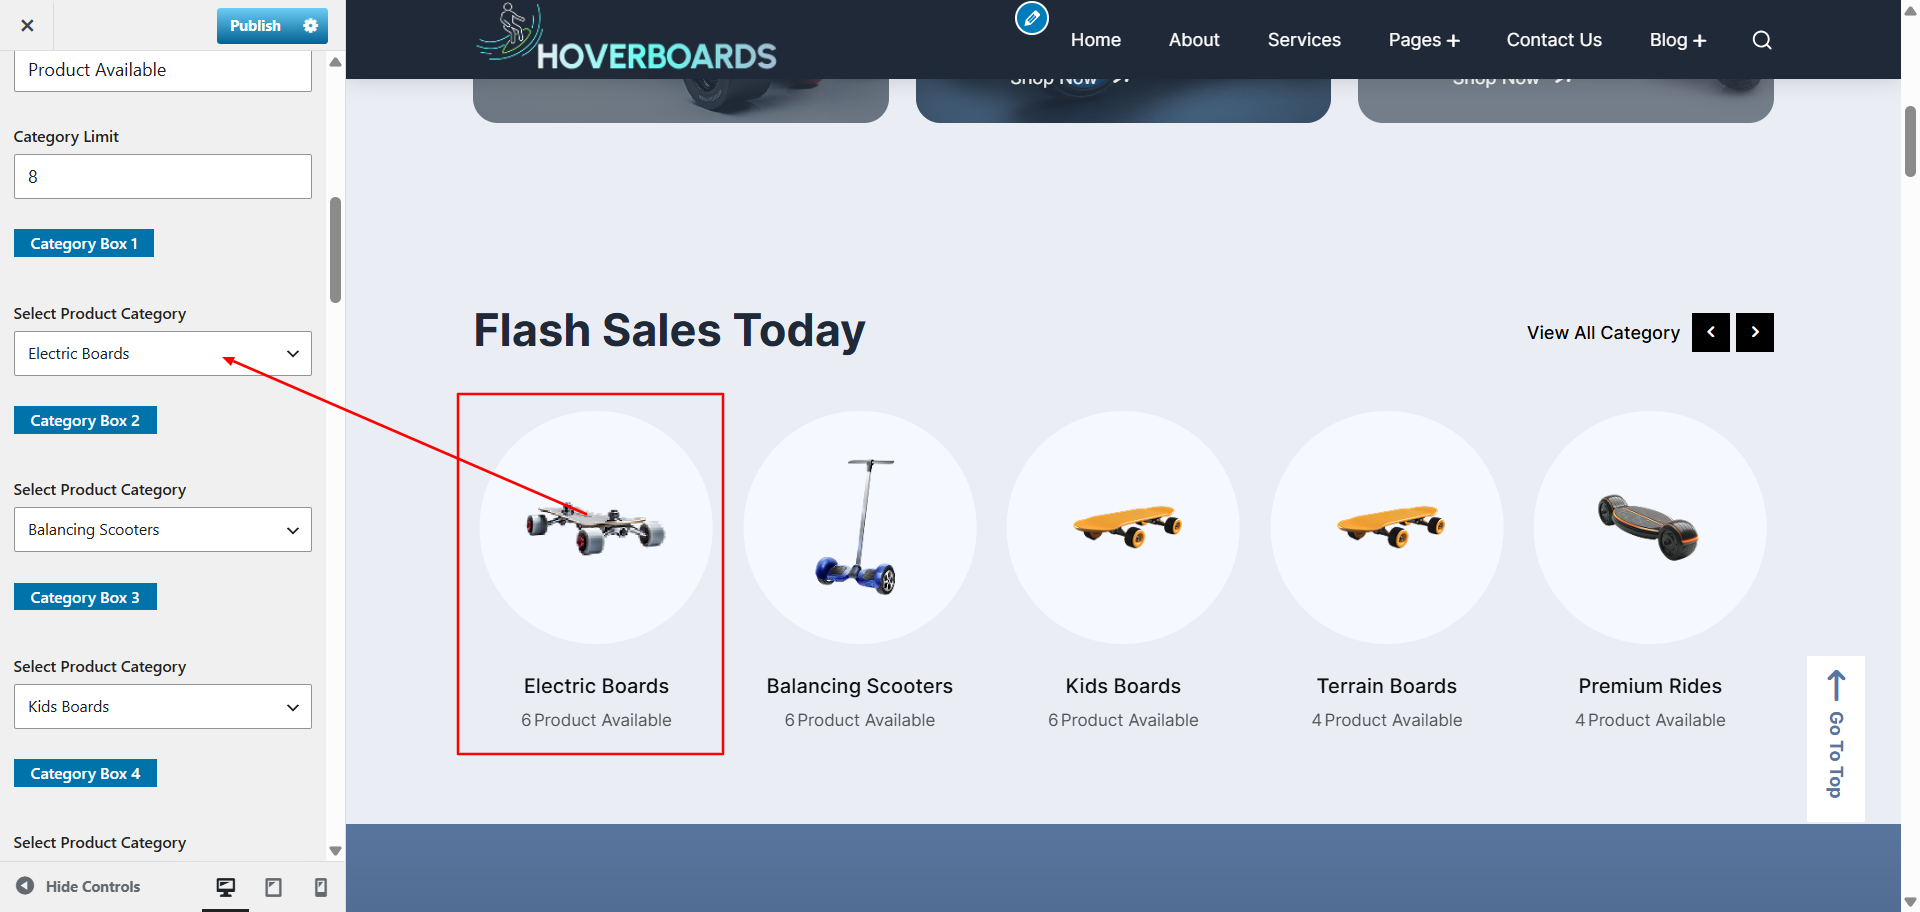
To control how categories appear on the site, go to Appearance → Customize → Theme Settings → Product Categories. Here you can adjust the number of categories shown, their order, and layout style to match your design needs.
9.5. Configure Product Tabs
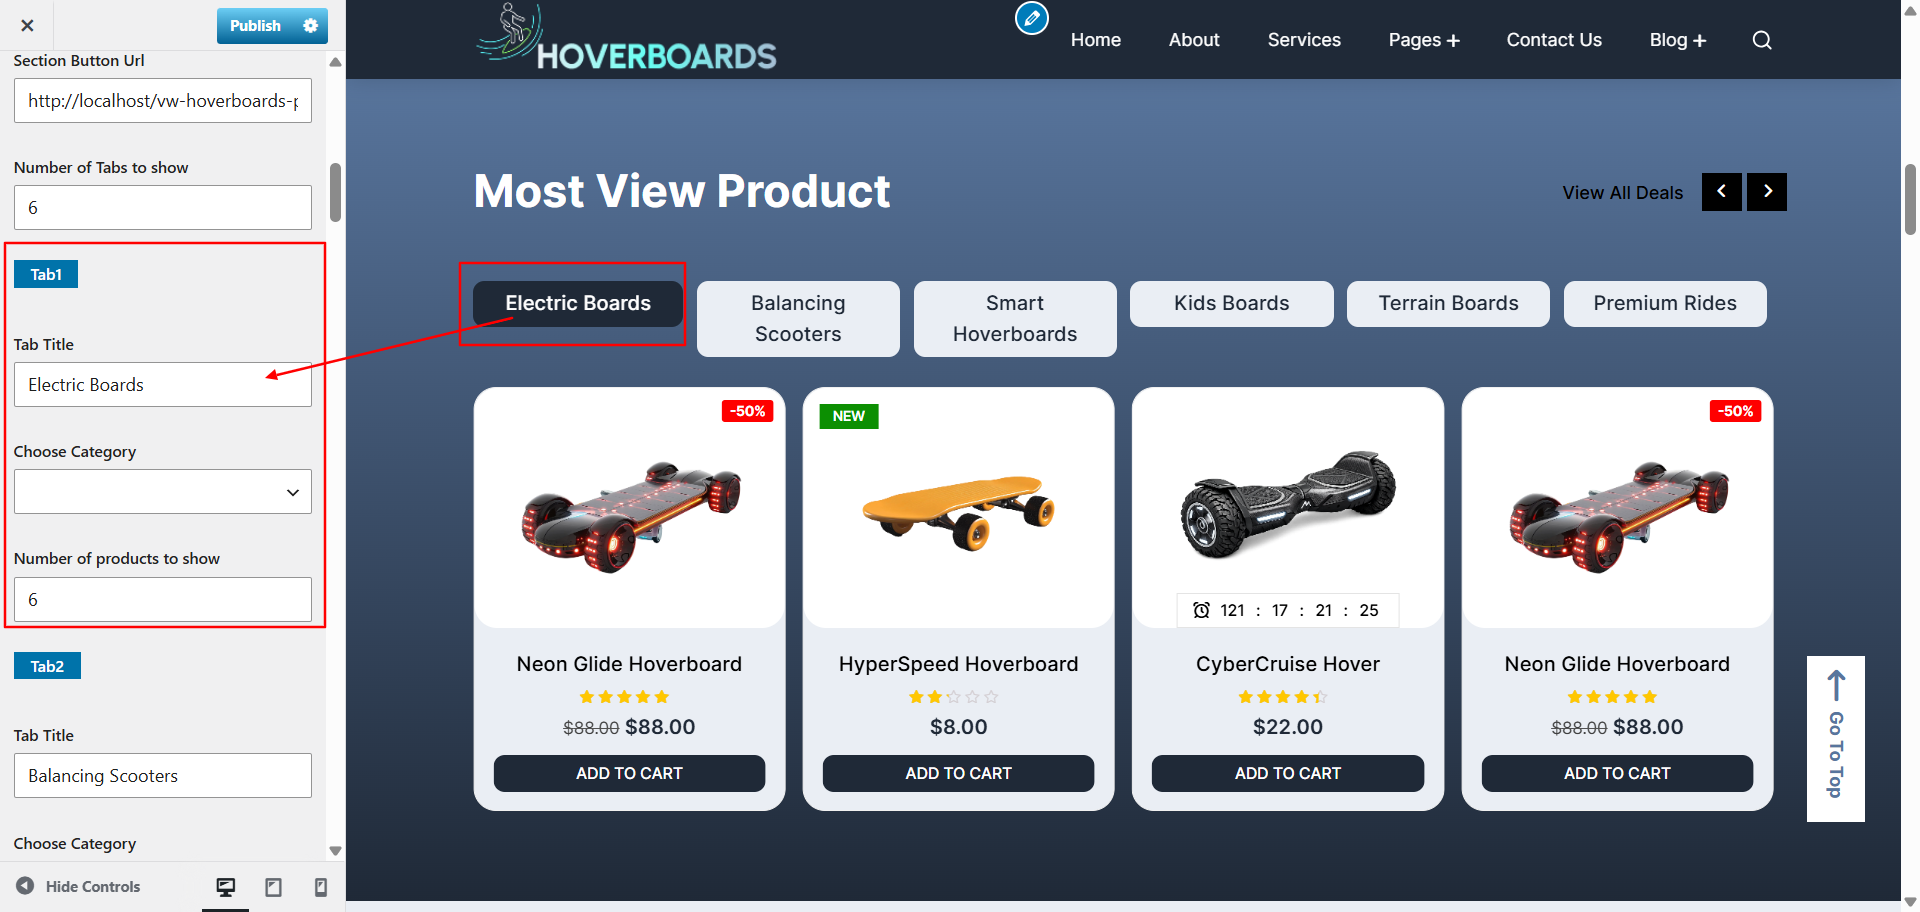
The Product Tabs section allows you to highlight items by category in a tabbed layout. Each tab can be linked to a specific product category, making it easier for customers to browse grouped products.
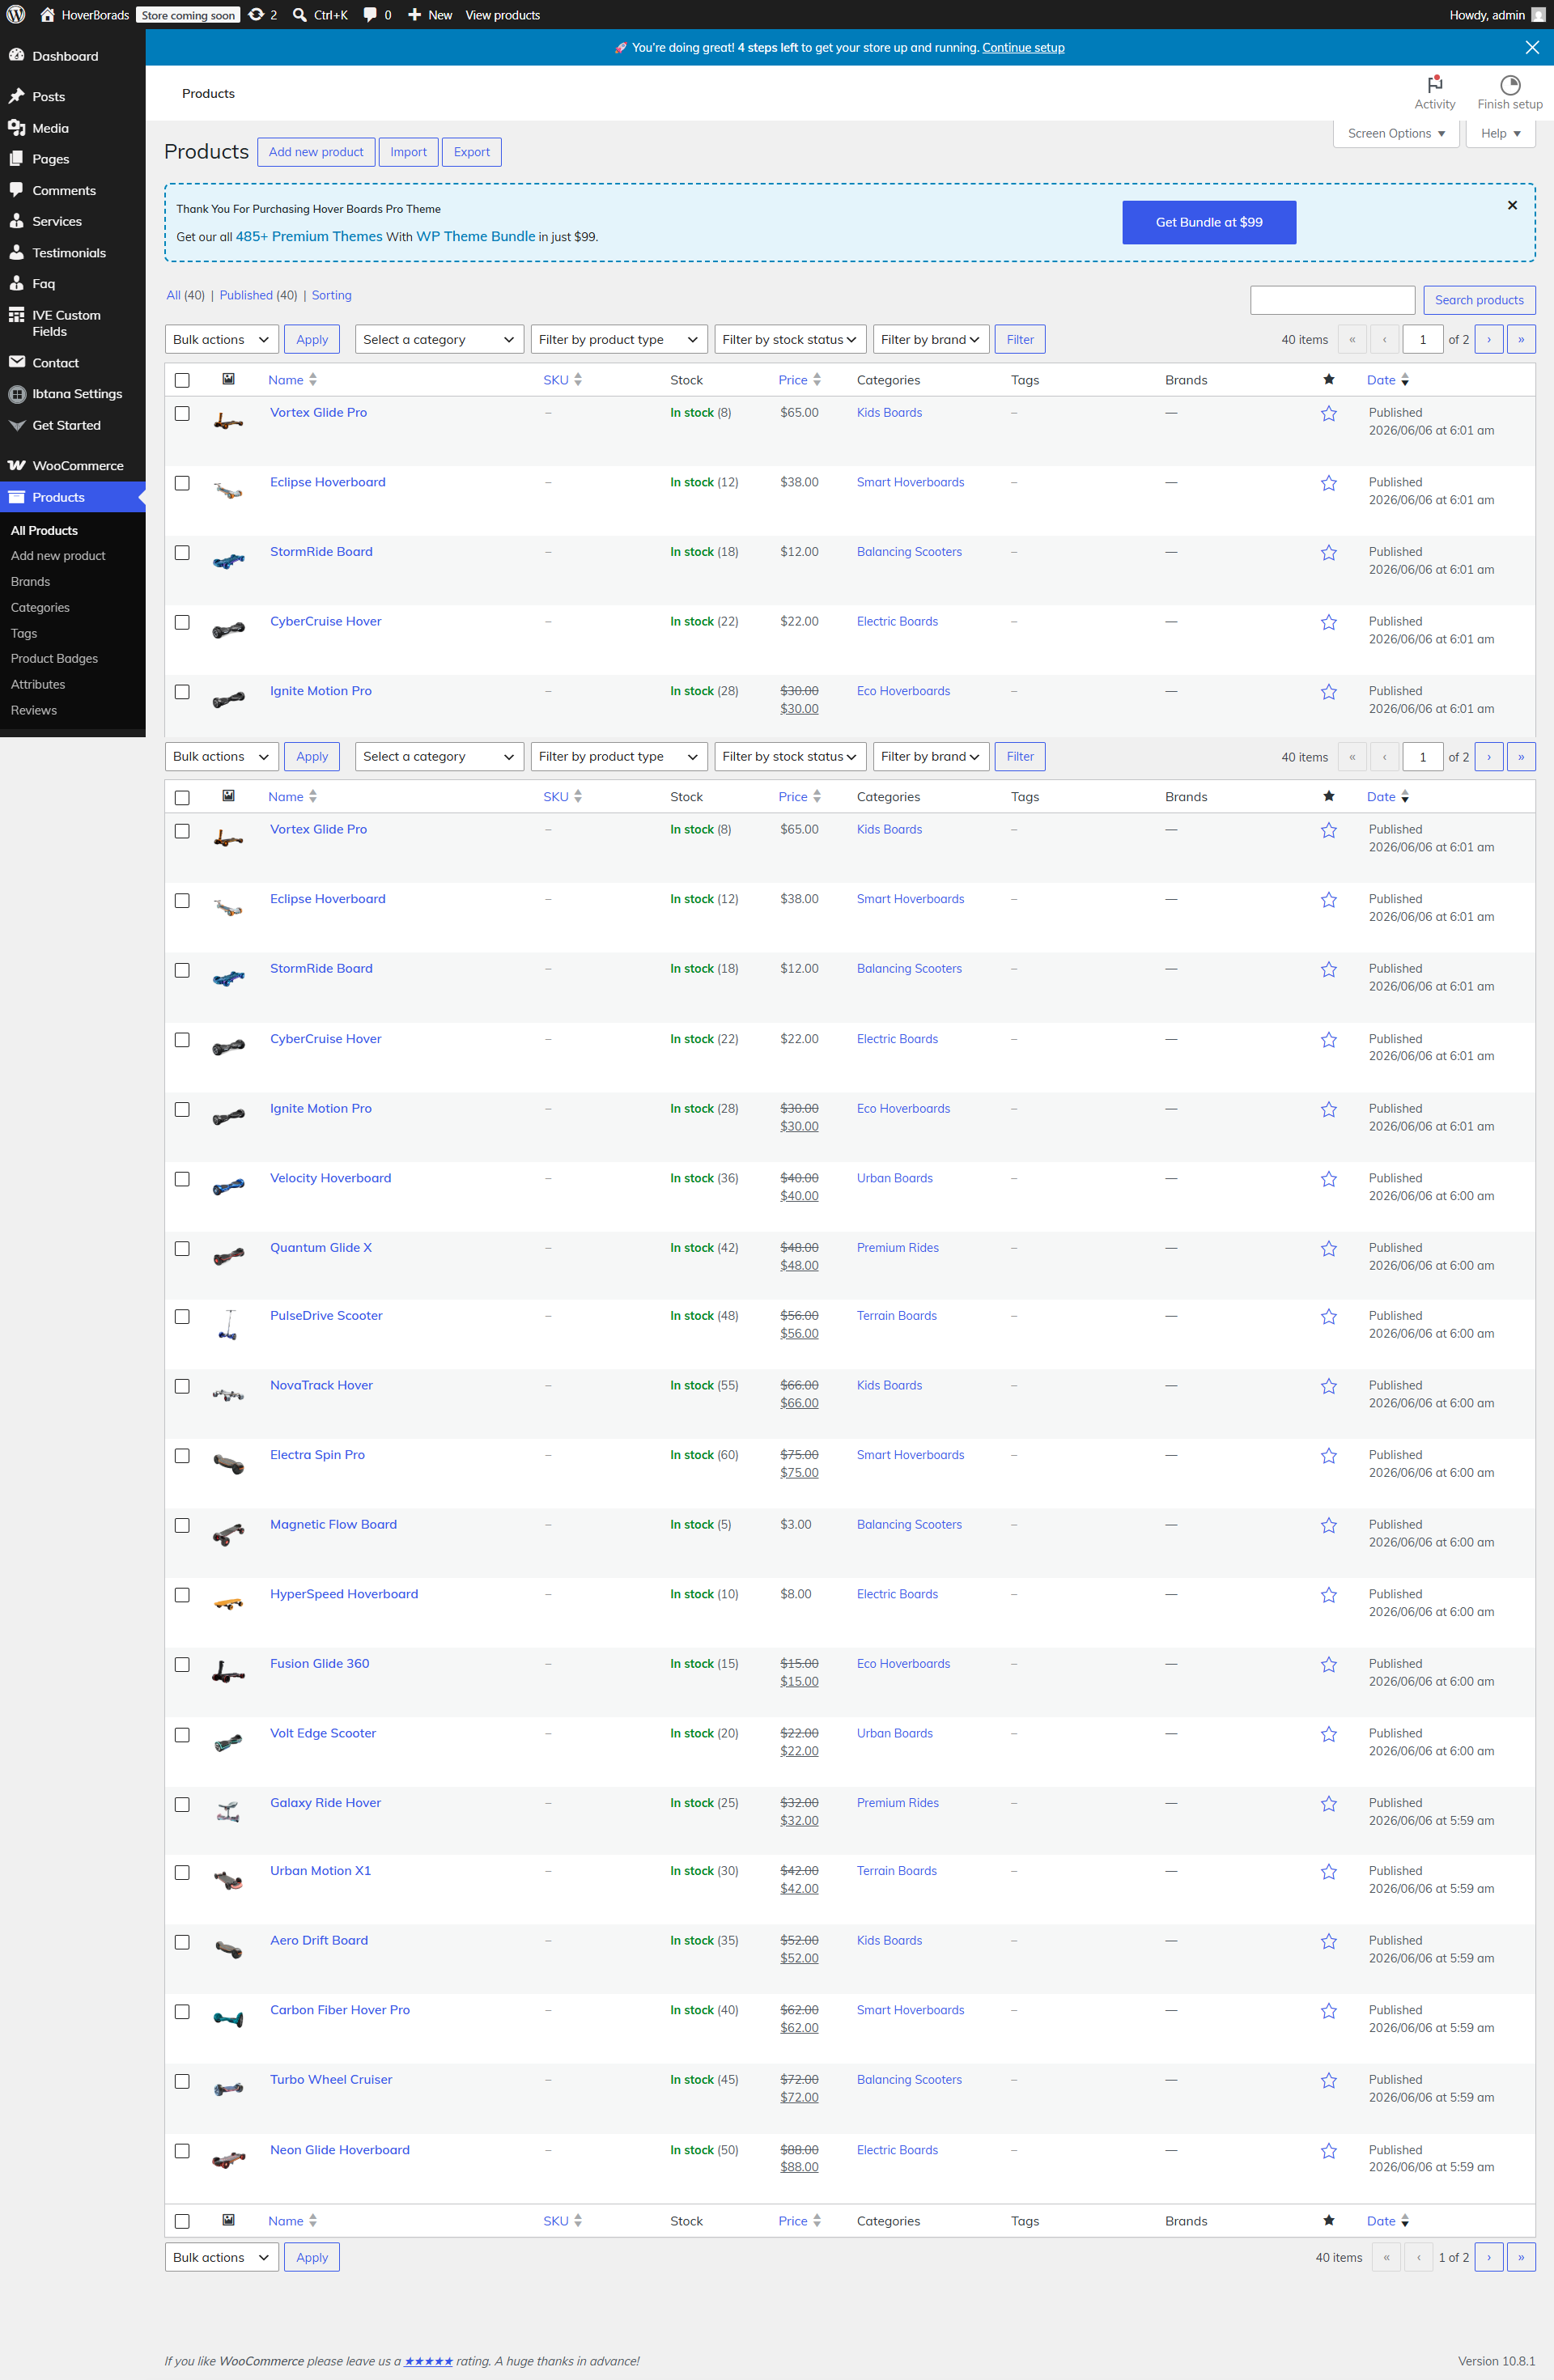
- Go to WooCommerce → Products → Add New to create a product.
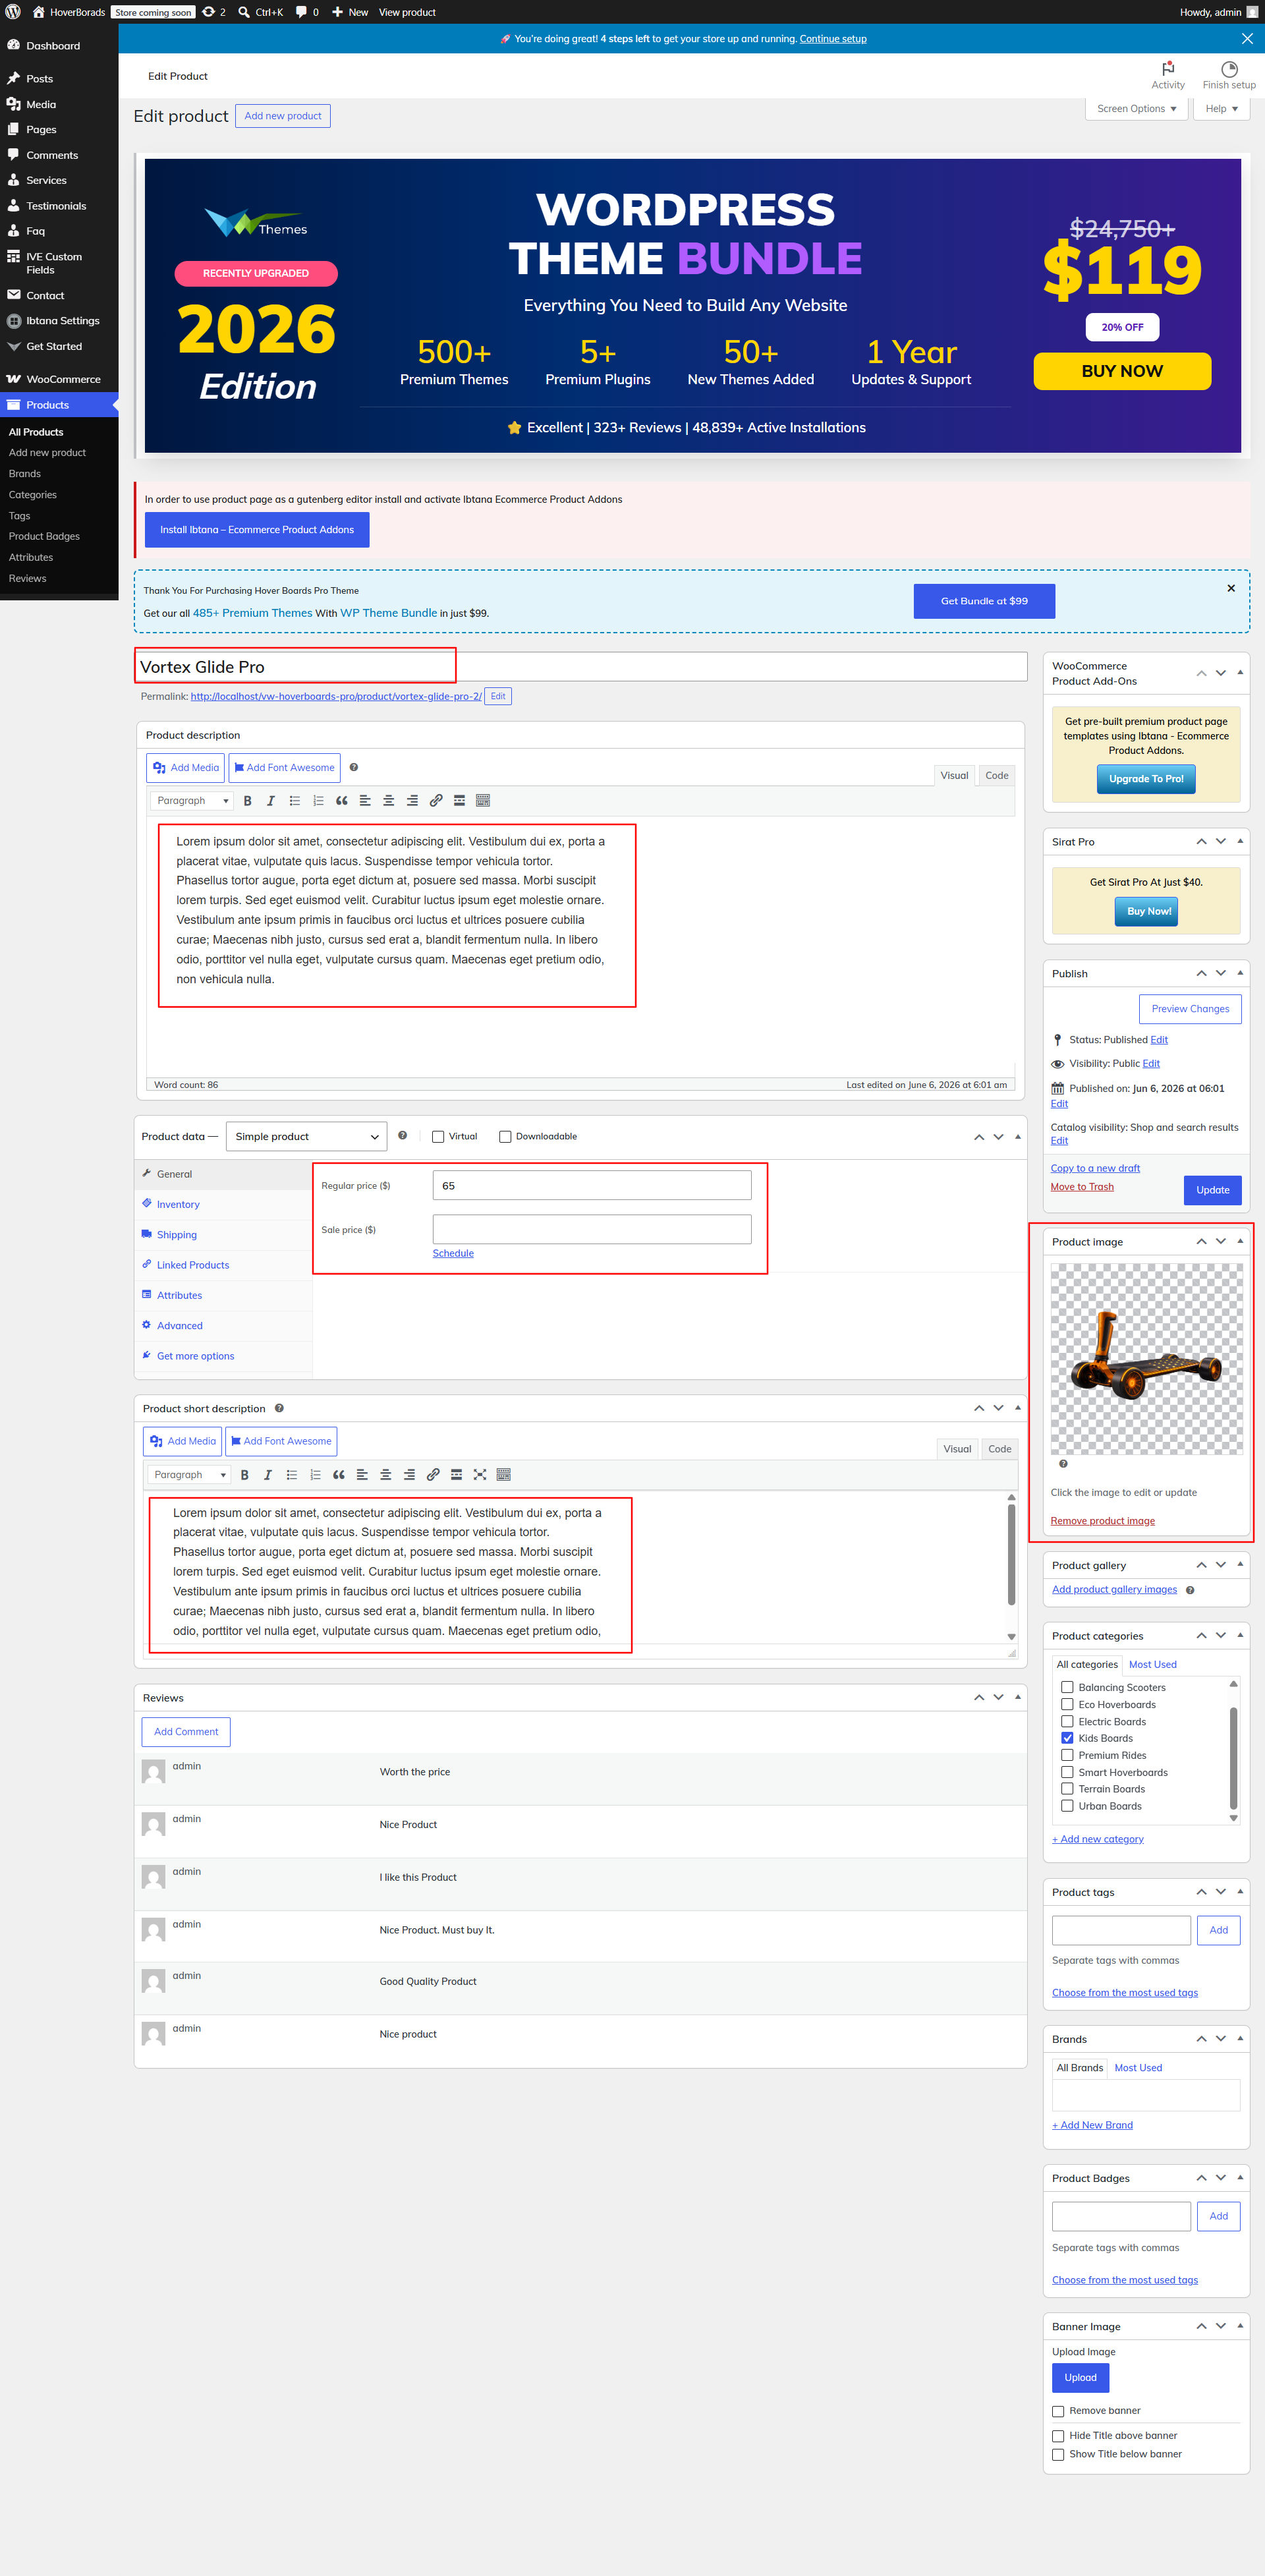
- Fill in the product details such as Title, Description, Price, and Image.
- On the right panel, select the appropriate Category for the product. Categories must be created beforehand (see Product Categories setup).
- Publish the product.
- Repeat the process for all products you want to display under different tabs.
Once products are assigned to categories, you can control how they appear in tabs:
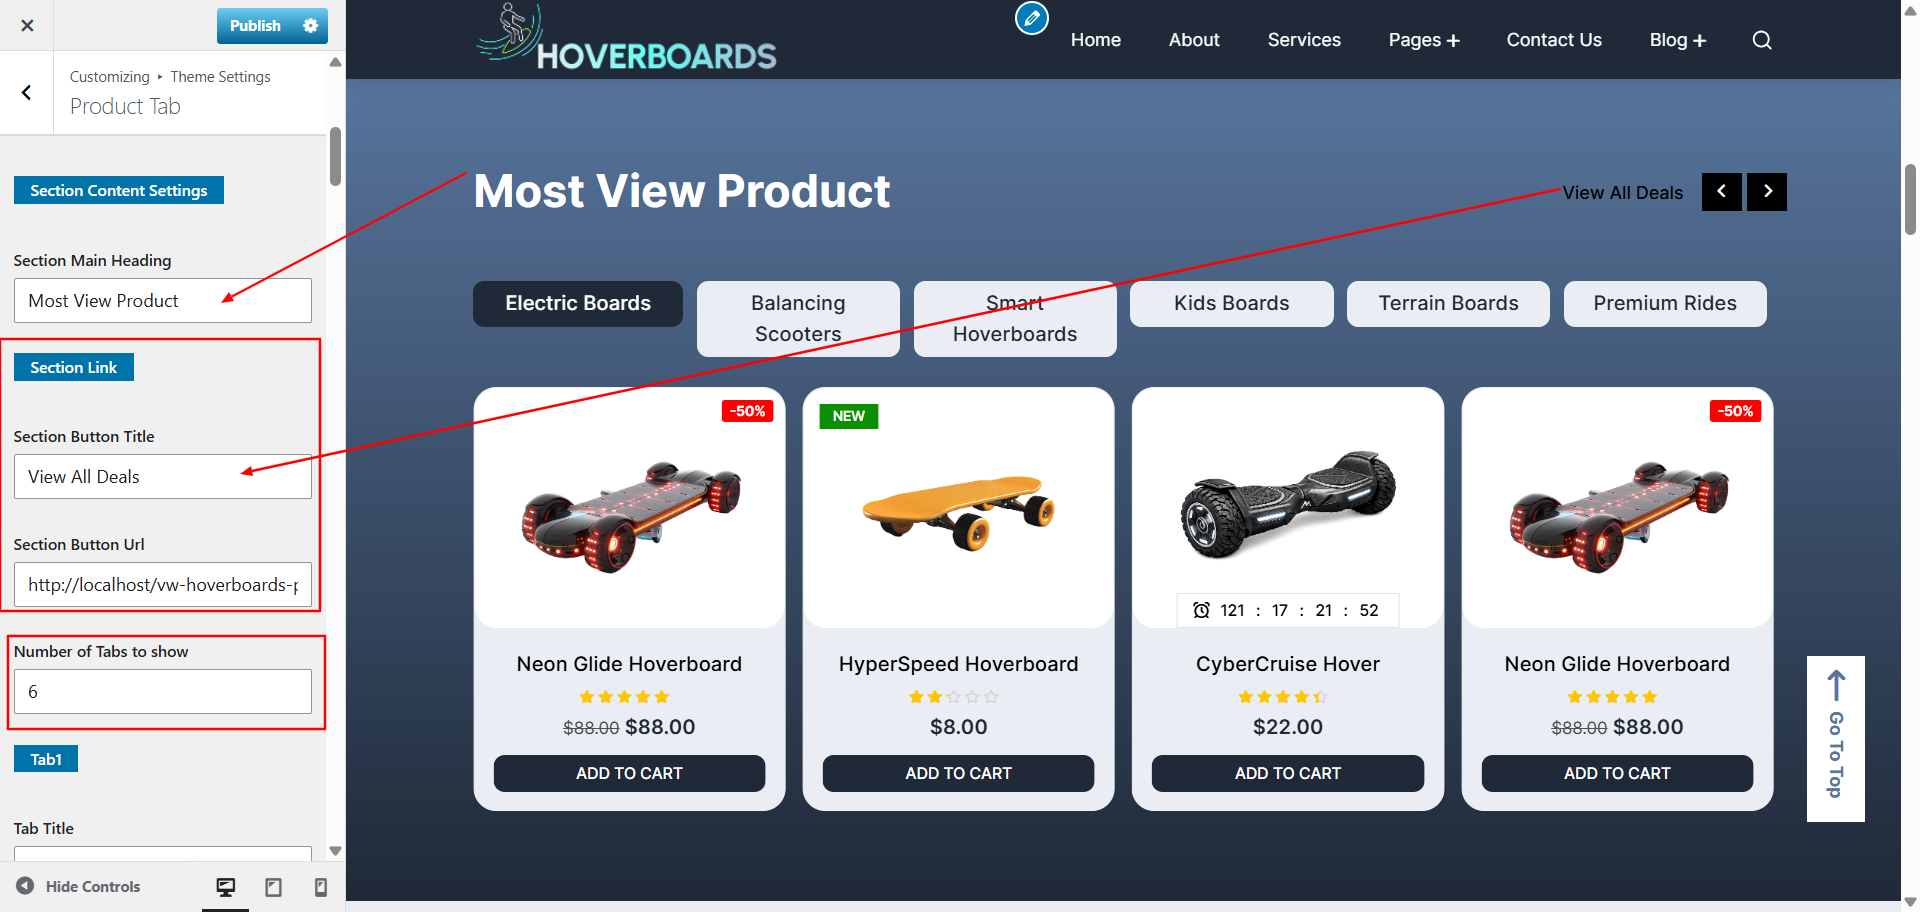
Navigate to Appearance → Customize → Theme Settings → Product Tabs. Here you can:
- Choose which categories should be displayed as tabs.
- Adjust the number of tabs shown.
- Reorder tabs to match your preferred layout.
- Preview how products are grouped under each tab.
9.6. Configure About Us Section
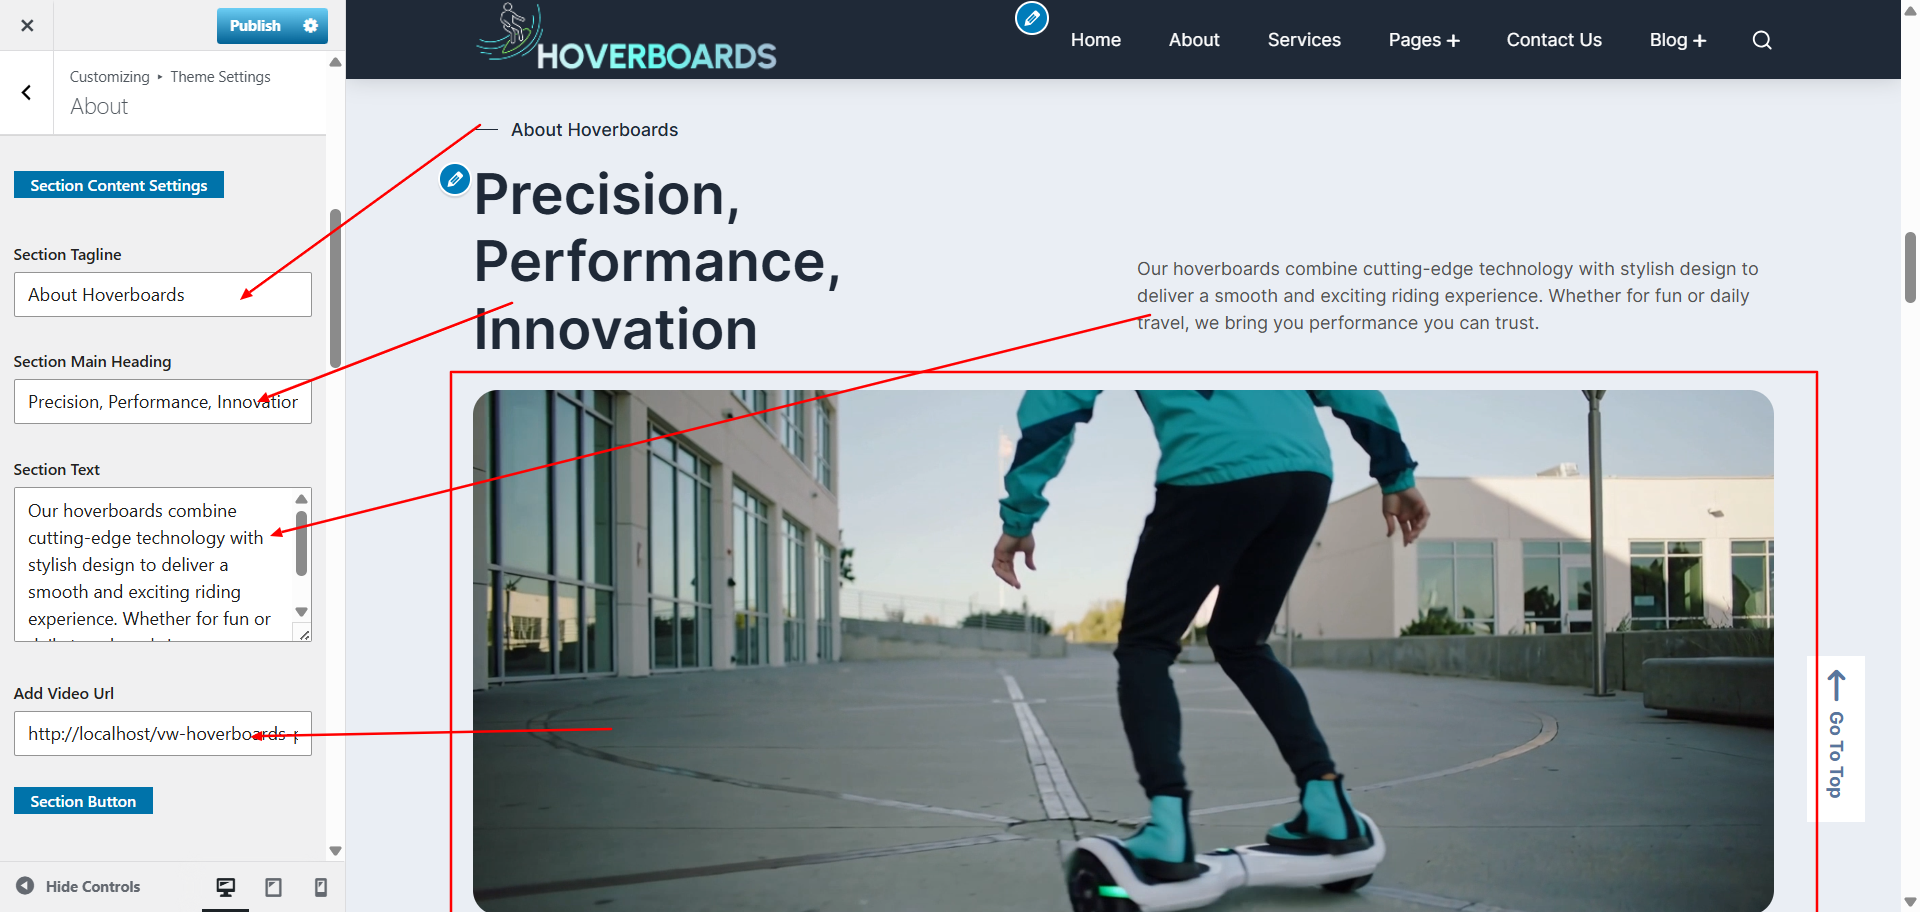
The About Us section allows you to introduce your brand, share your story, or highlight your mission. You can also embed a video to make the section more engaging.
- Go to Appearance → Customize → Theme Settings → About Us.
- Enter your About Us content in the text editor. This can include your company background, vision, or values.
- Paste a Video URL (e.g., YouTube or Vimeo) into the provided field if you want a video to play in this section.
- Save and publish your changes.
Once updated, the About Us section will display your text and video on the front page, giving visitors a clear understanding of your business identity.
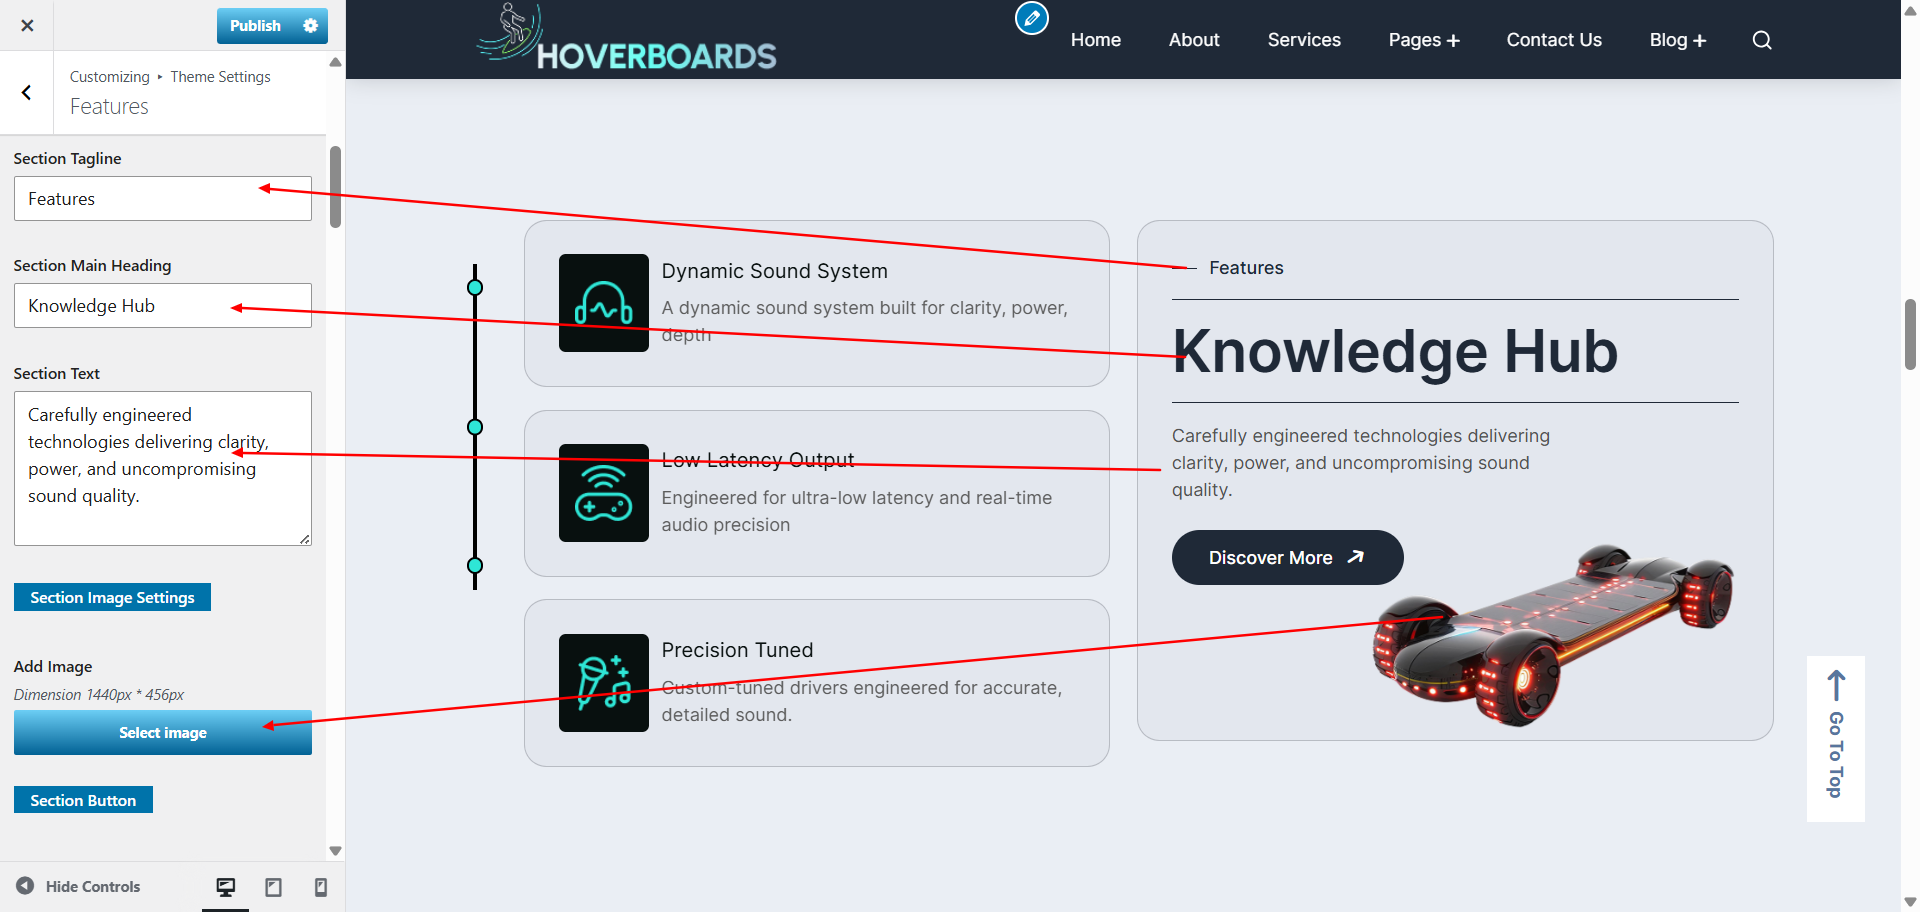
9.7. Configure Features Section
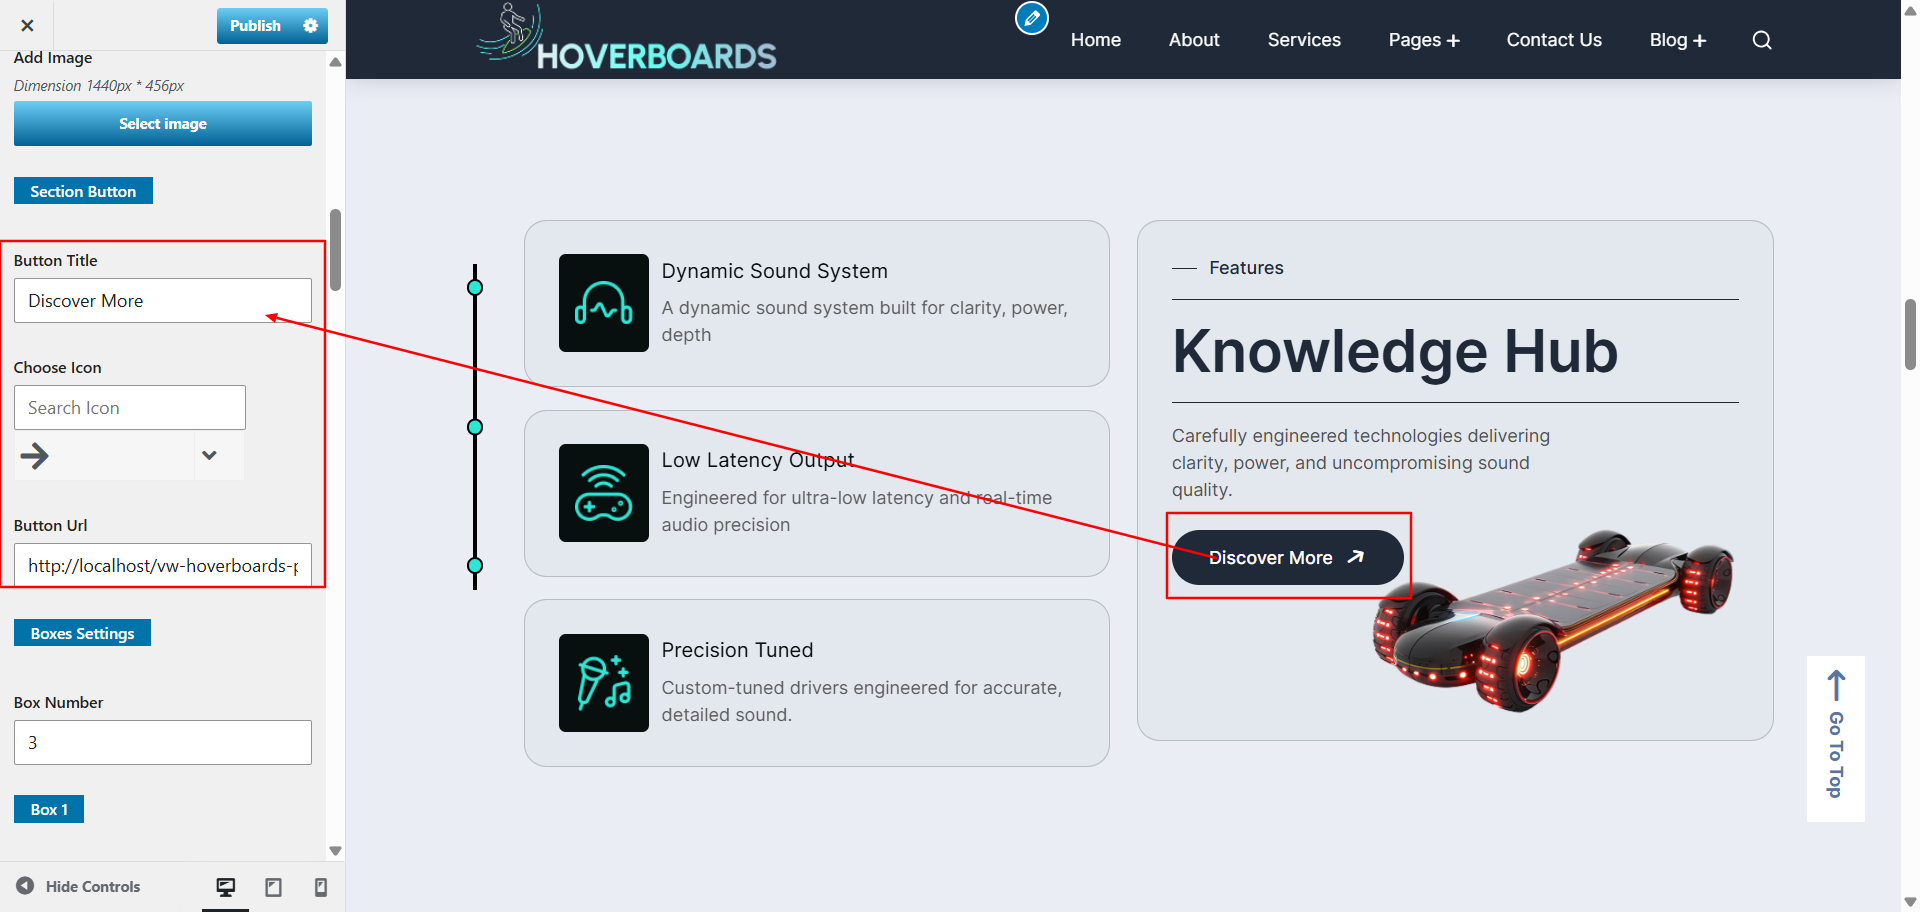
The Features section allows you to highlight the key strengths or unique selling points of your product. Each feature can include a title, description, and icon/image for better presentation.
- Go to Appearance → Customize → Theme Settings → Features.
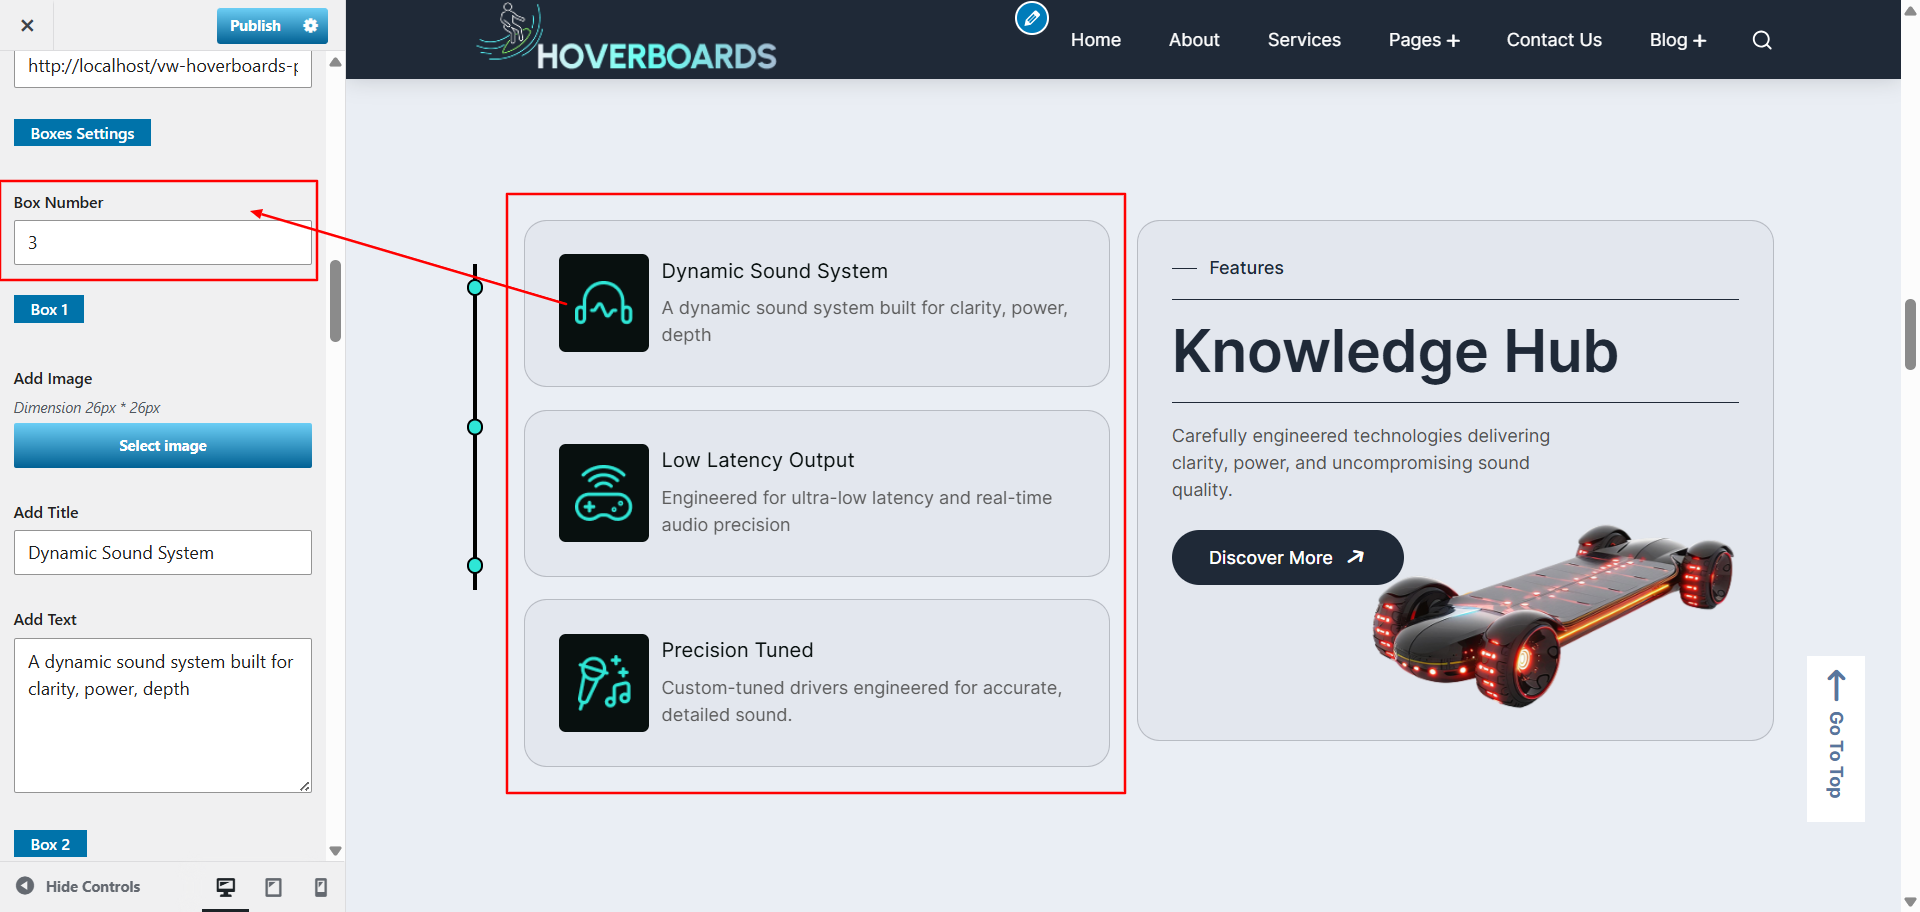
- Increase or decrease the number of features to show.
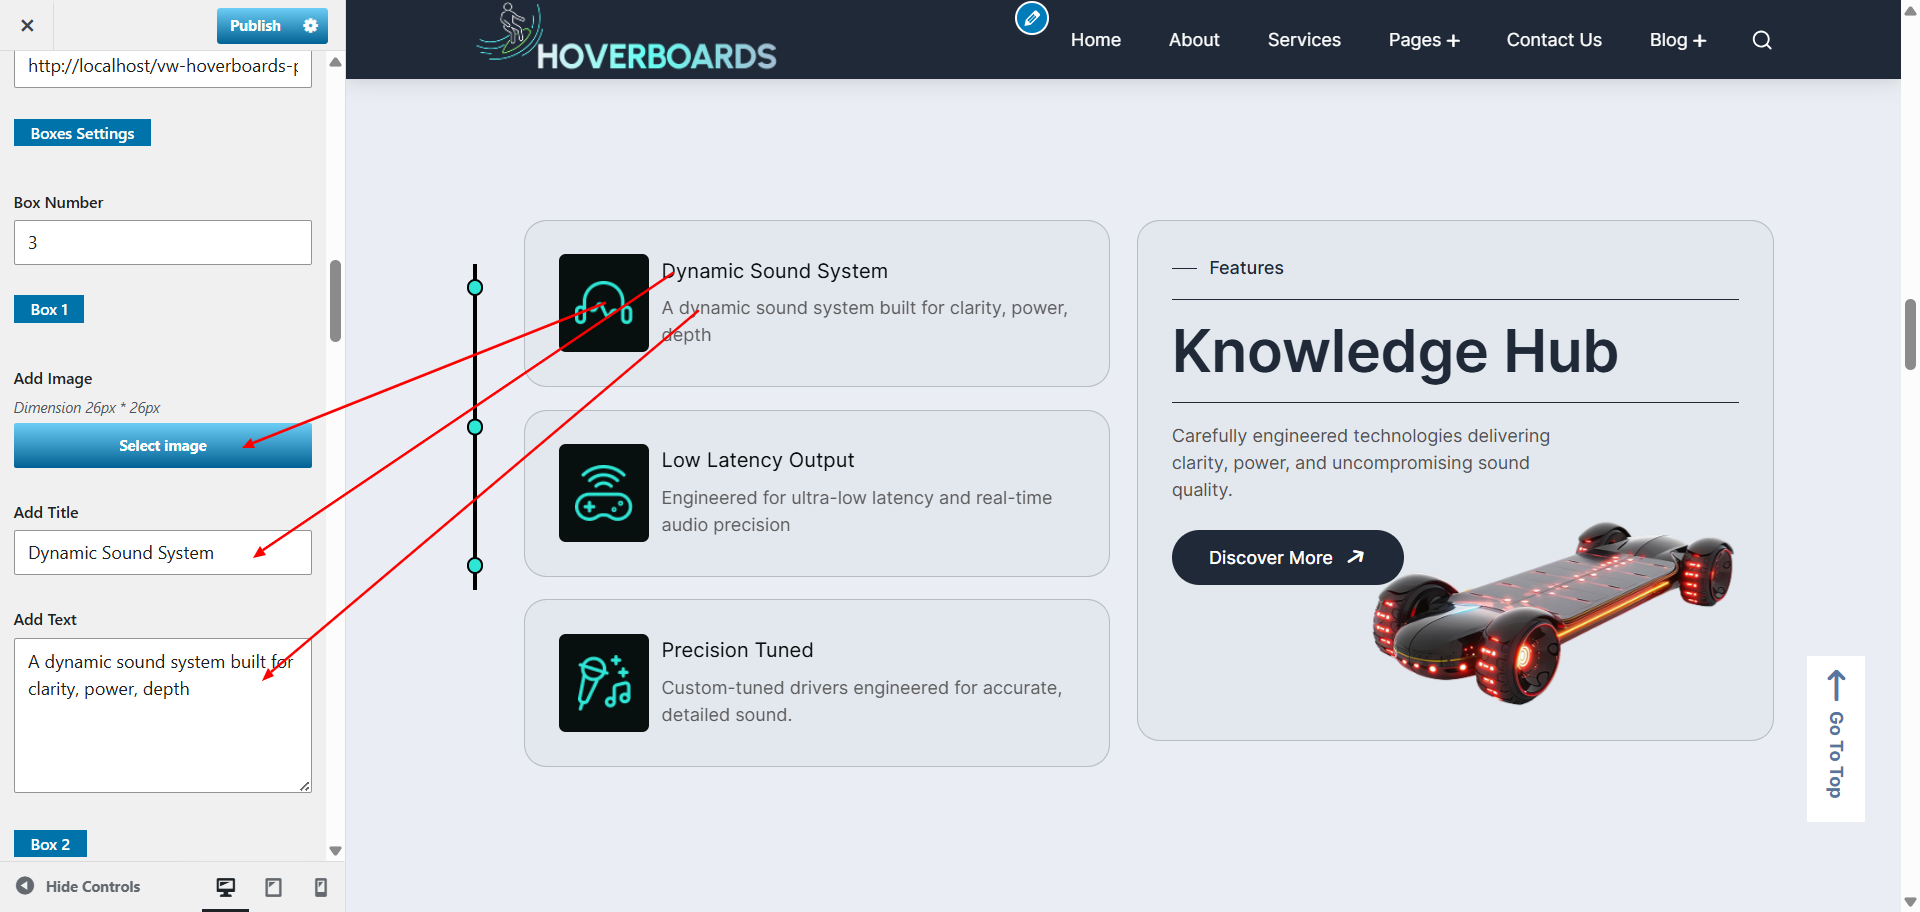
- Enter a Title (e.g., “Dynamic Sound System”).
- Add a short Description explaining the feature.
- Upload an Icon or Image to visually represent the feature.
- Save the feature. Repeat the process to add multiple features.
Once configured, the Features section will display your chosen highlights on the front page, helping visitors quickly understand the product’s advantages.
9.8. Configure Services Section
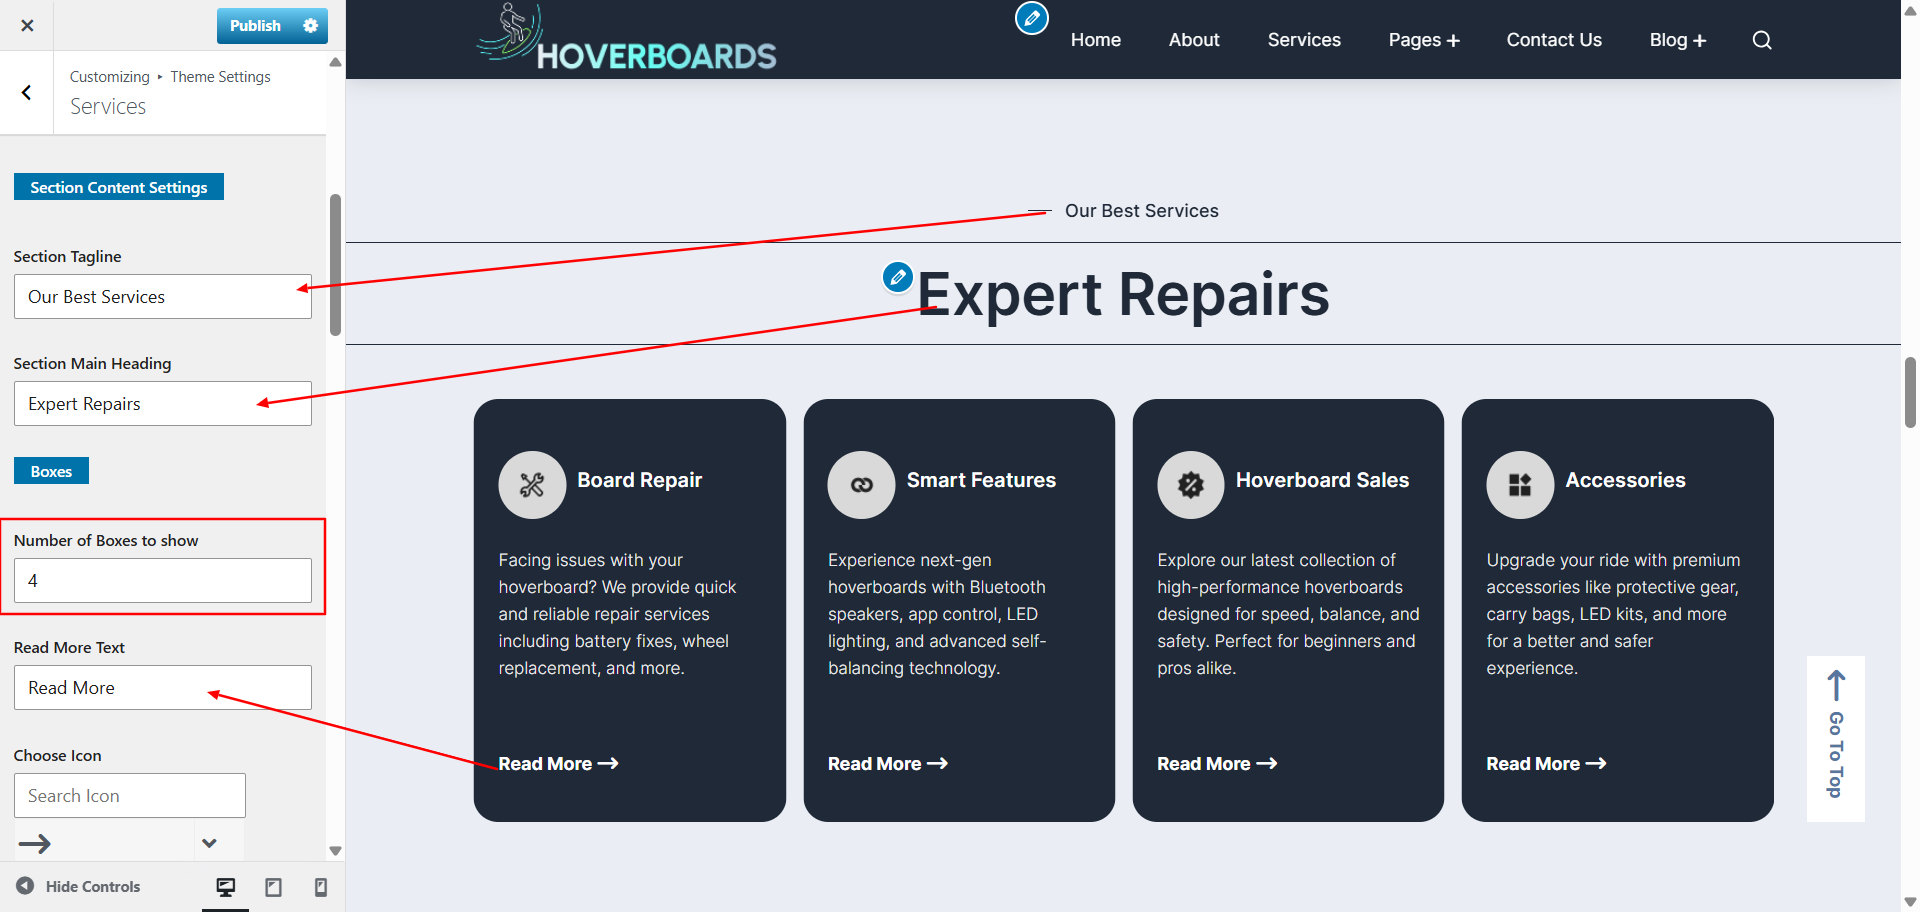
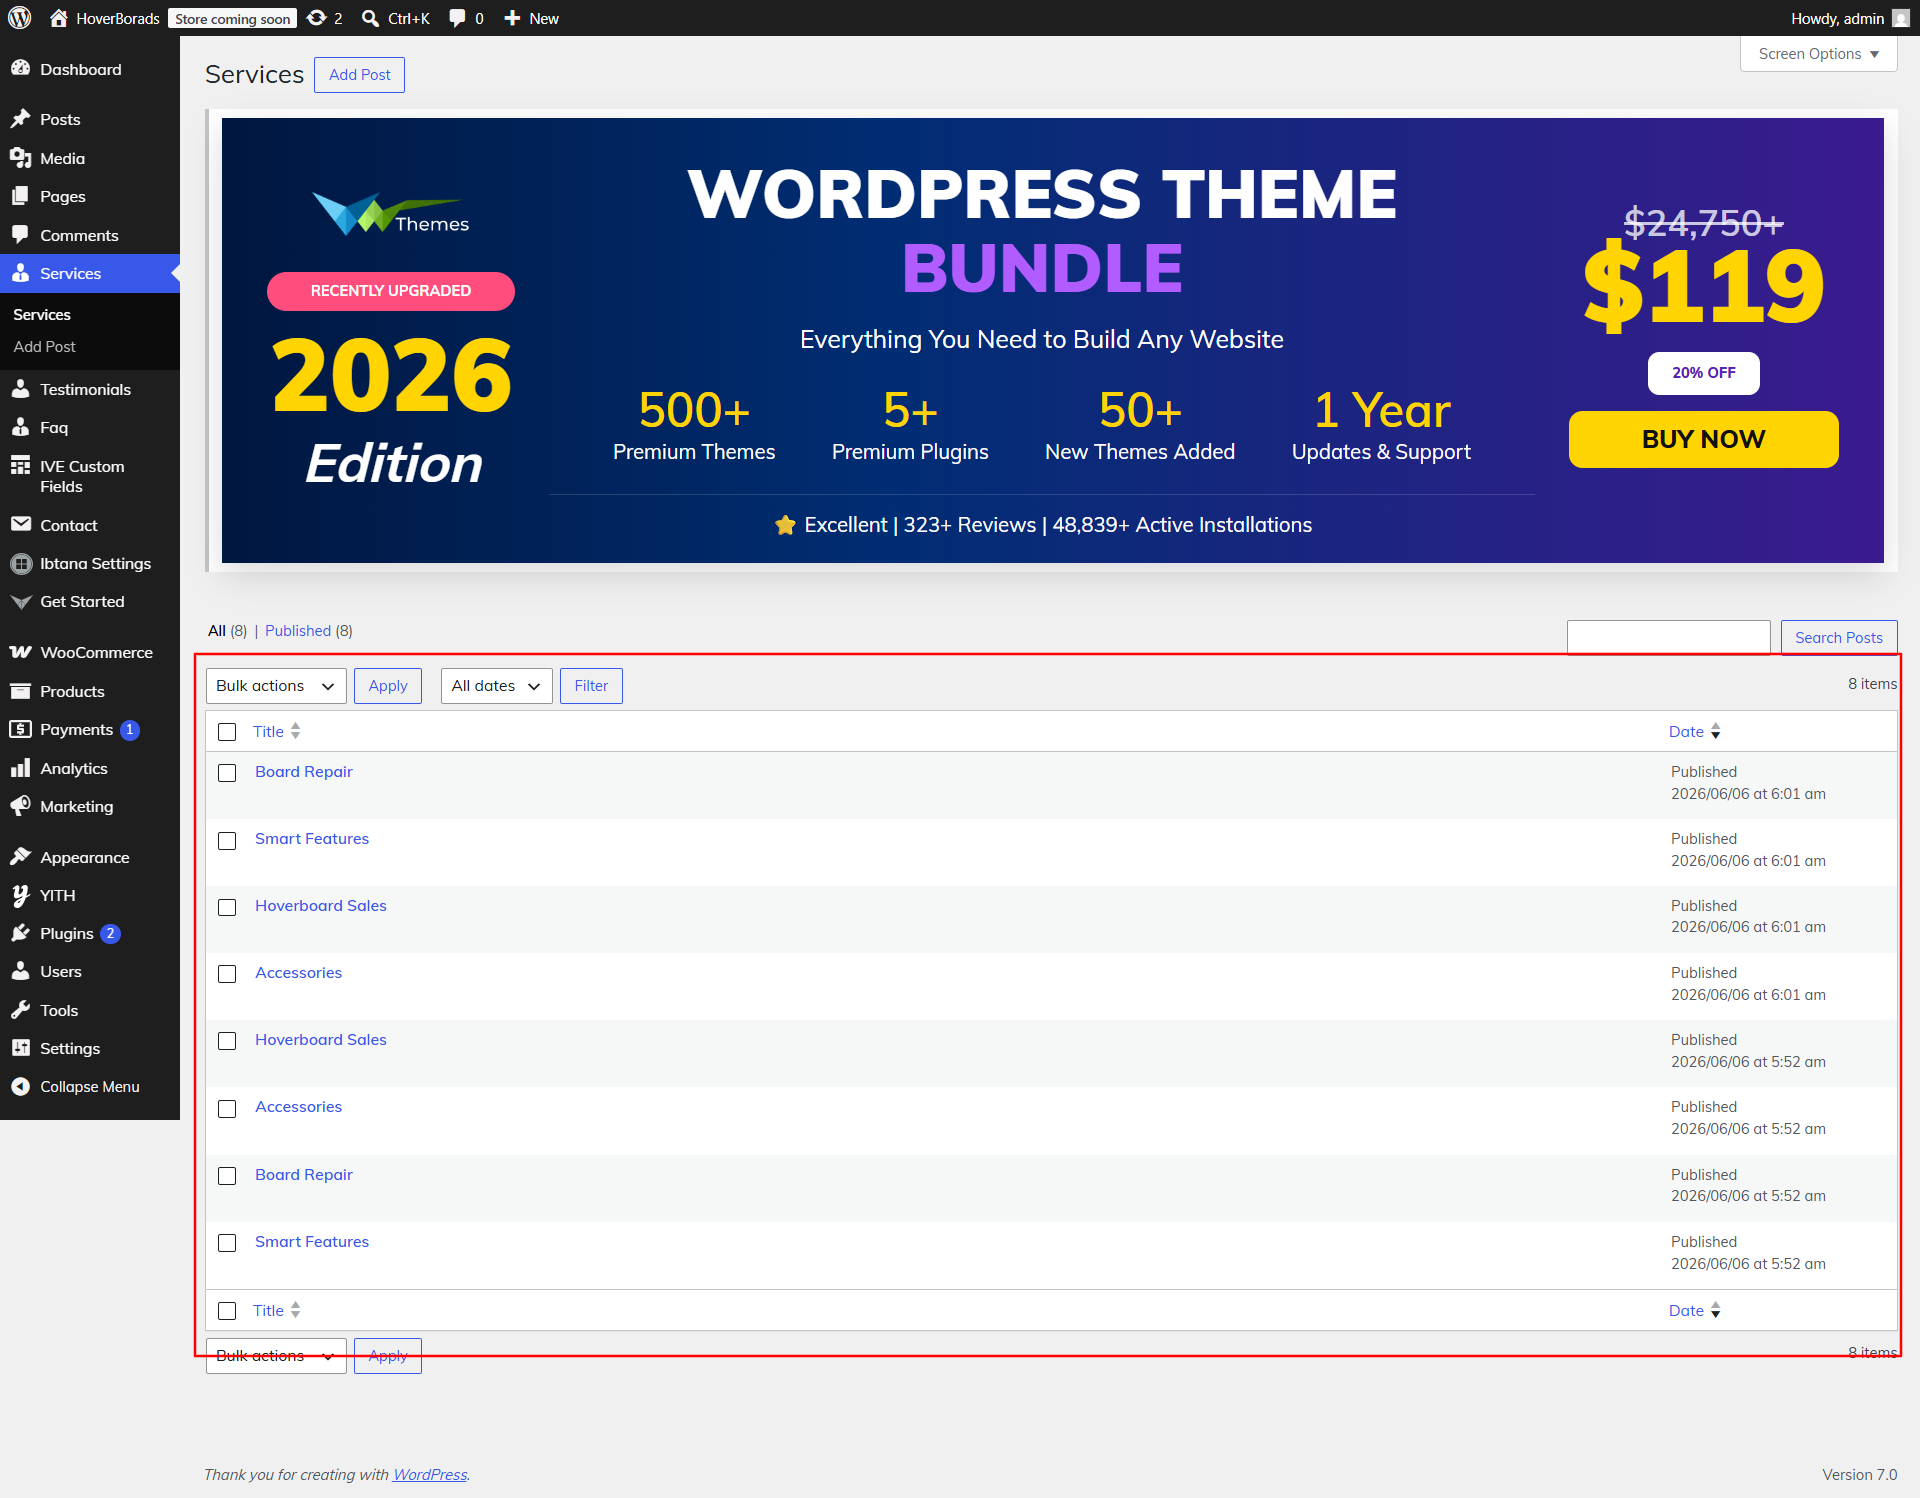
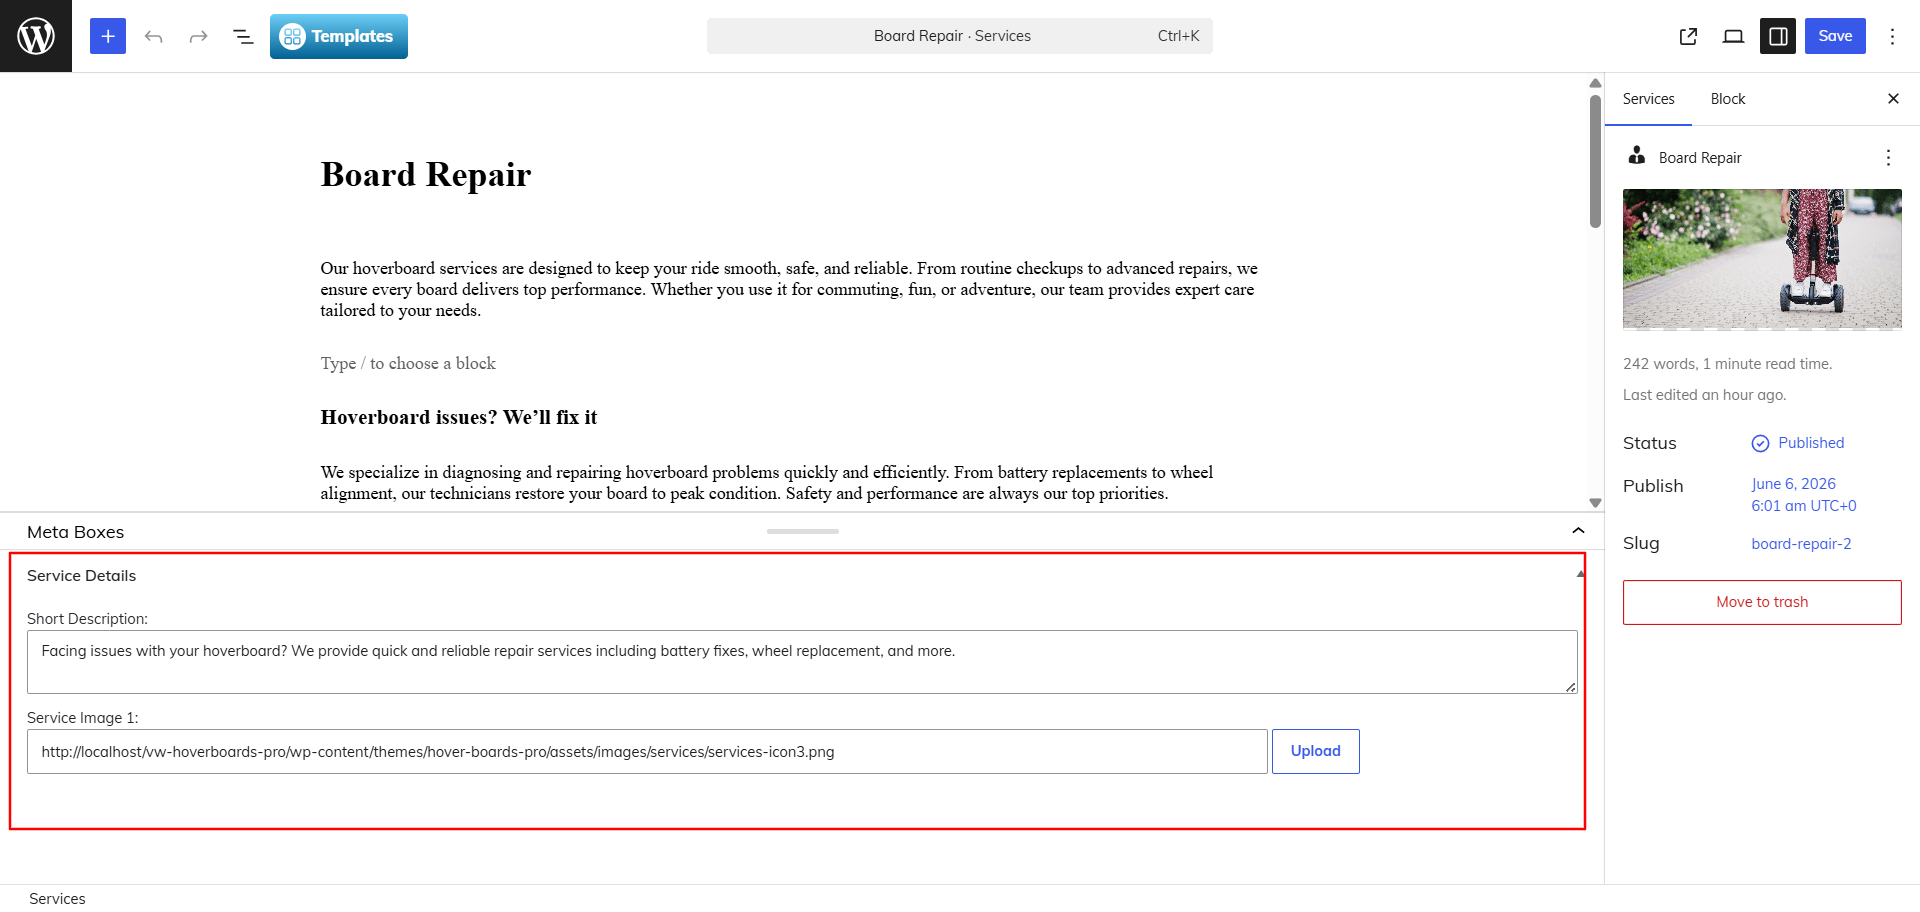
The Services section is powered by a custom post type. Each service entry can include a title, short description, and an icon image, all managed through meta fields.
- Go to Appearance → Customize → Theme Settings → Services.
- Update the section heading, description, and adjust how many services you want to display.
- Navigate to Dashboard → Services to manage individual service posts.
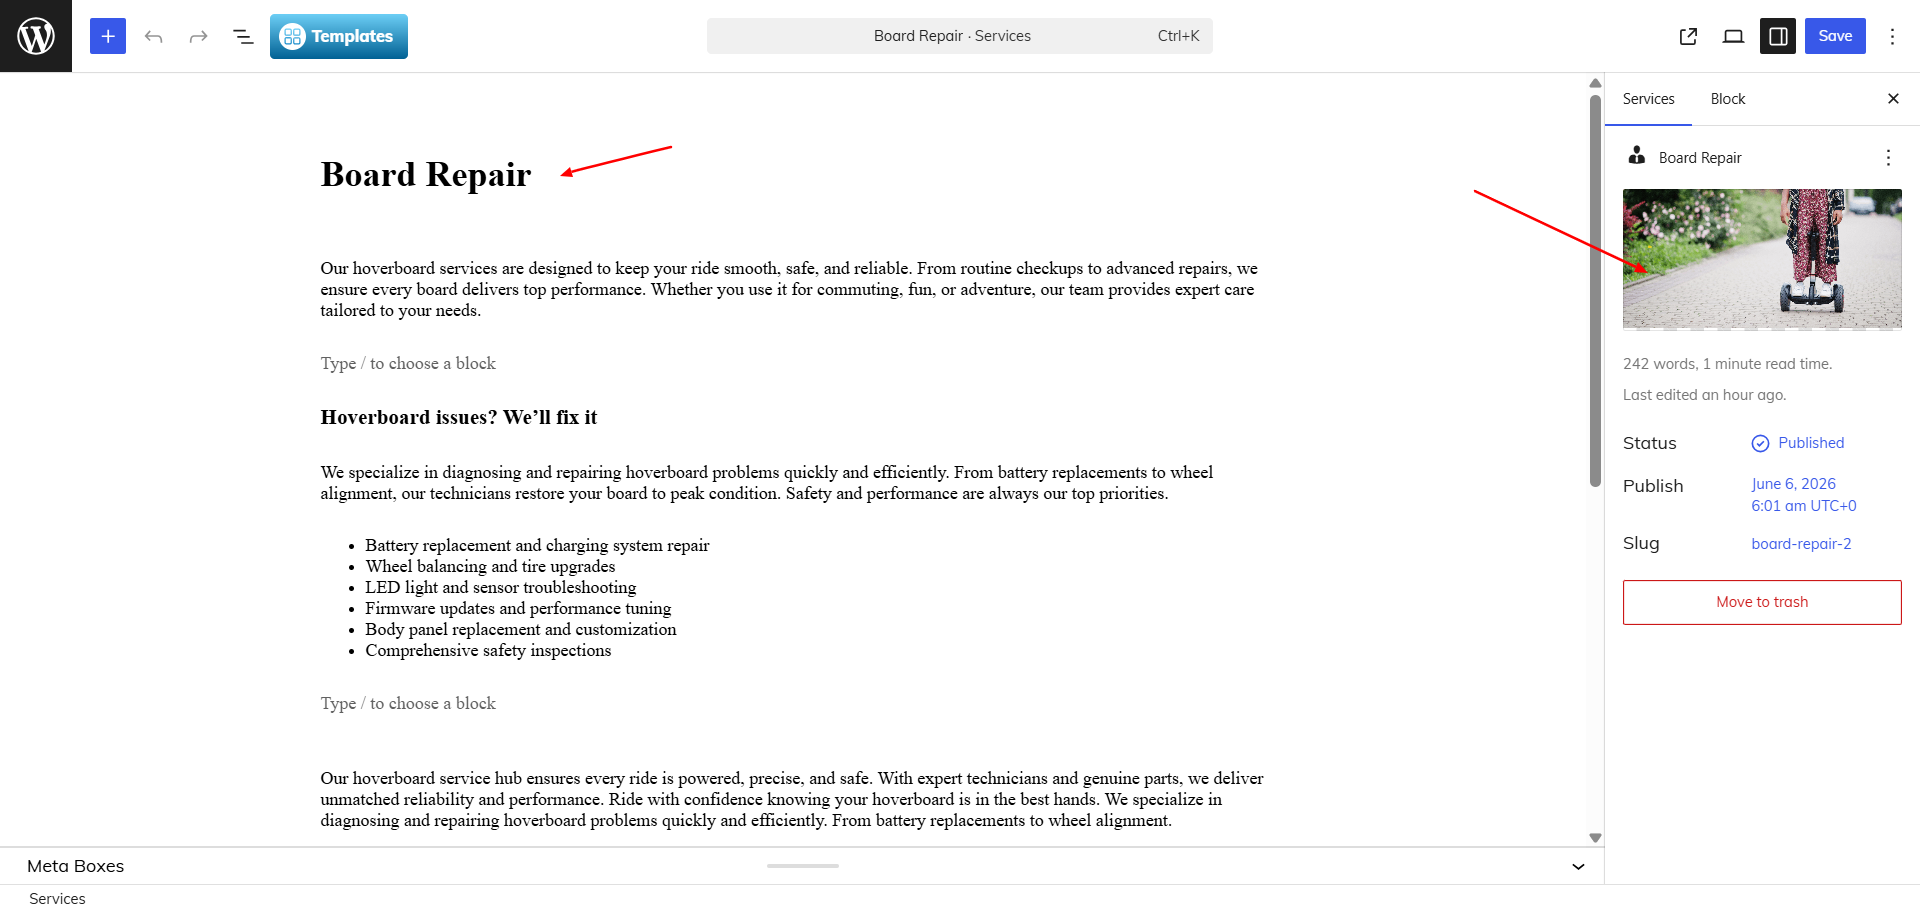
- Edit the demo service posts provided, or click Add New to create your own.
- Fill in the Service Title and Content area with details about the service.
- Use the meta fields to upload an icon image and enter a short text description.
- Publish the service post. Repeat for each service you want to showcase.
Once saved, the Services section will automatically pull content from the custom post type. The icon image and short text are displayed from the meta fields, ensuring a consistent layout across all service boxes.
9.5. Configure Latest Rides
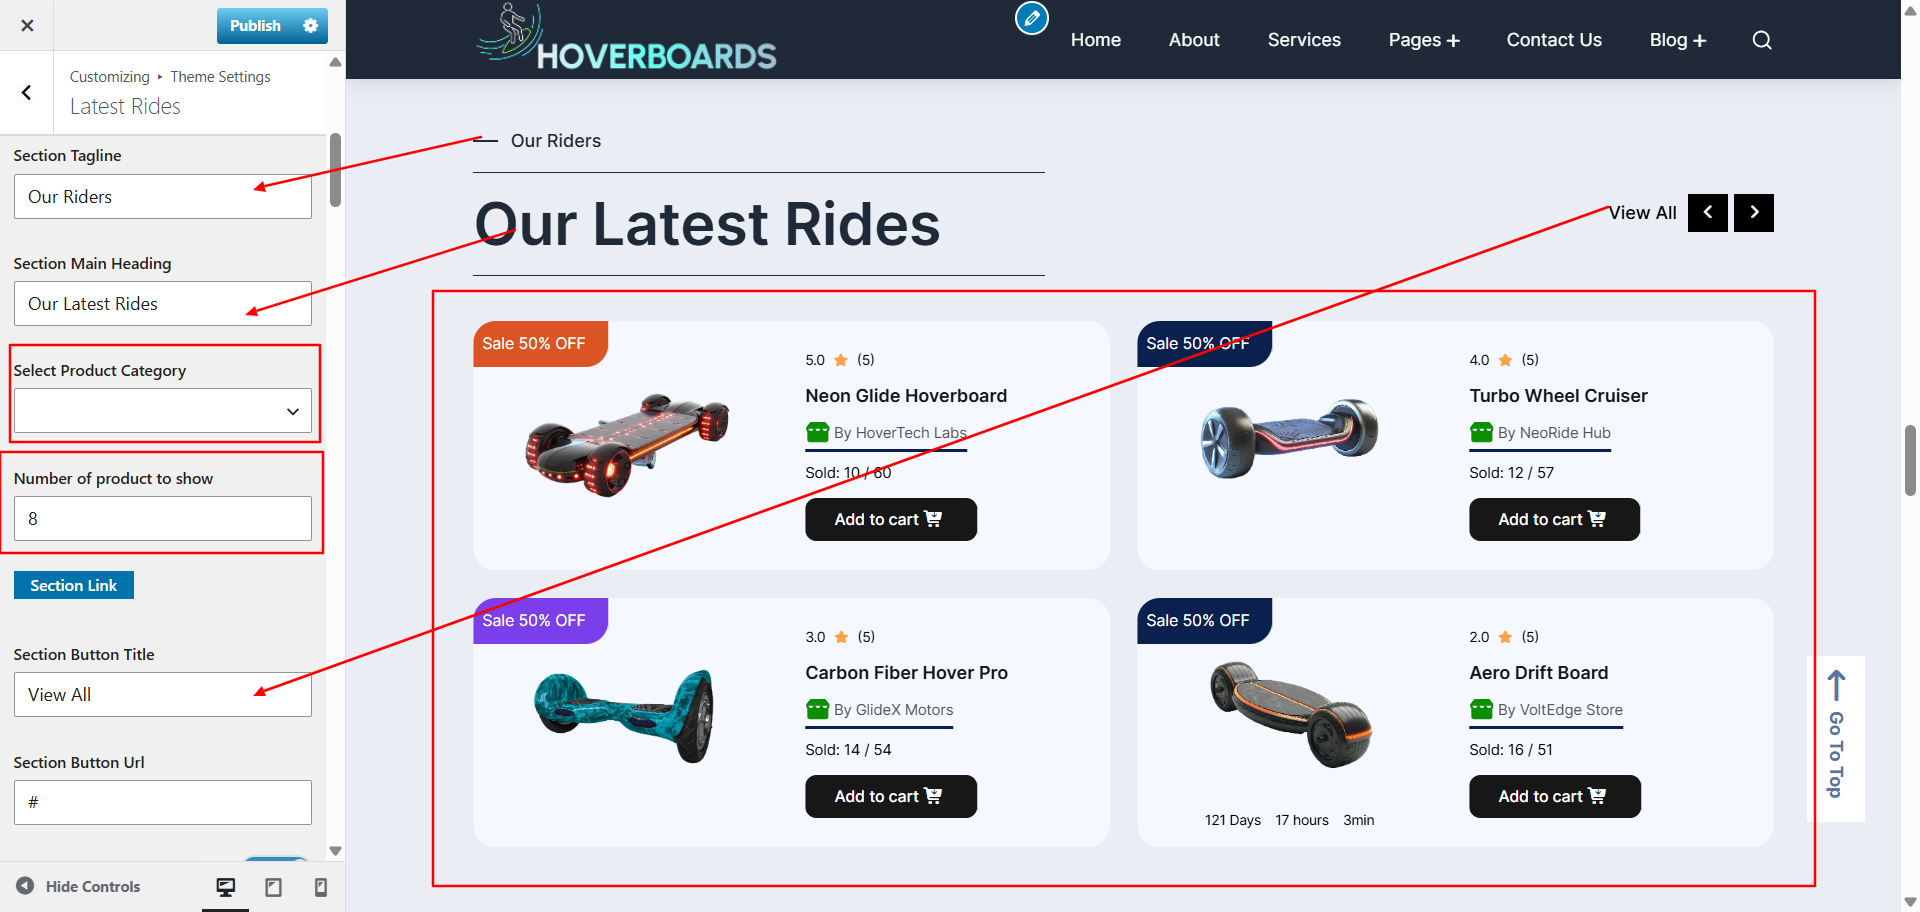
The Latest Rides section allows you to highlight items by category.
- Go to WooCommerce → Products → Add New to create a product.
- Fill in the product details such as Title, Description, Price, and Image.
- On the right panel, select the appropriate Category for the product. Categories must be created beforehand (see Product Categories setup).
- Publish the product.
- Repeat the process for all products you want to display under different tabs.
Navigate to Appearance → Customize → Theme Settings → Product Tabs. Here you can:
- Choose which categories products should be displayed.
- Adjust the number of products shown.
9.9. Configure Testimonials Section
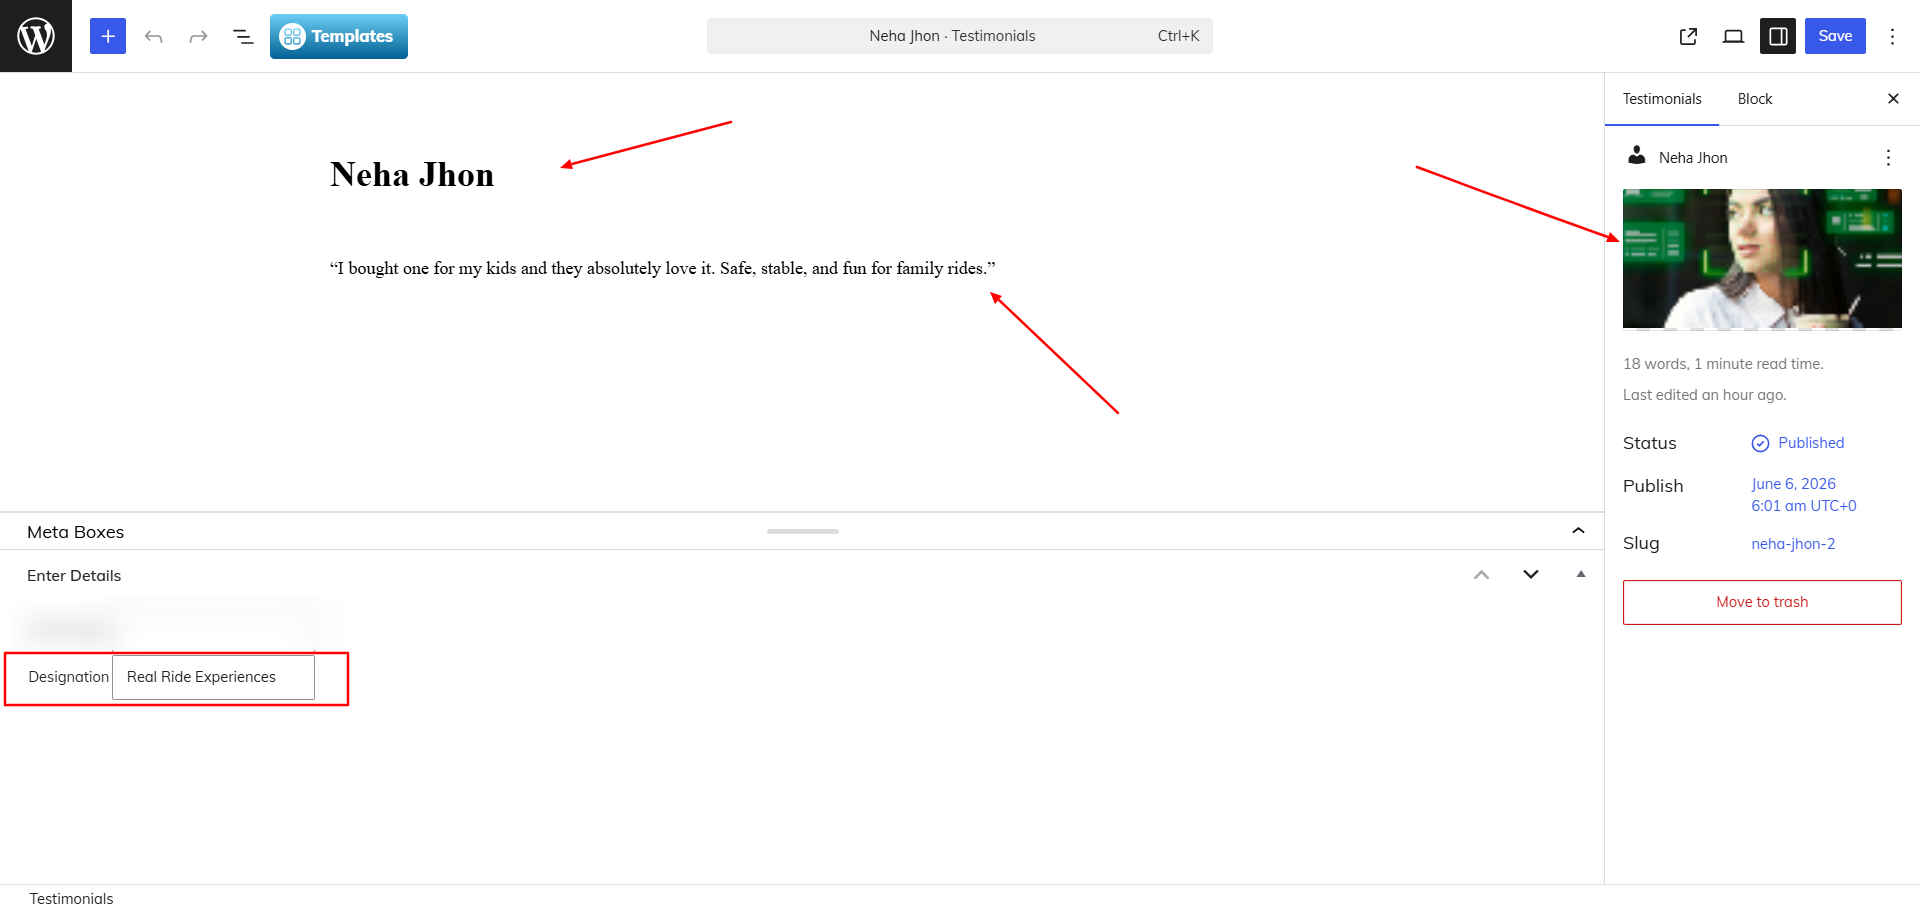
The Testimonials section is designed to showcase customer feedback or user experiences. Content for this section is managed through a custom post type, making it easy to add, edit, and organize testimonials.
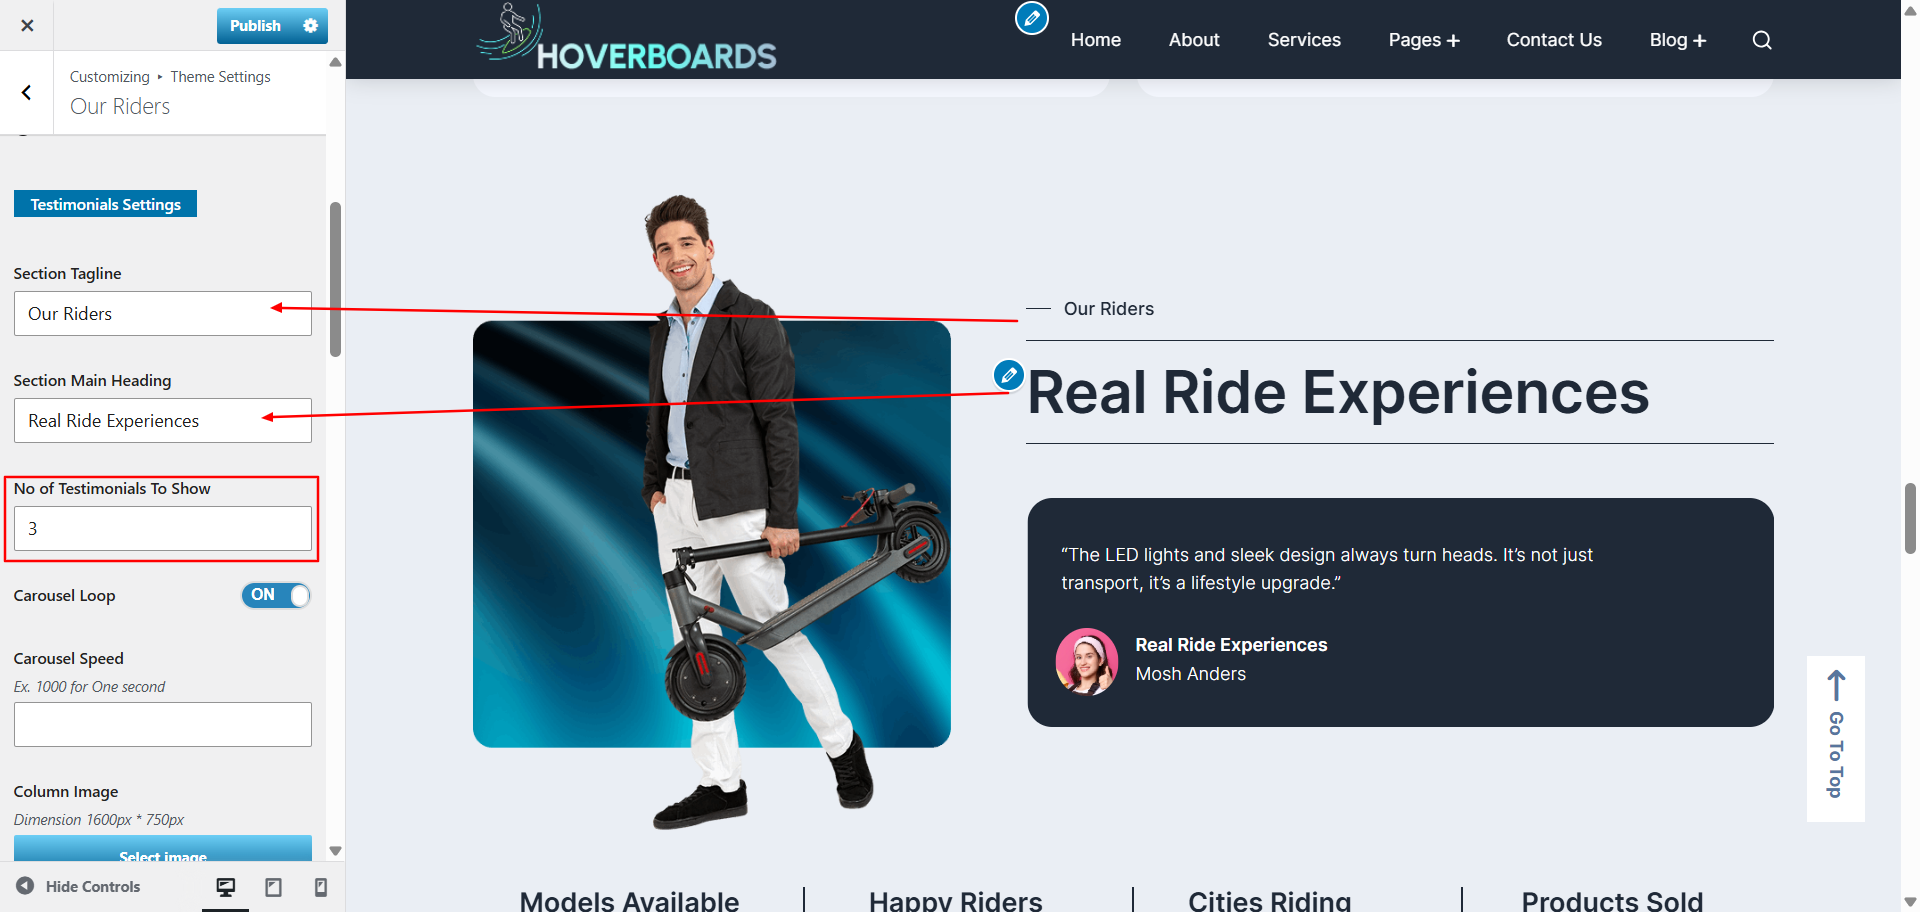
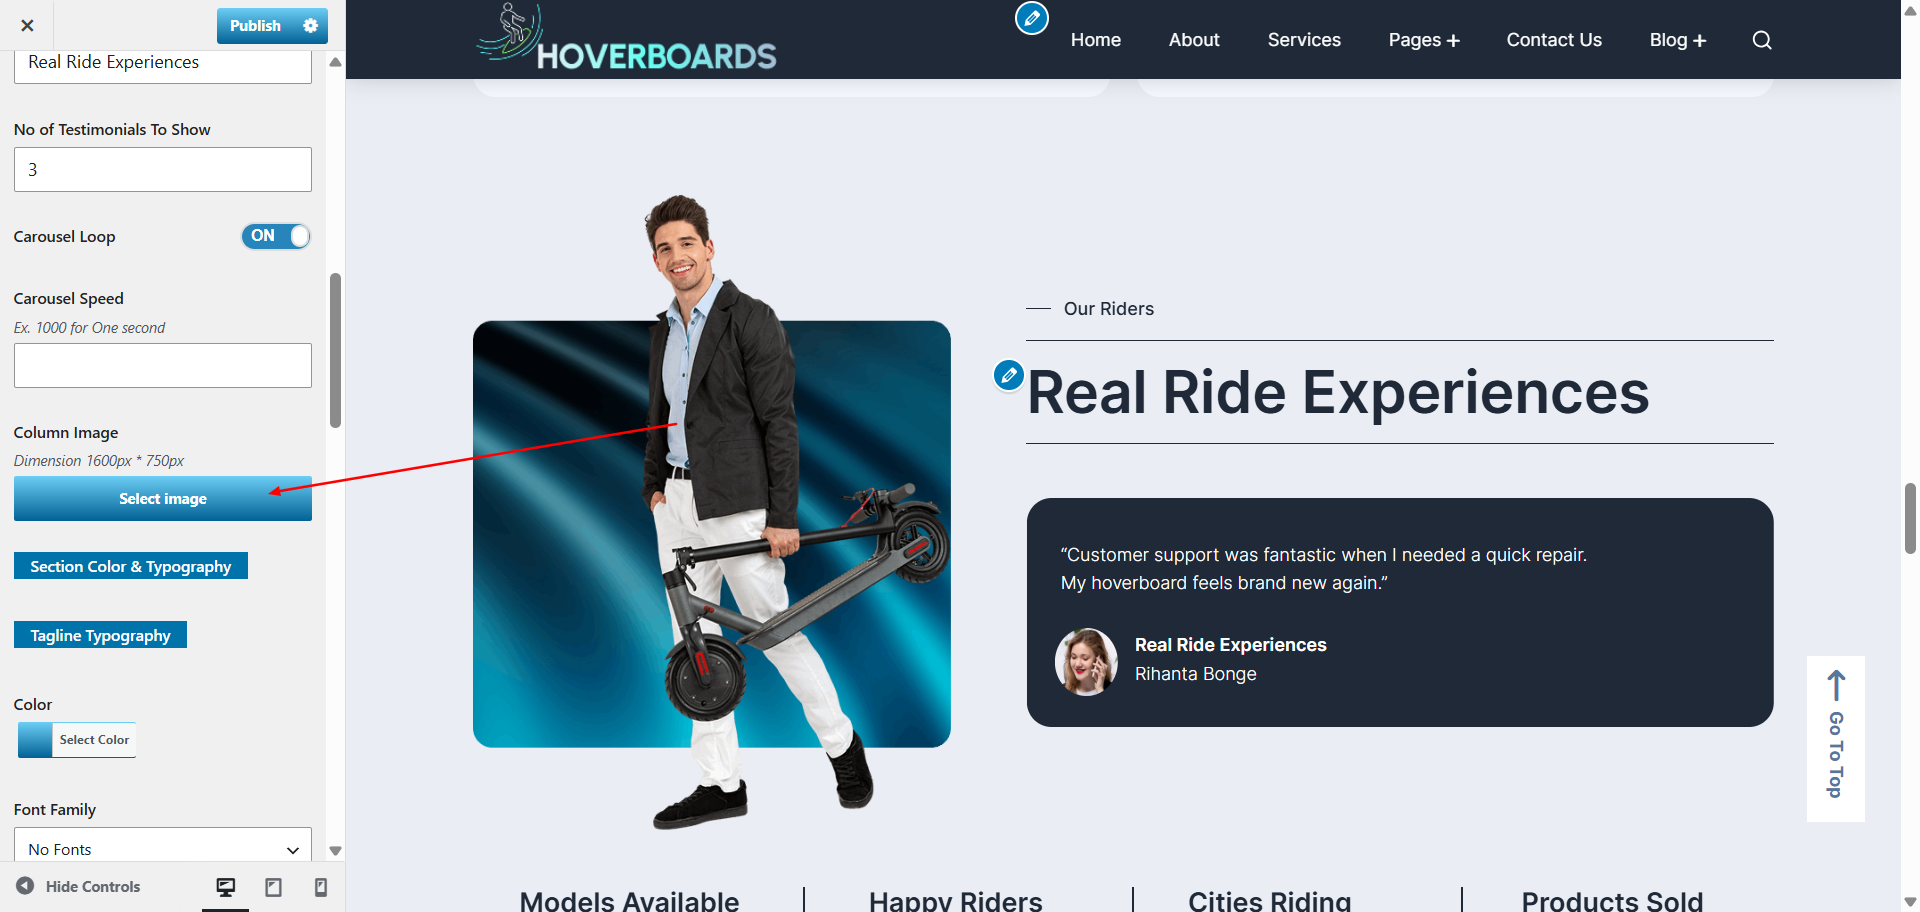
- Go to Appearance → Customize → Theme Settings → Testimonials.
- Update the section heading, description, and adjust how many testimonials you want to display.
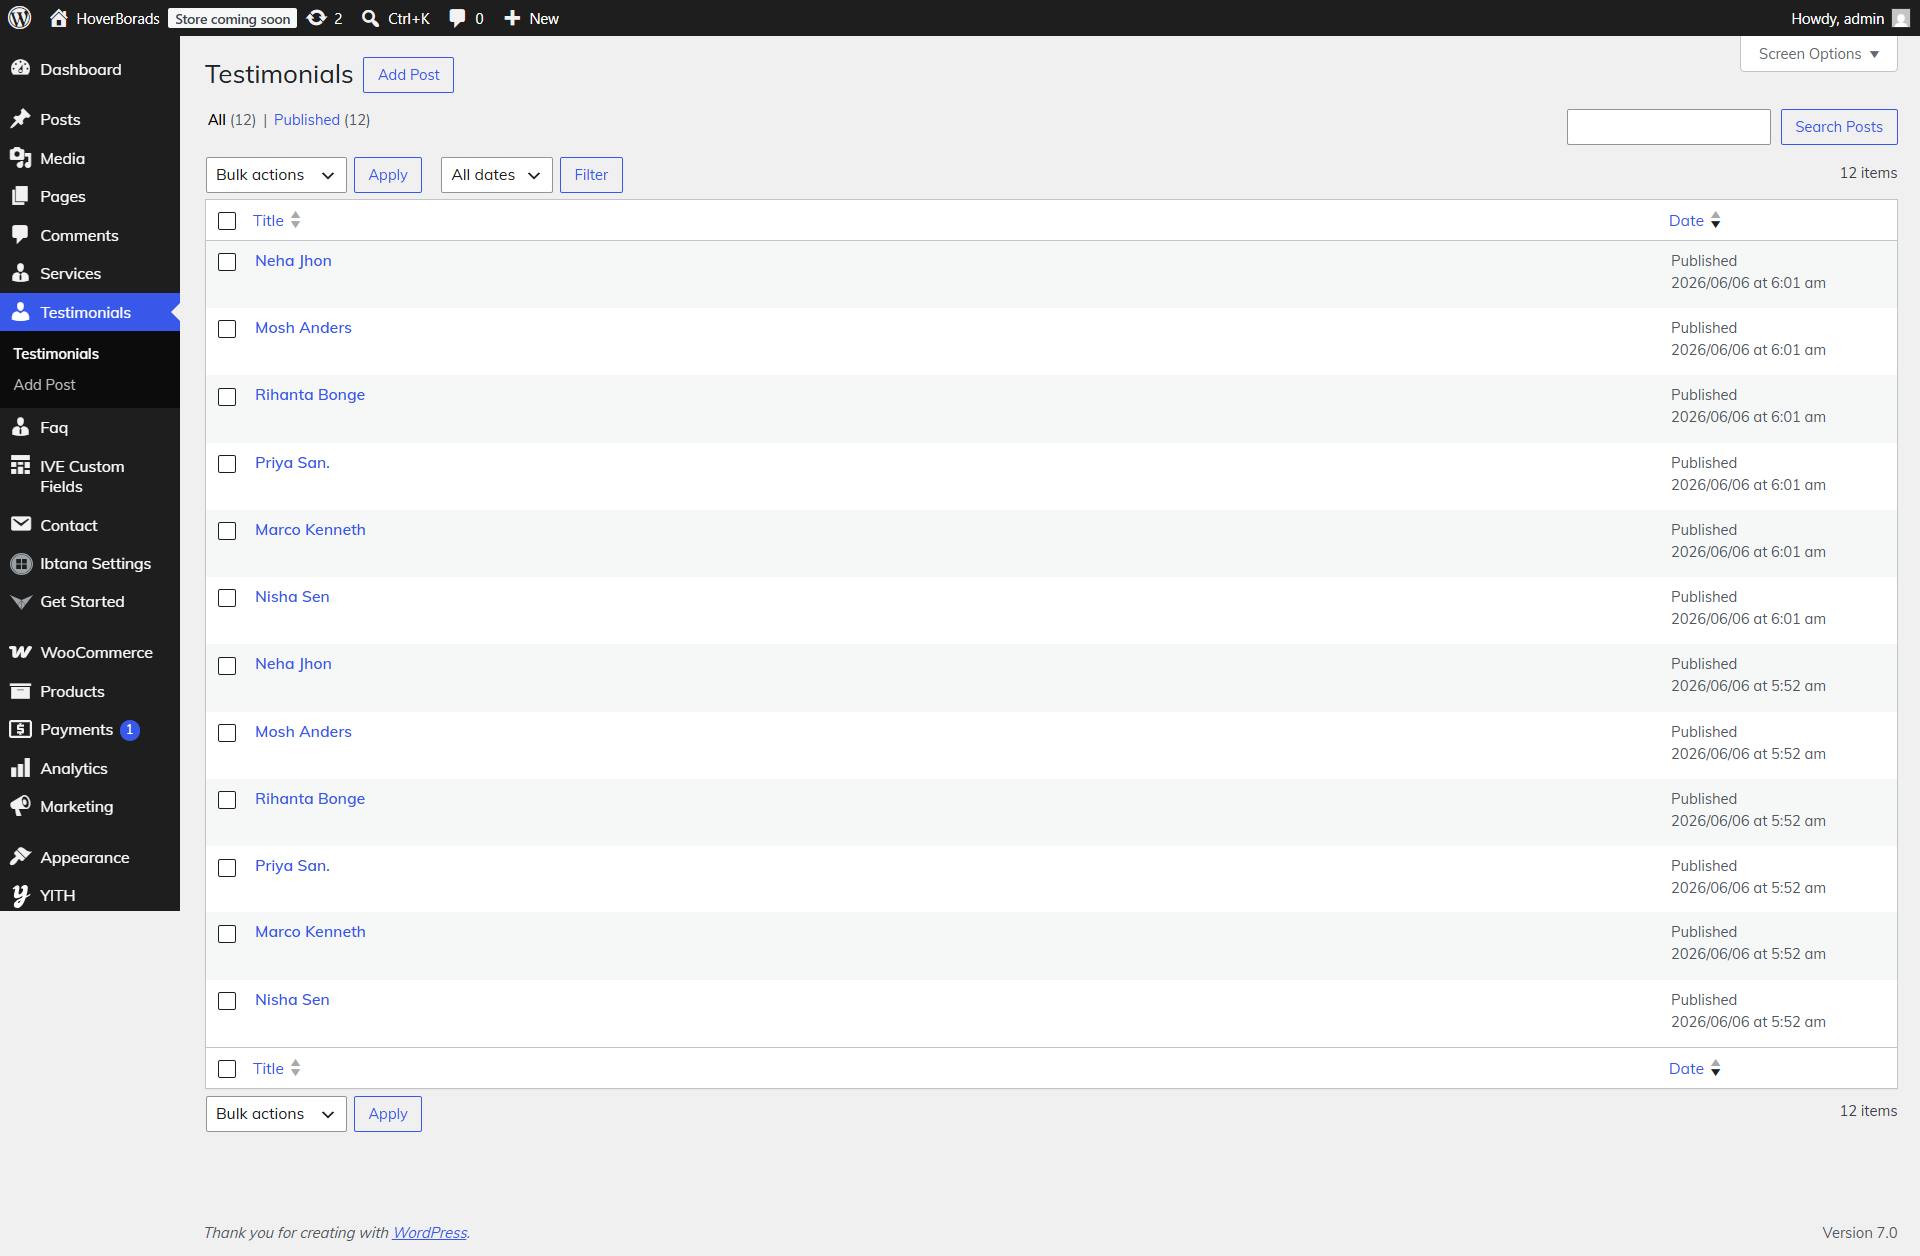
- Navigate to Dashboard → Testimonials to manage individual testimonial posts.
- Edit the demo testimonial posts provided, or click Add New to create your own.
- Fill in the Testimonial Title (usually the customer’s name or company).
- Add the Testimonial Content in the editor — this is the feedback text.
- Use the meta fields to include extra details such as designation, star rating, or social profile links.
- Upload a Featured Image if you want to display the customer’s photo or logo.
- Publish the testimonial. Repeat for each testimonial you want to showcase.
Once saved, the Testimonials section will automatically pull content from the custom post type. Meta fields provide structured data like ratings and icons, ensuring a consistent and professional layout across all testimonial entries.
9.10. Configure Records Section
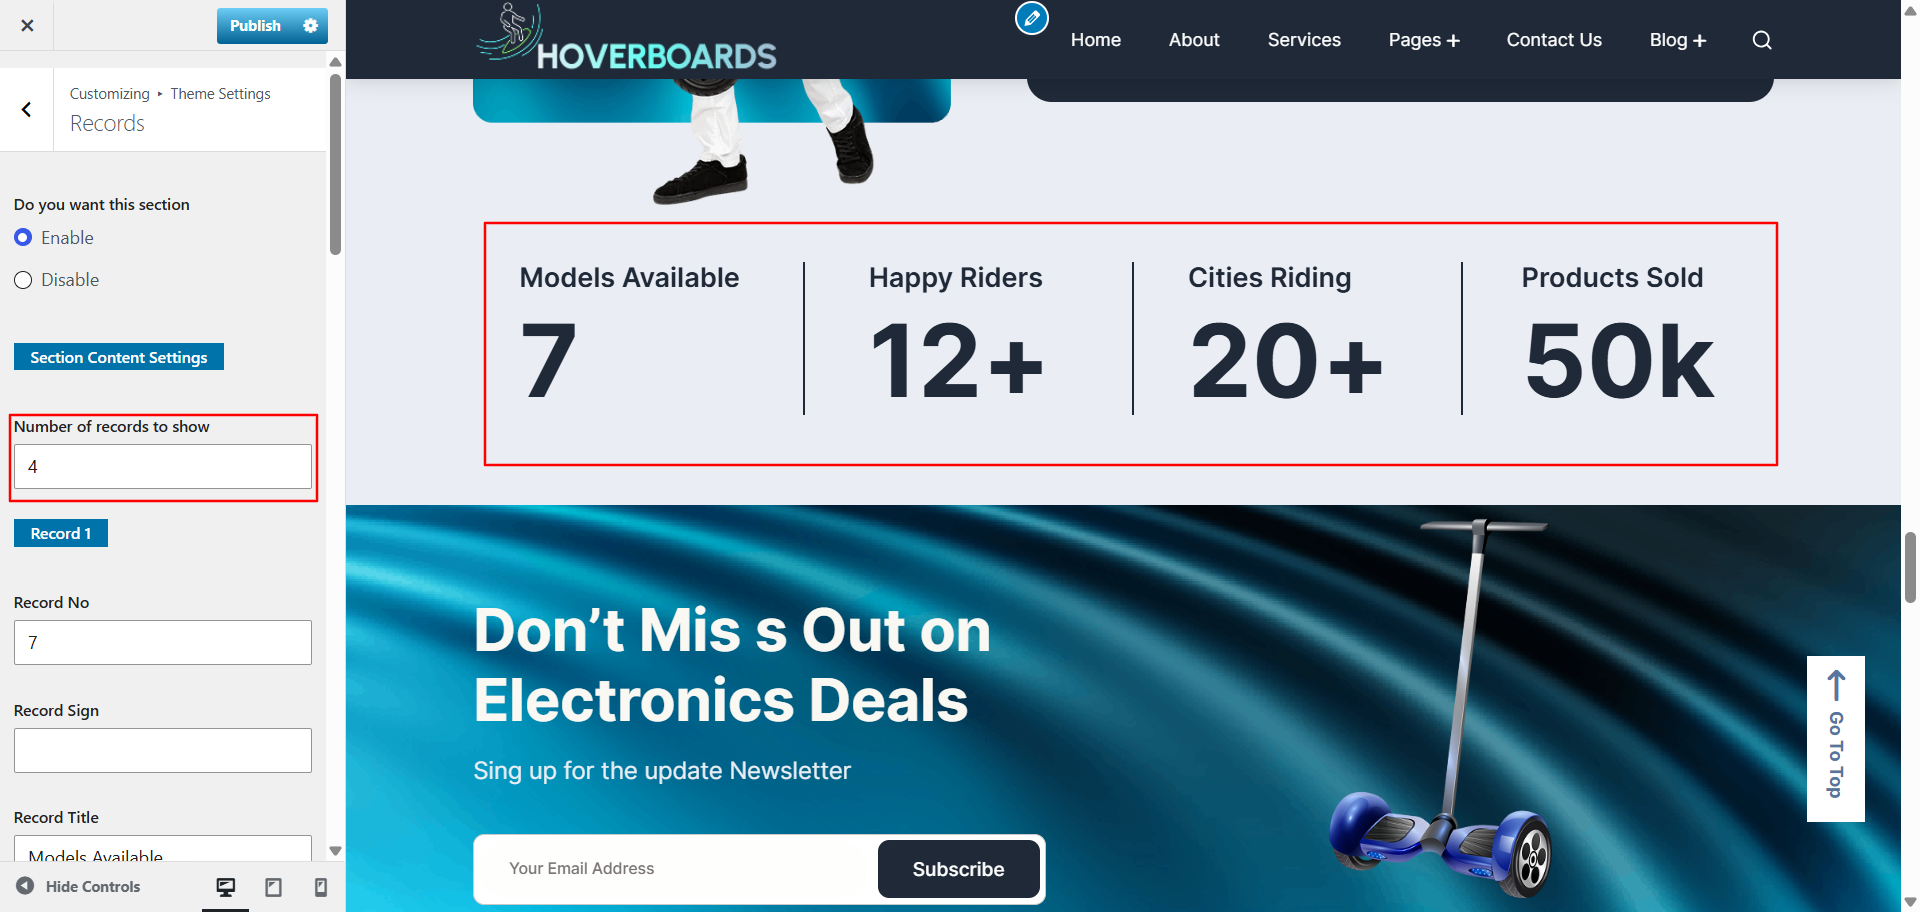
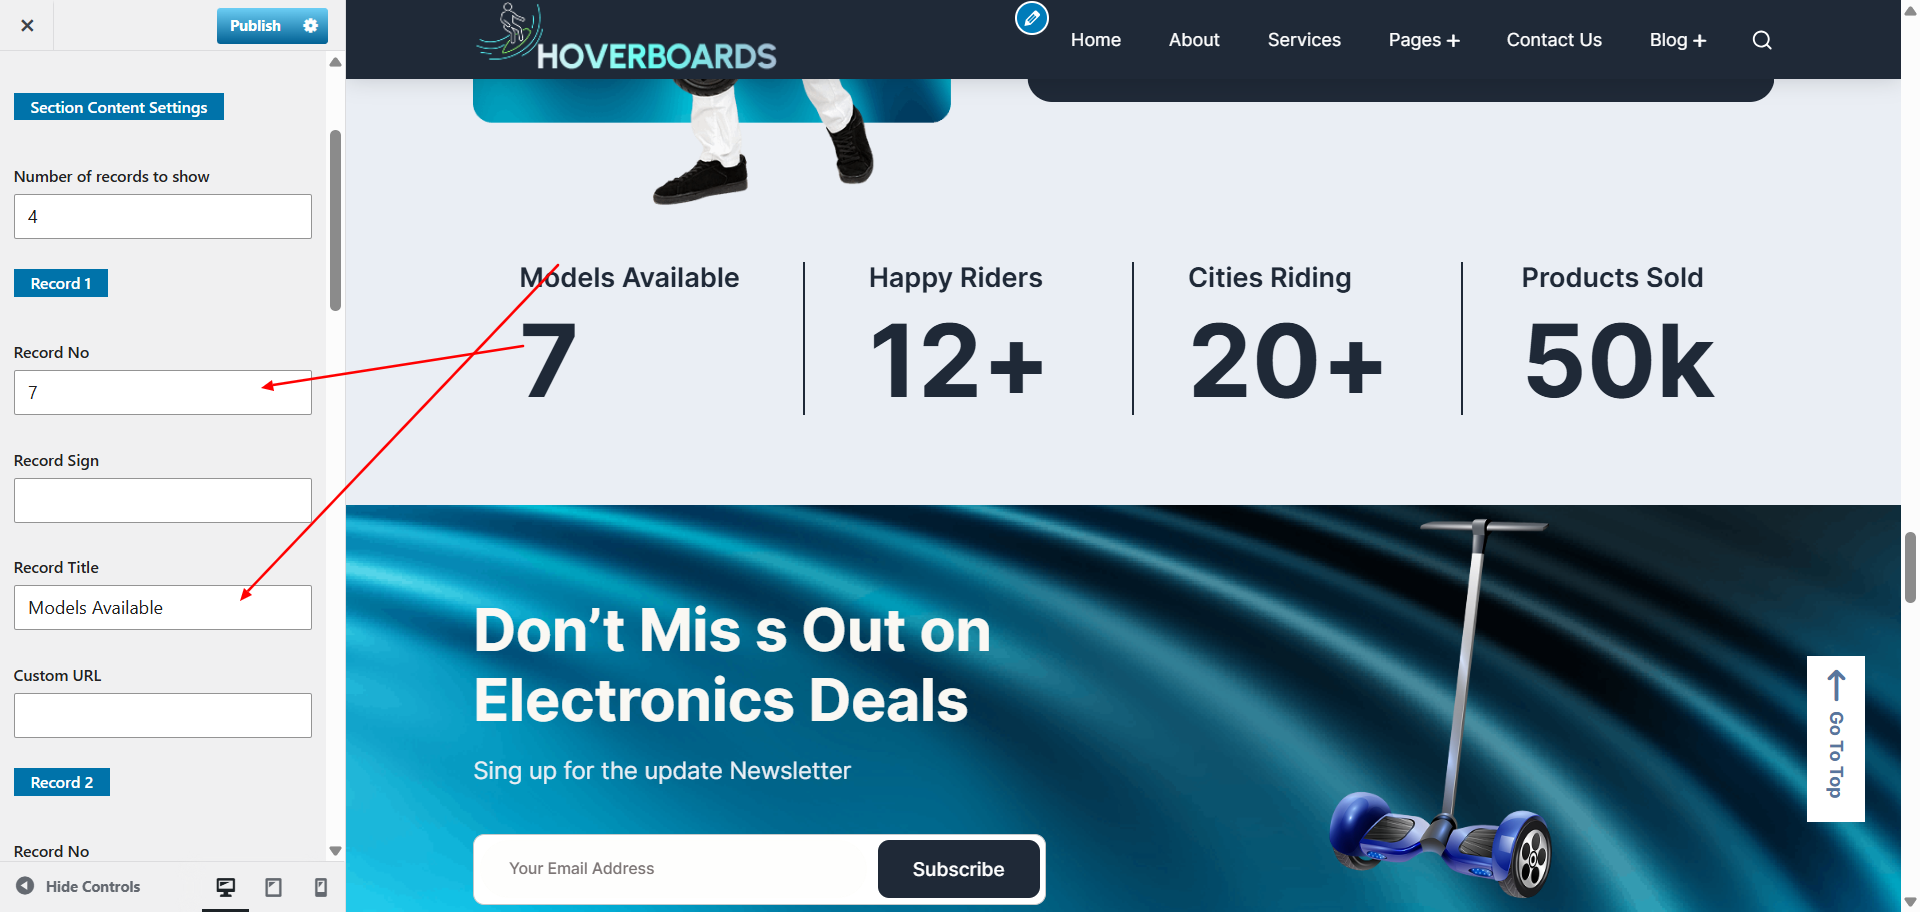
The Records section is used to display key statistics, milestones, or achievements in a visually appealing block layout. Each record can include a number, title, and short description.
- Go to Appearance → Customize → Theme Settings → Records.
- Update the section heading and description to match your content.
- Choose how many record blocks you want to display — you can increase or decrease the count as needed.
- For each record block, enter the Title (e.g., “Projects Completed”), the Number/Statistic (e.g., “120+”), and a short Description.
- Save and publish your changes.
Once configured, the Records section will automatically show your chosen statistics in a grid or block format, helping visitors quickly understand your achievements.
9.11. Configure Newsletter Section
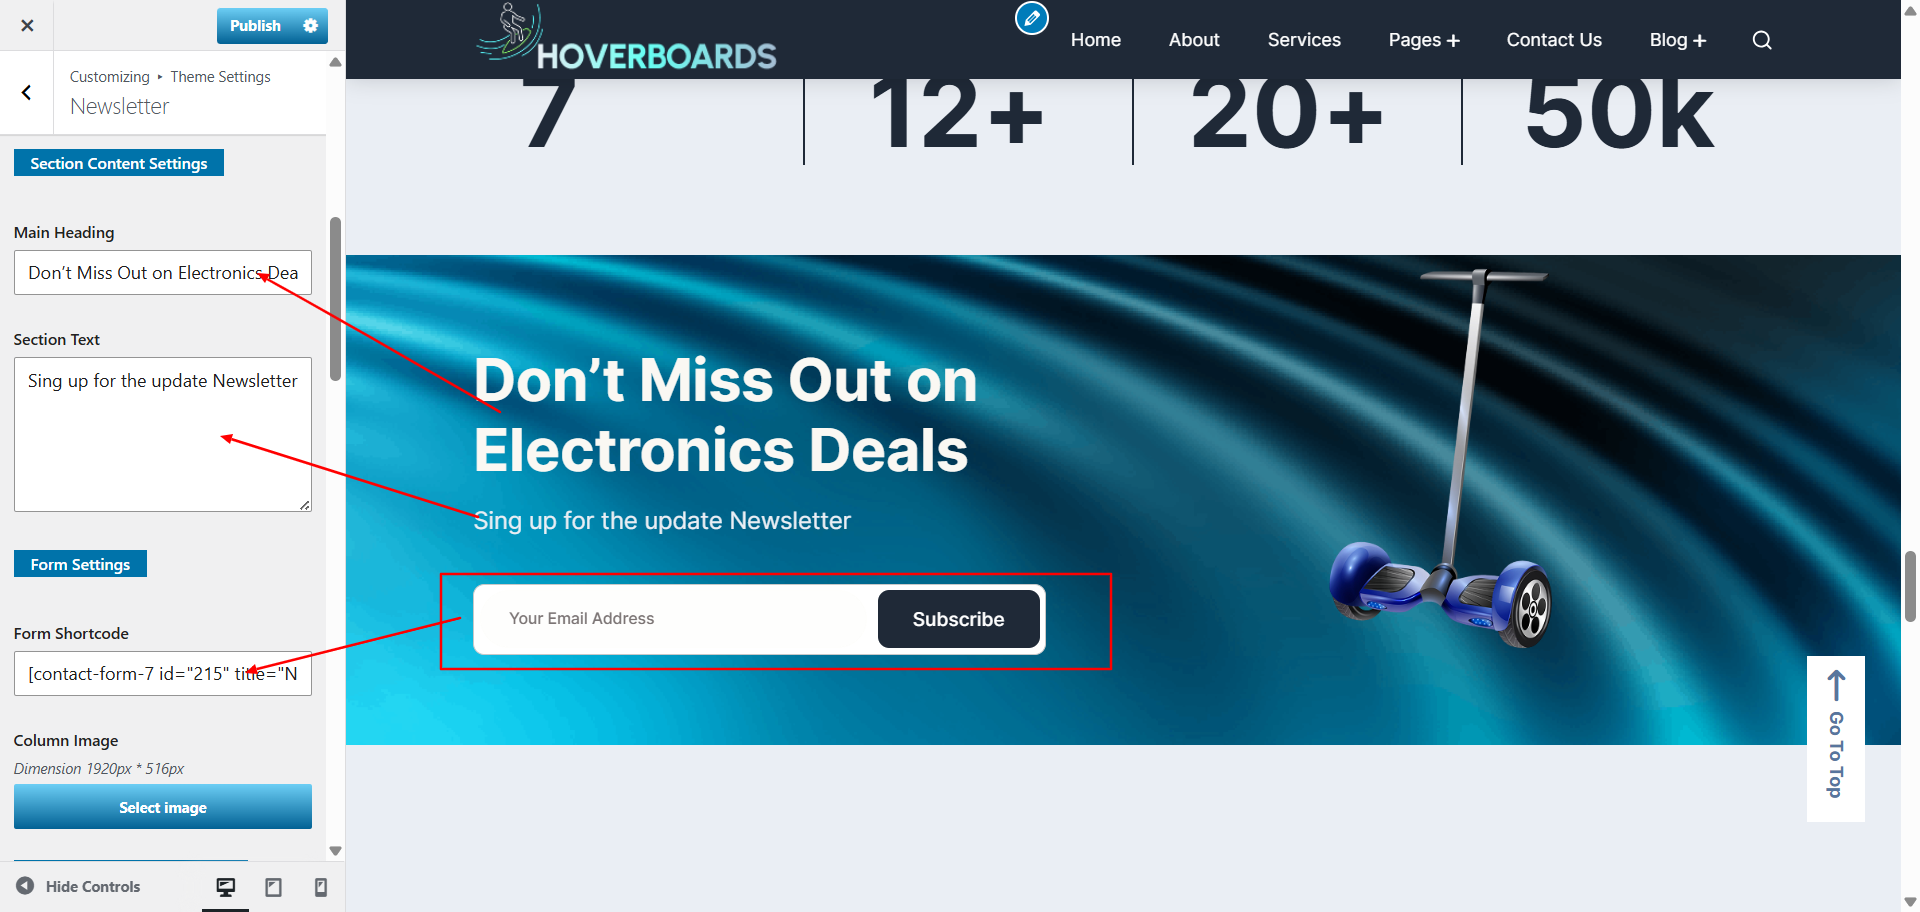
The Newsletter section allows visitors to subscribe to updates directly from your site. This section is powered by Contact Form 7, making it flexible and easy to customize.
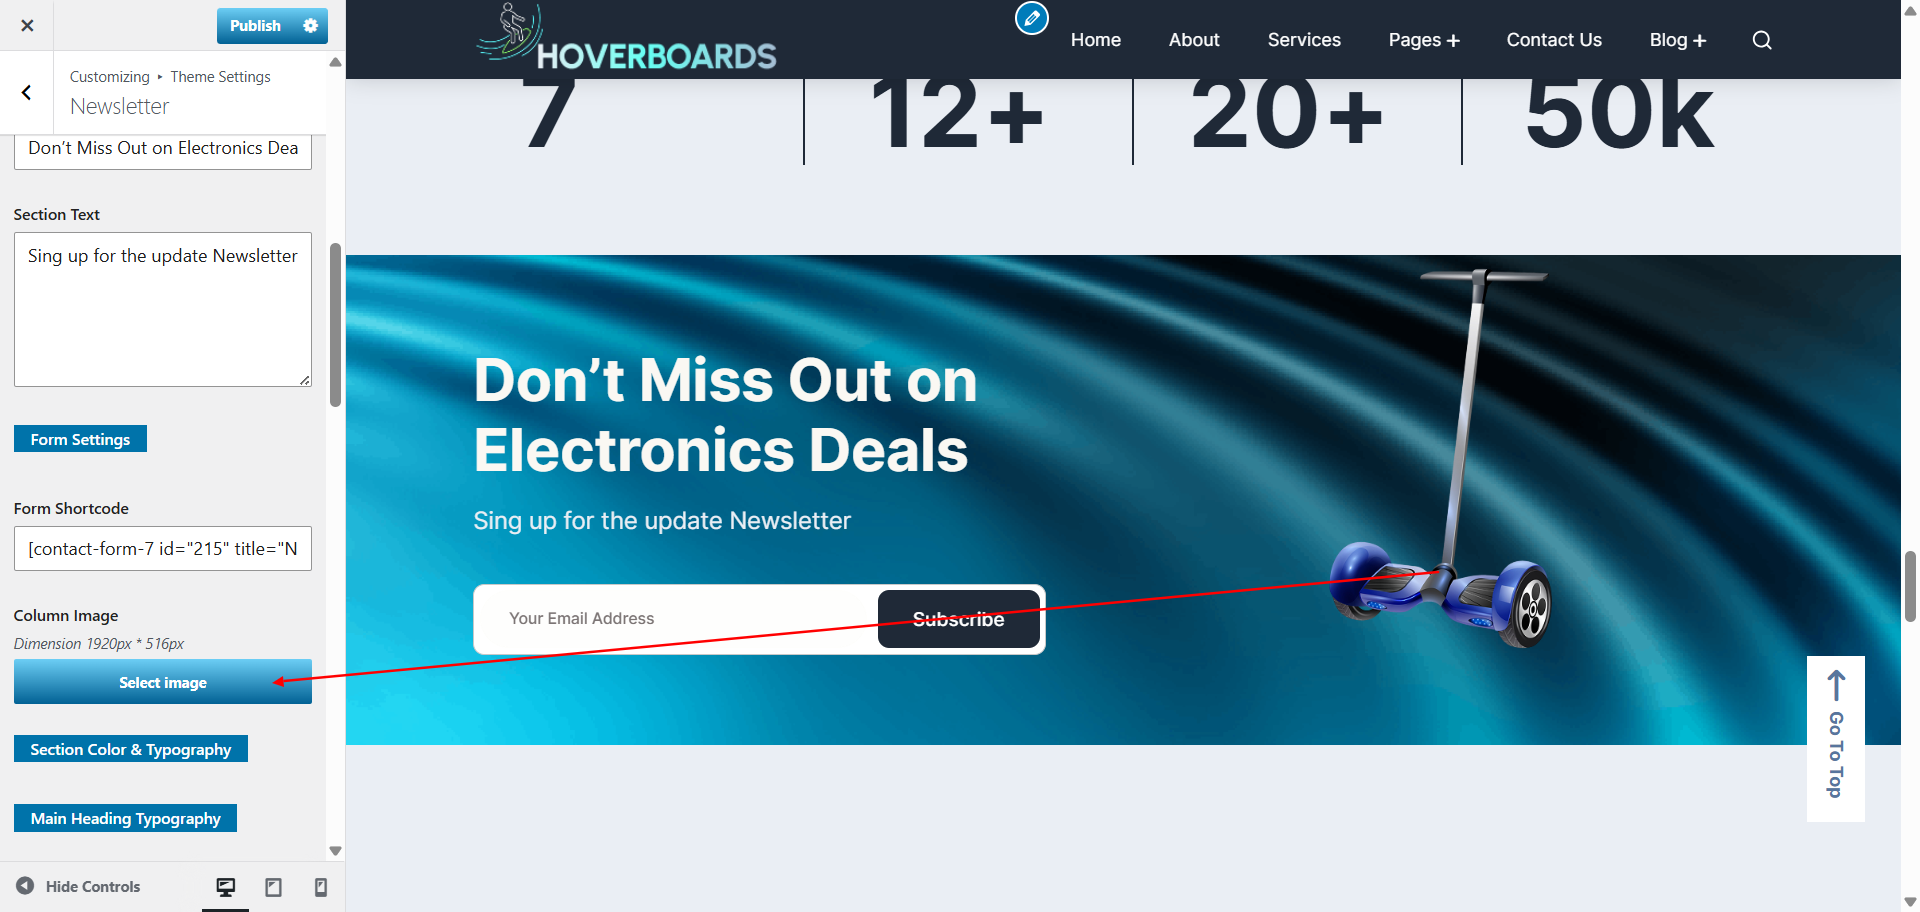
- Go to Appearance → Customize → Theme Settings → Newsletter.
- Update the section heading, description, and adjust the layout as needed.
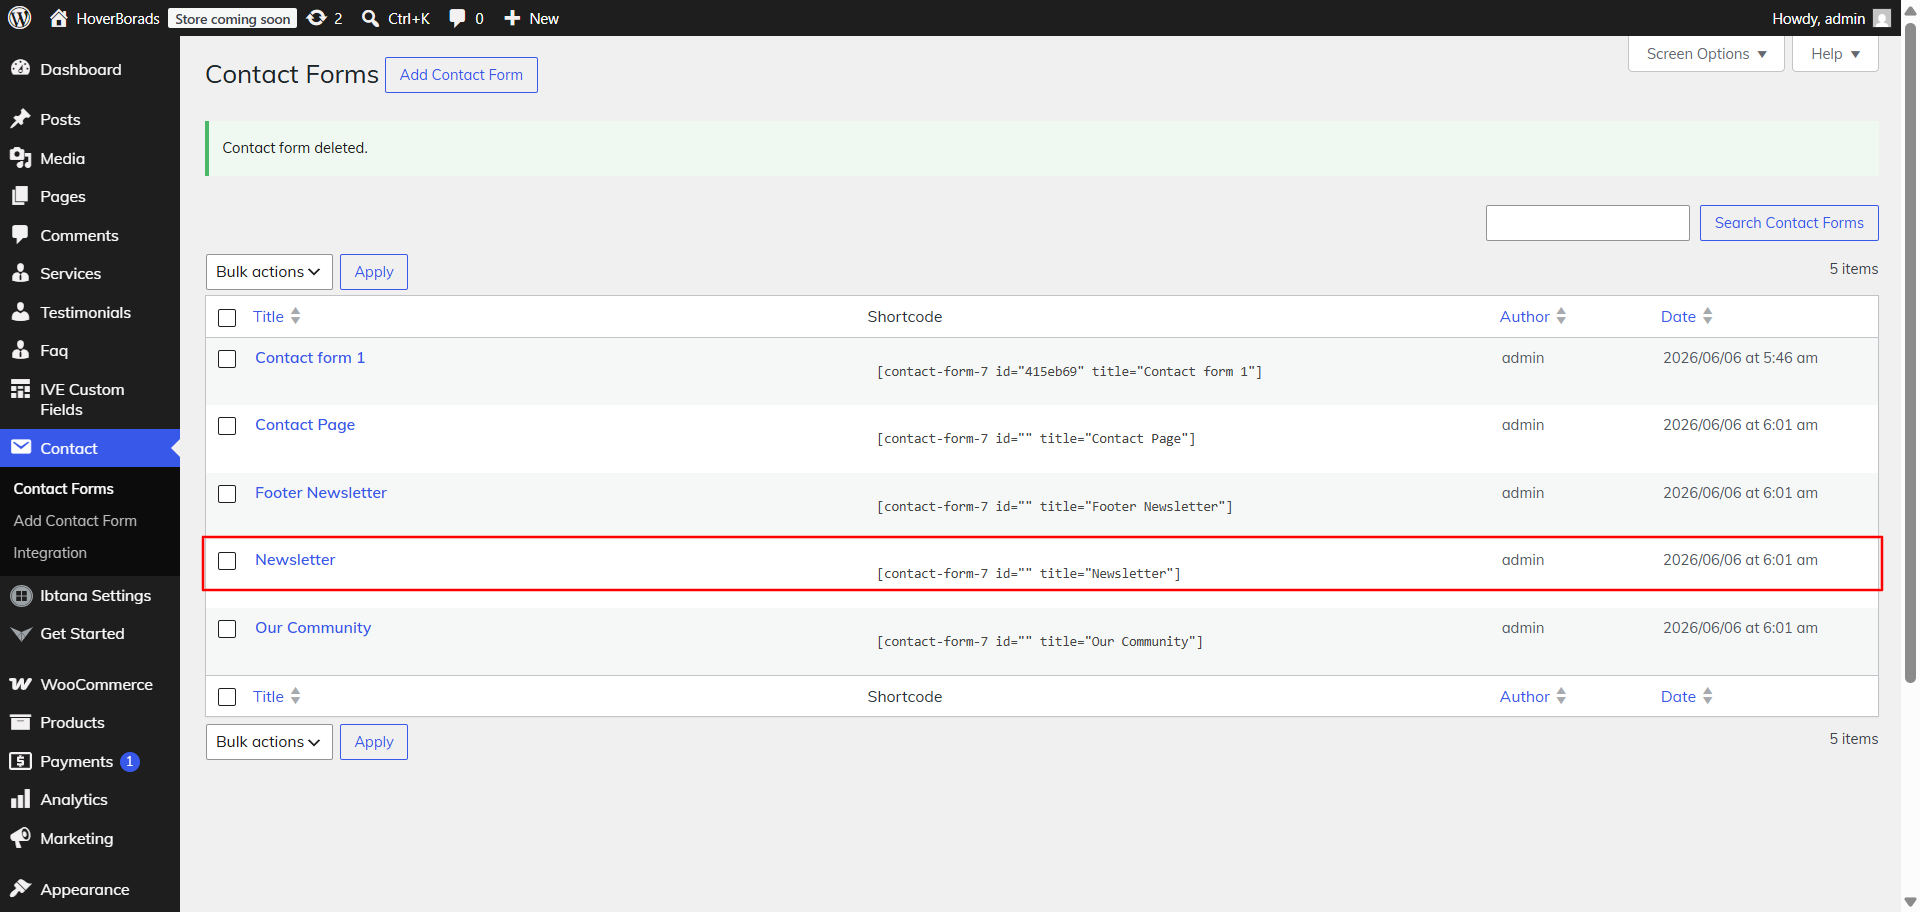
- Navigate to Dashboard → Contact to manage the newsletter form.
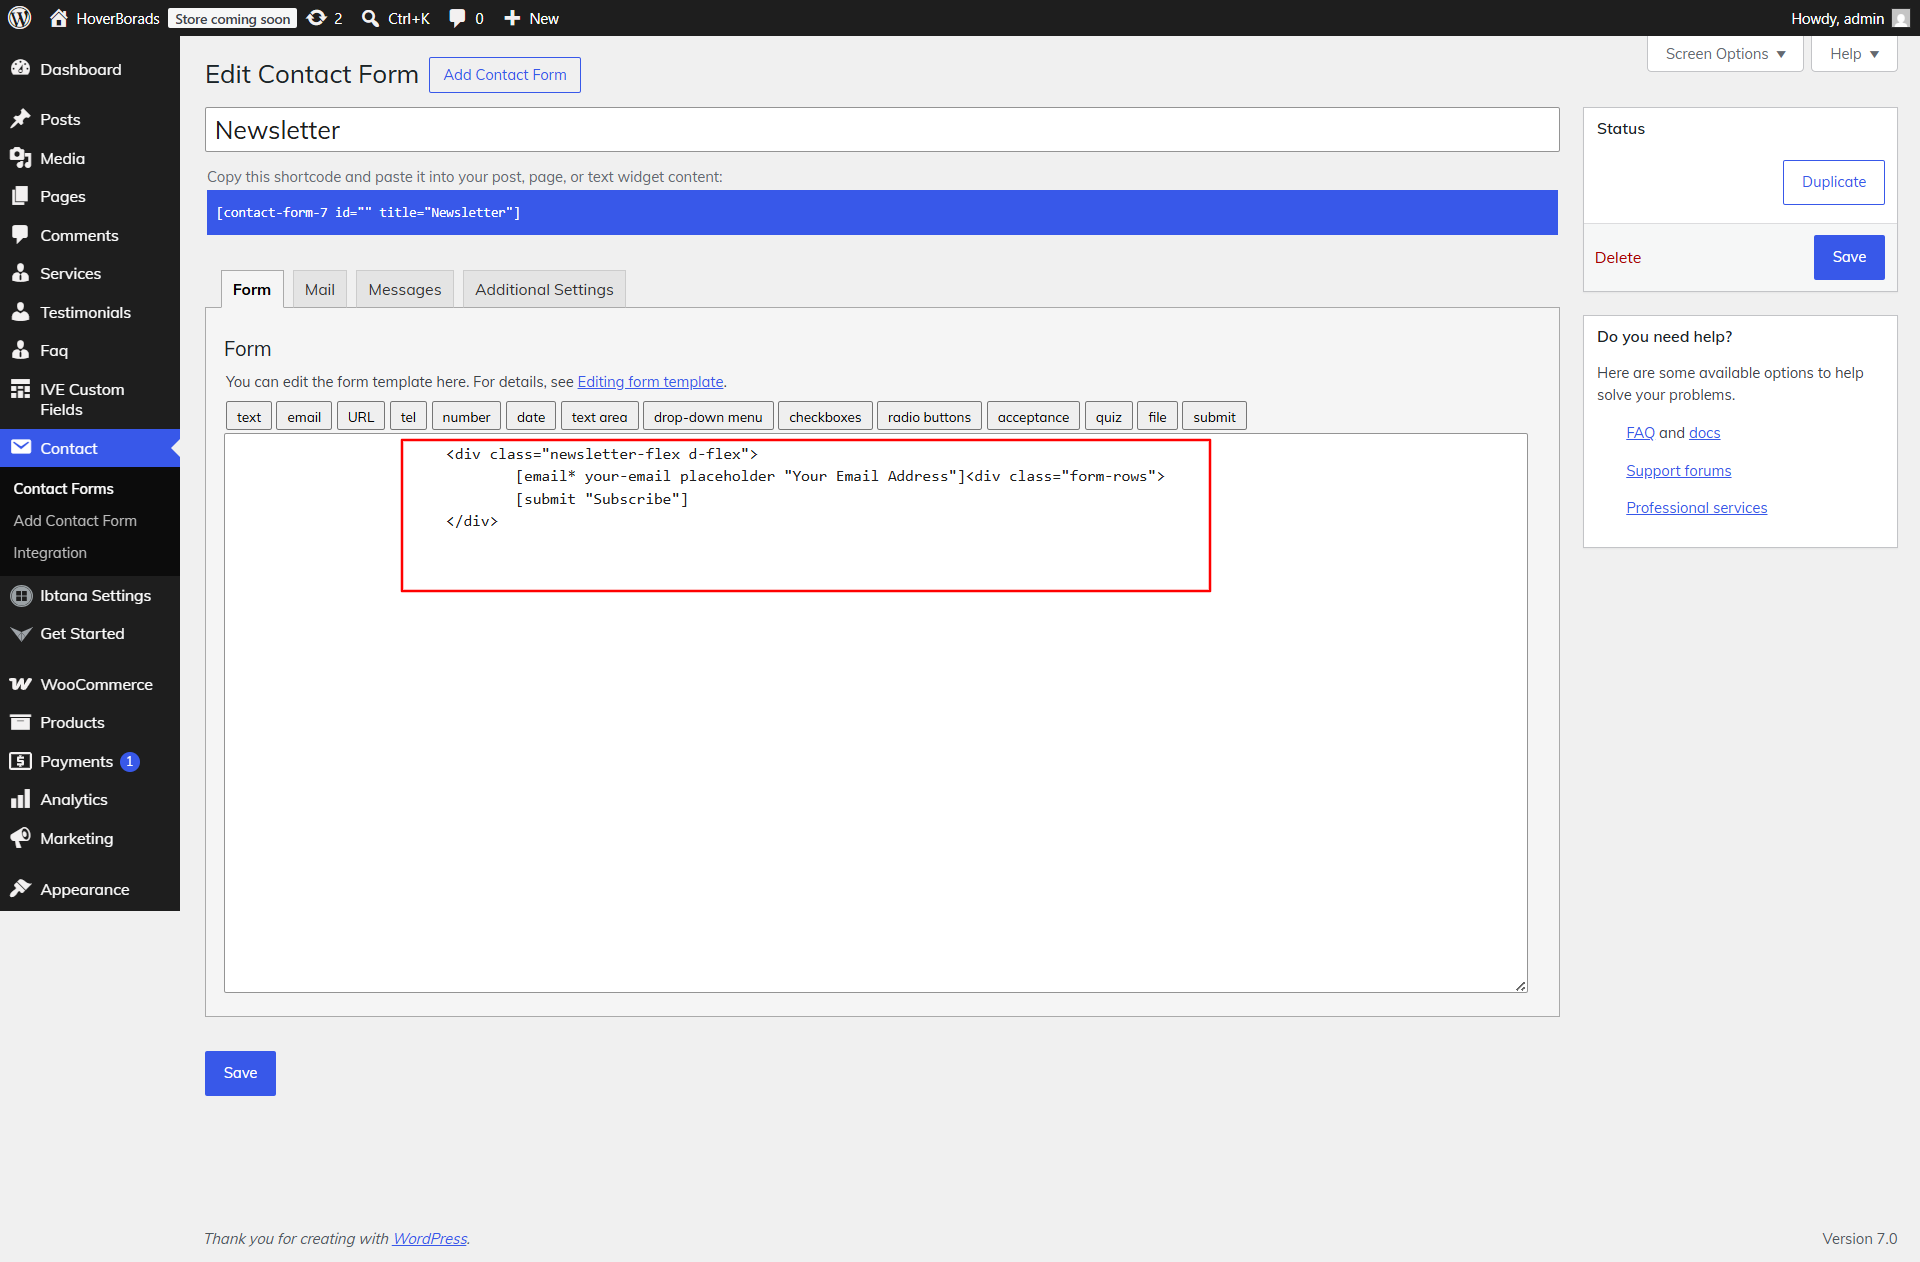
- Edit the demo form provided, or click Add New to create a new newsletter form.
- Include fields such as Email Address (required) and optional fields like
- Save the form and copy its shortcode.
- Return to the Newsletter settings in the Customizer and paste the shortcode into the designated field.
- Publish your changes to activate the newsletter form on the front end.
Once configured, the Newsletter section will display the subscription form created with Contact Form 7. Submissions will be stored and managed through the plugin, allowing you to collect and organize subscriber details easily.
9.12. Configure FAQ Section
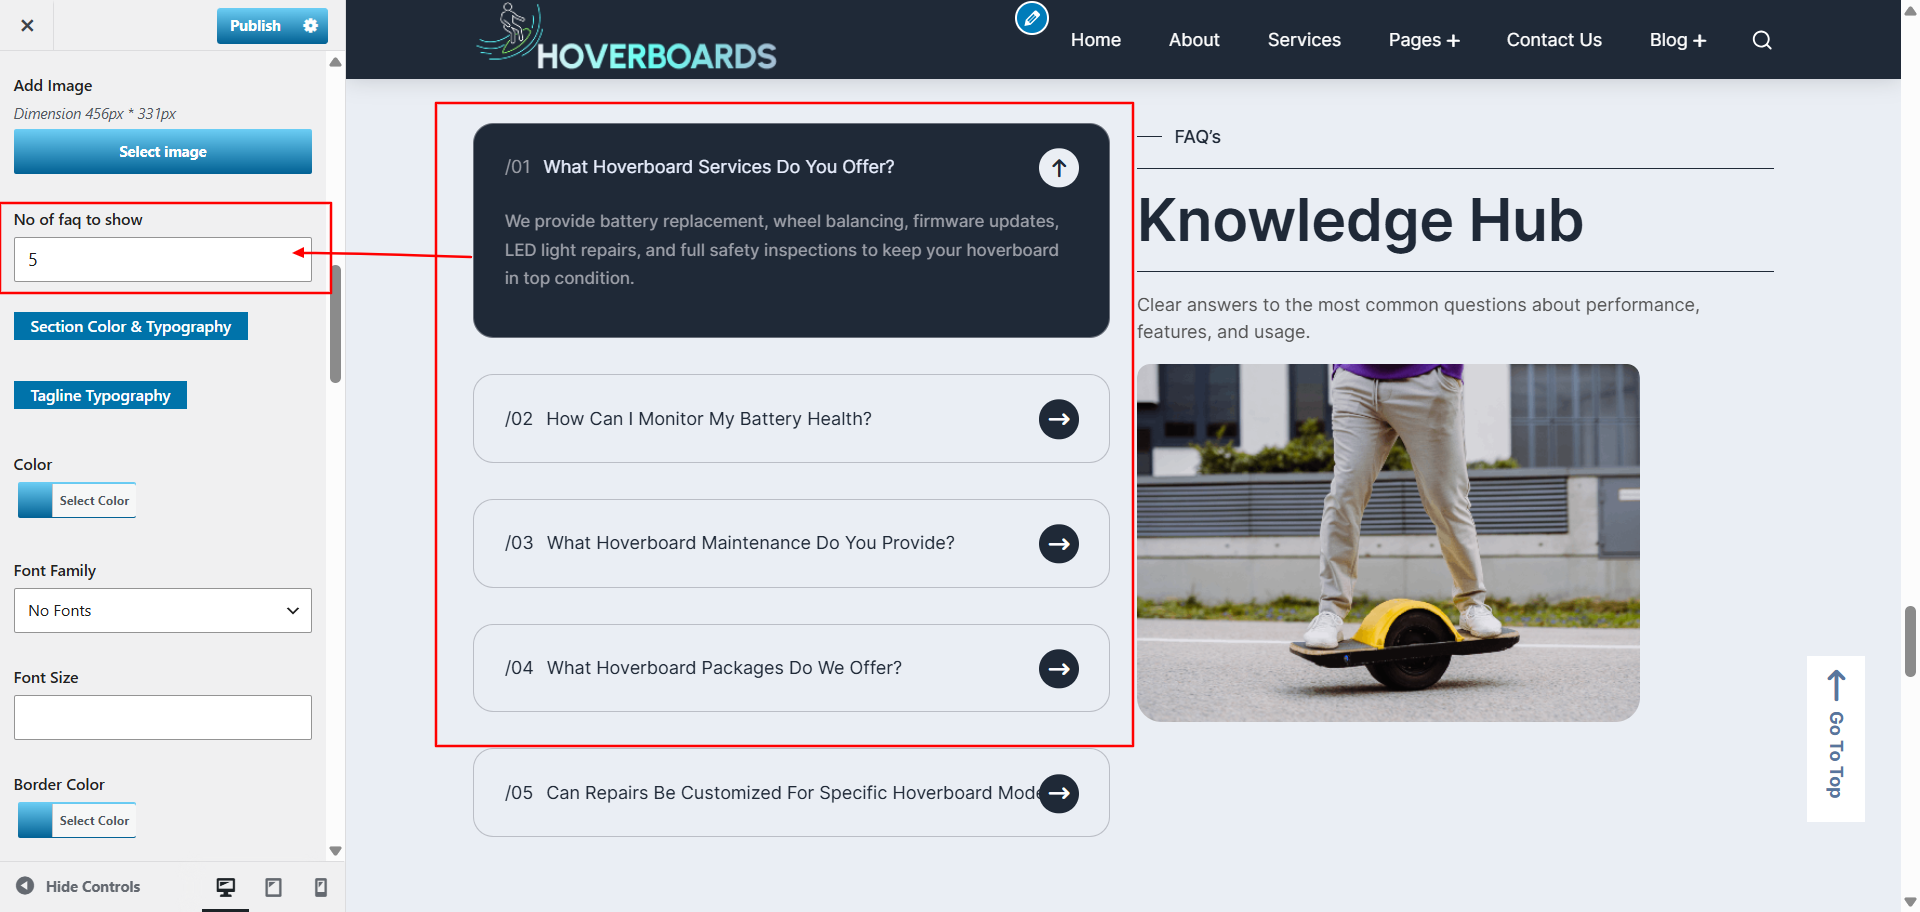
The FAQ (Frequently Asked Questions) section helps you provide quick answers to common queries. This section is powered by a custom post type, allowing you to easily add, edit, and manage FAQ entries.
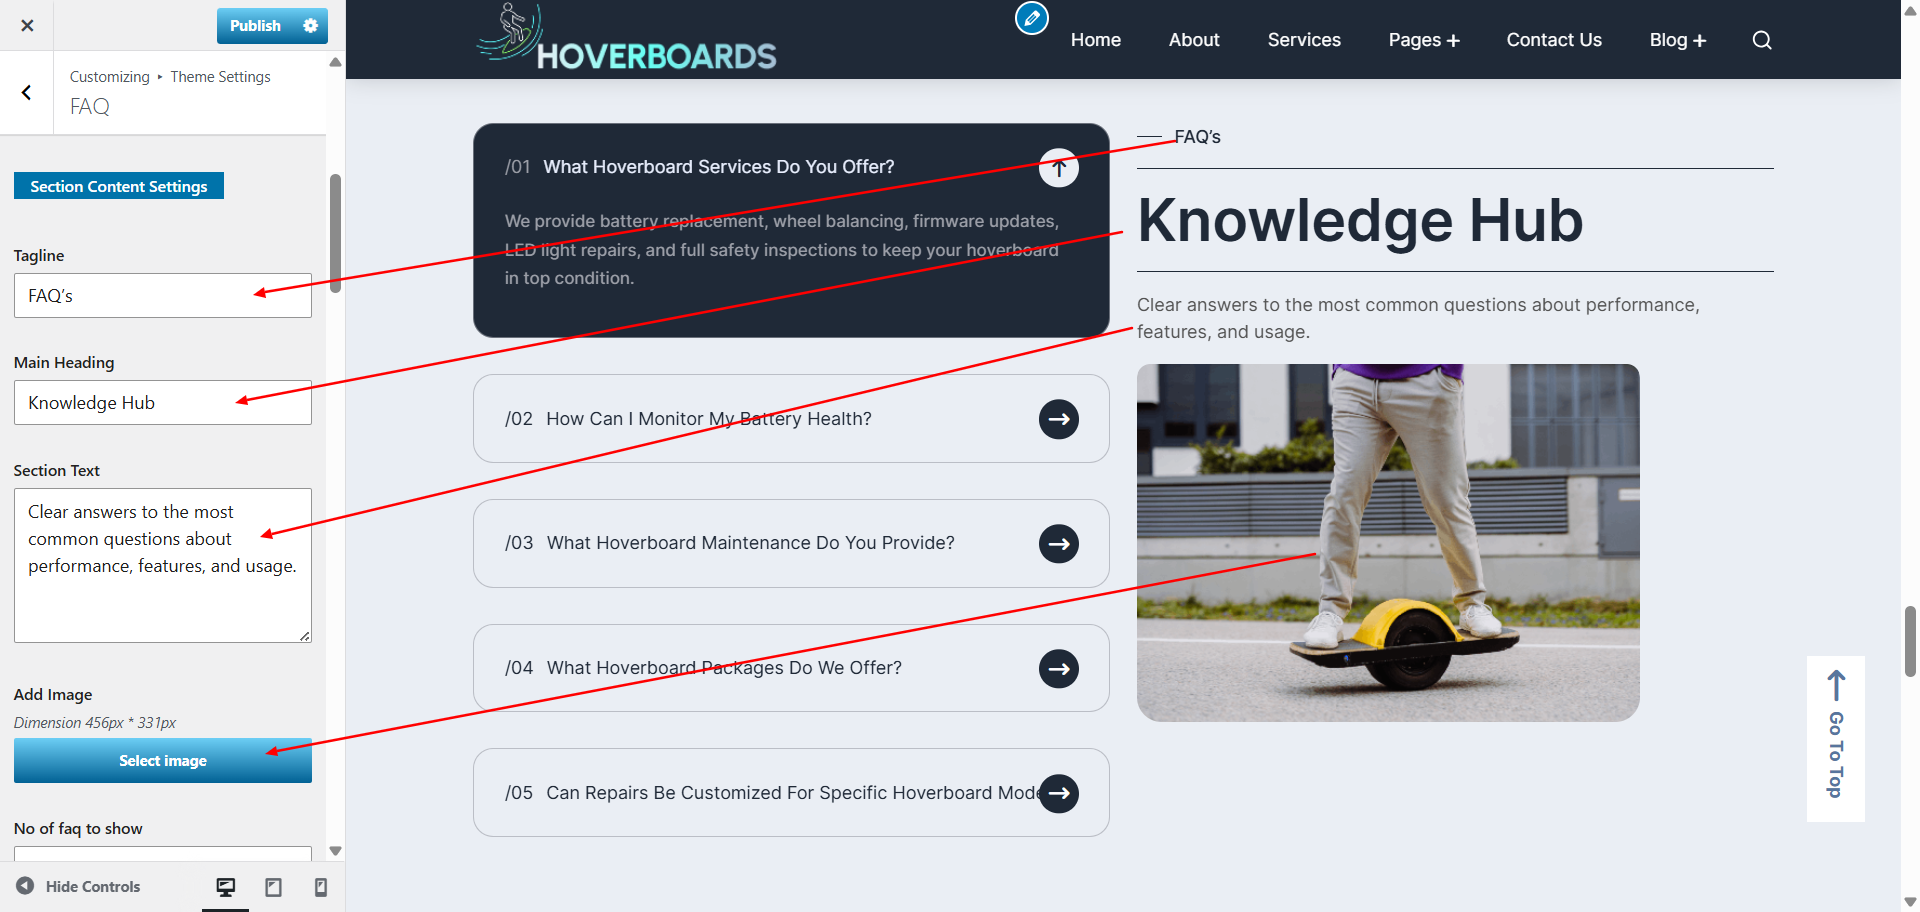
- Go to Appearance → Customize → Theme Settings → FAQ.
- Update the section heading, description, and adjust how many FAQs you want to display.
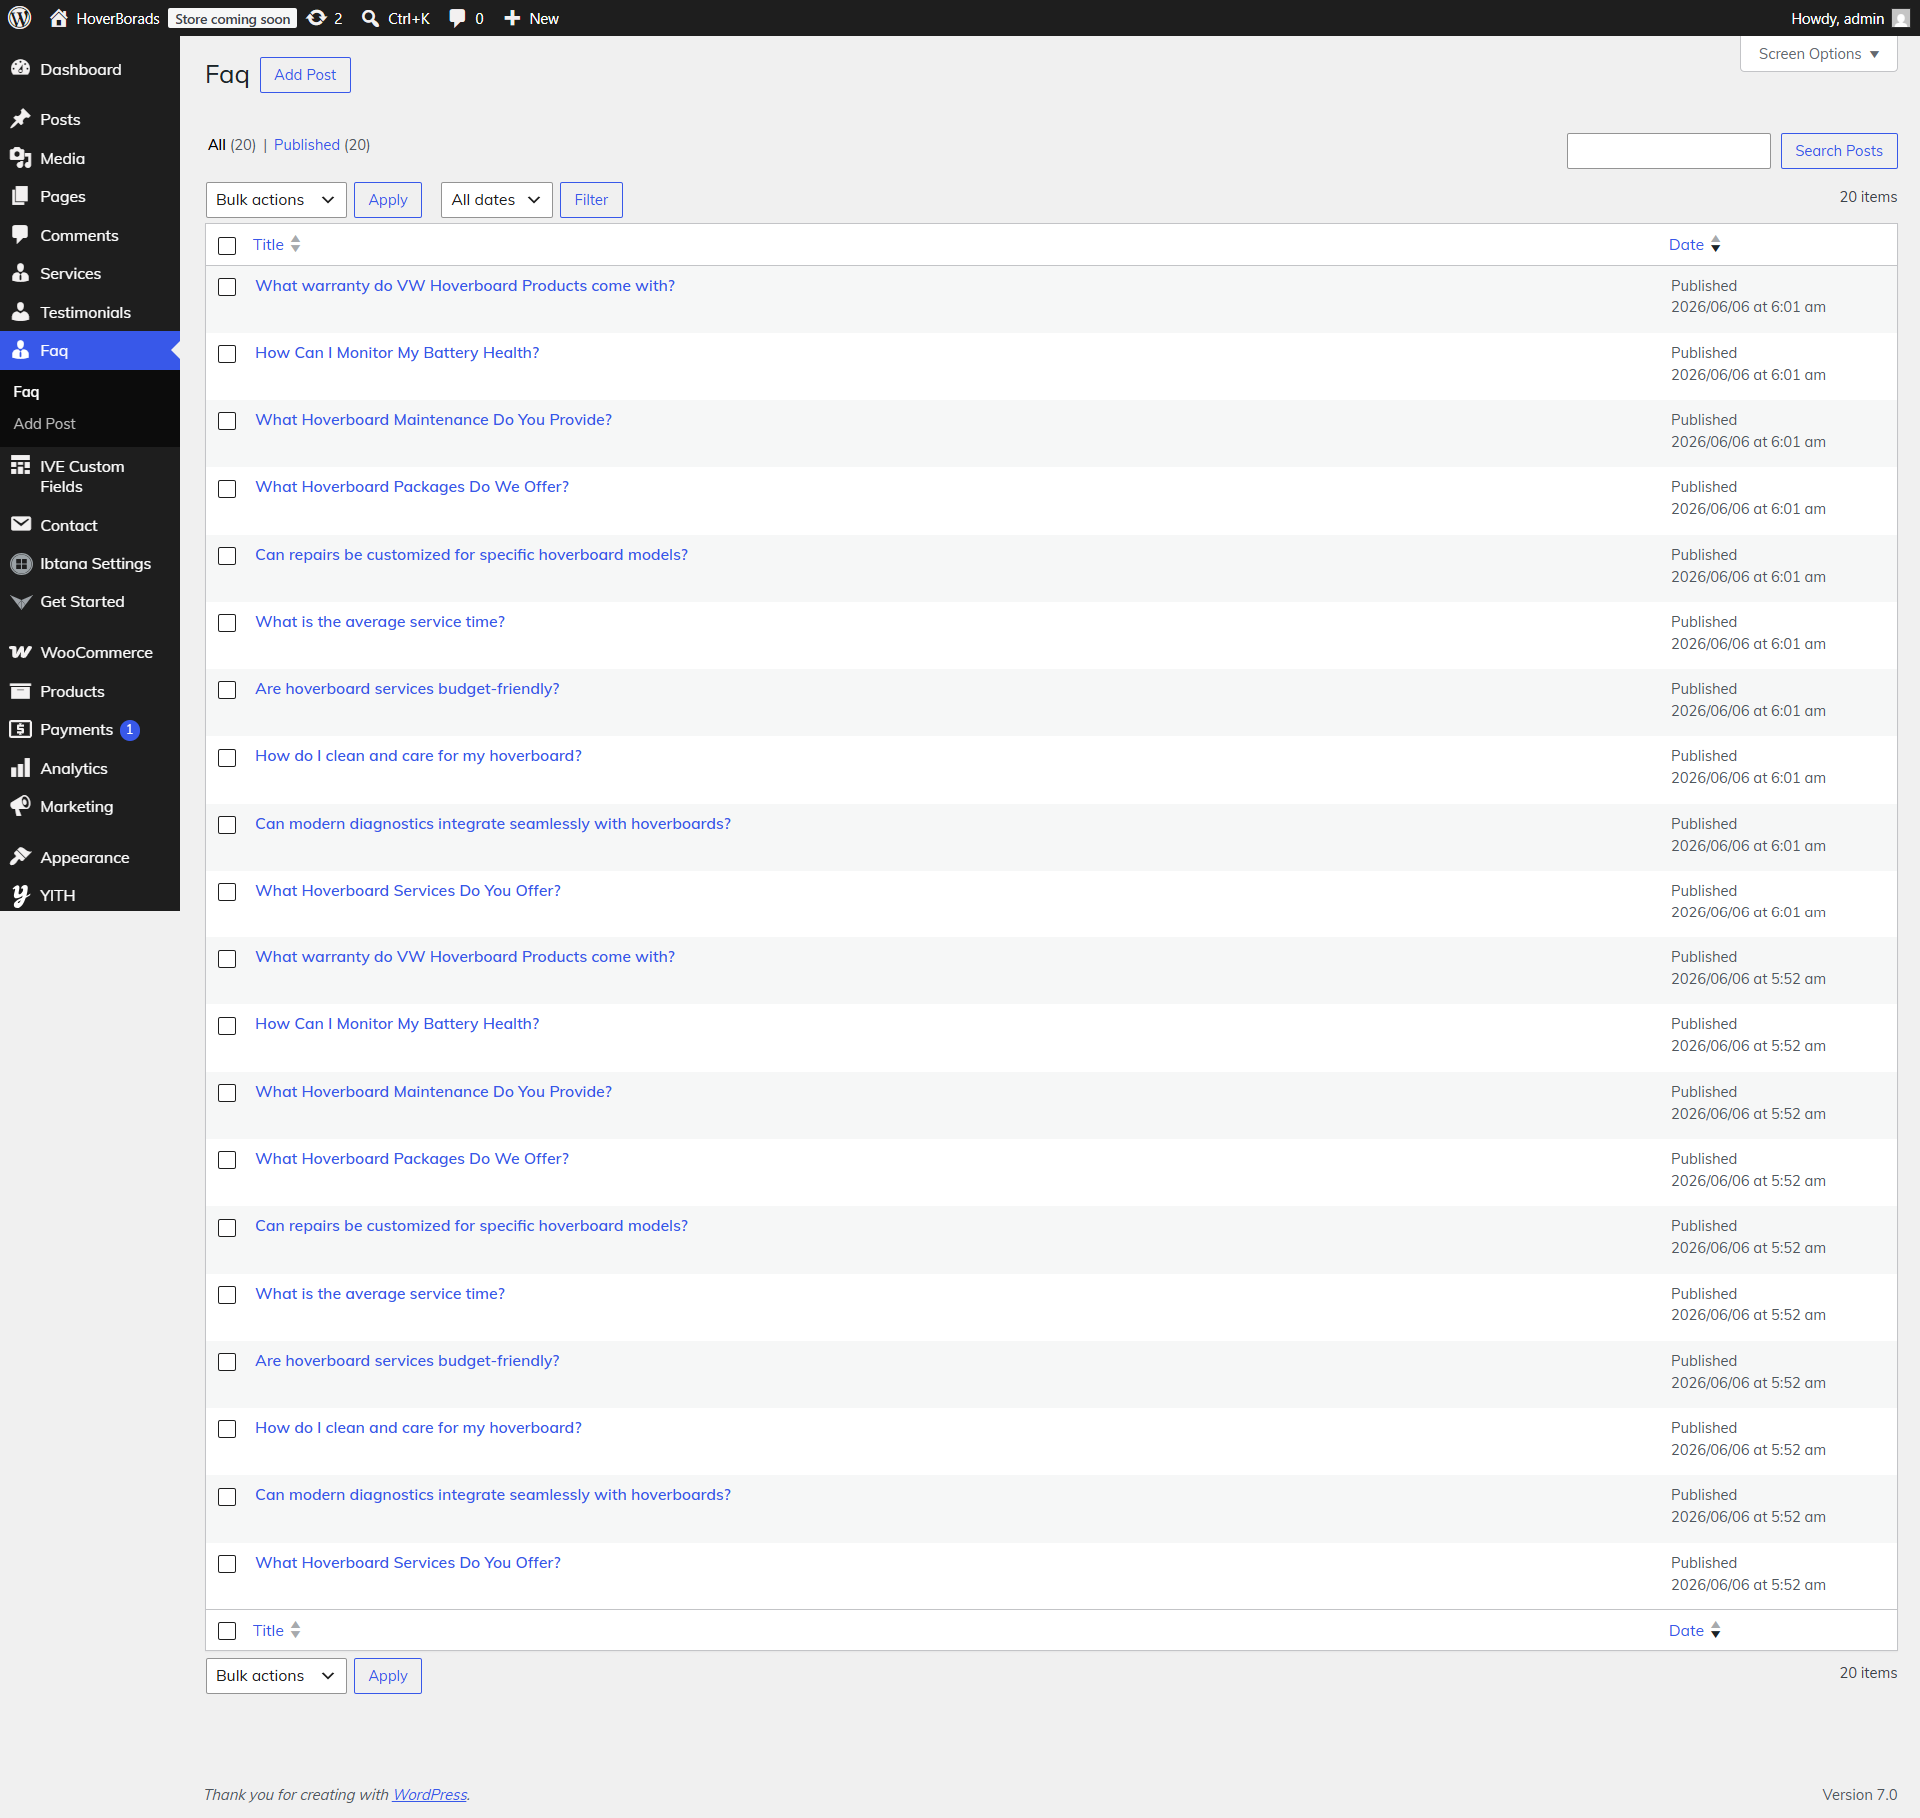
- Navigate to Dashboard → FAQ to manage individual FAQ posts.
- Edit the demo FAQ posts provided, or click Add New to create your own.
- Enter the Question in the post title field.
- Add the Answer in the content editor.
- Use any available meta fields for extra options such as icons or ordering preferences.
- Publish the FAQ post. Repeat for each question you want to include.
Once saved, the FAQ section will automatically pull content from the custom post type. Each entry displays the question and answer in an accordion or list format, making it easy for visitors to find information quickly.
9.13. Configure Our Community Section
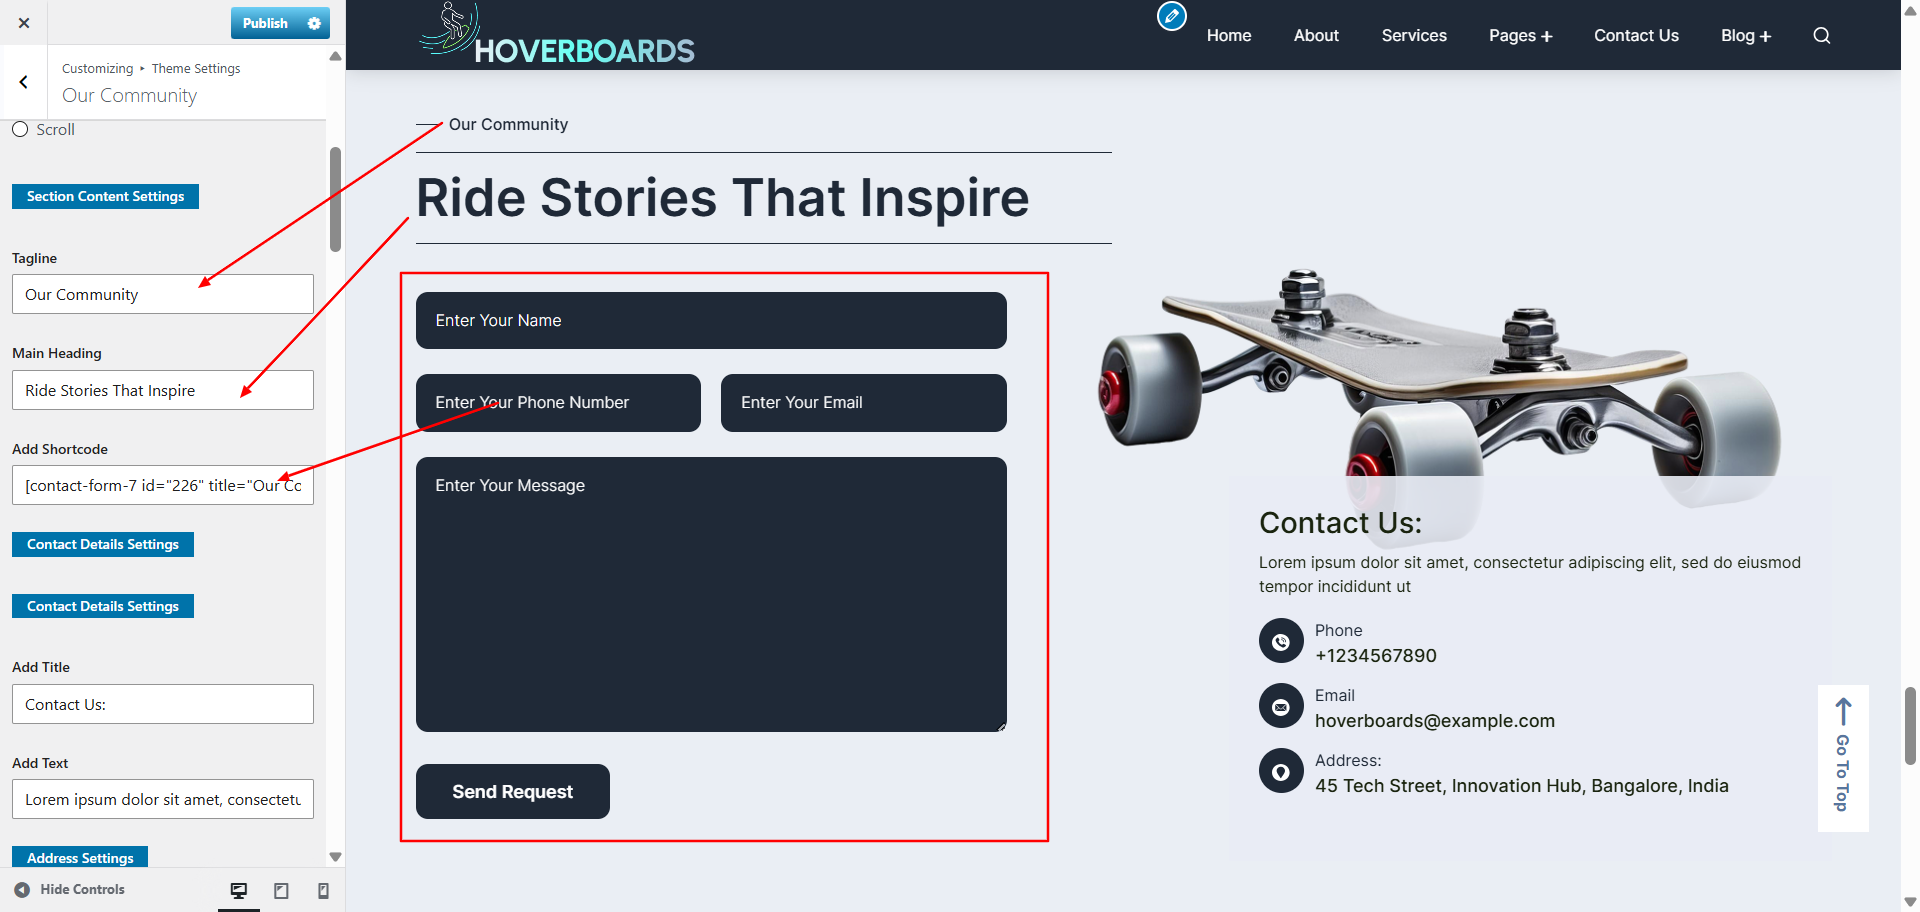
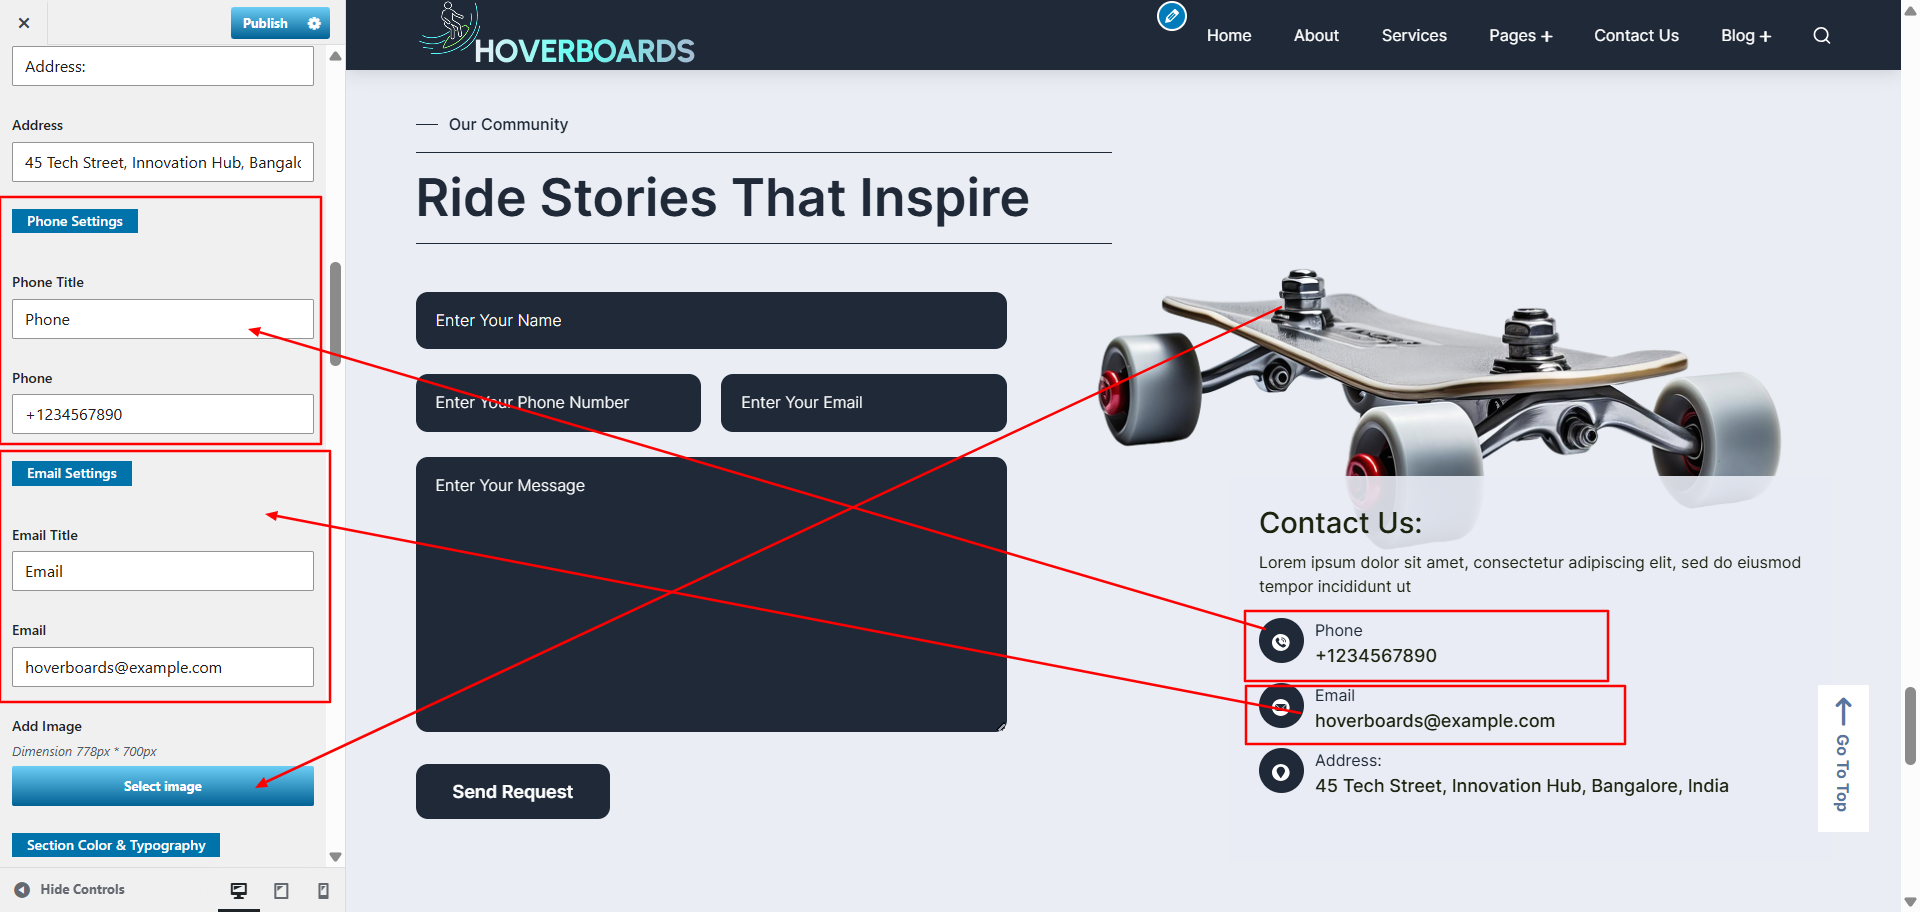
The Our Community section is designed to encourage interaction and engagement with your visitors. It typically includes a contact or signup form powered by Contact Form 7, allowing users to share feedback, join initiatives, or subscribe to updates.
- Go to Appearance → Customize → Theme Settings → Our Community.
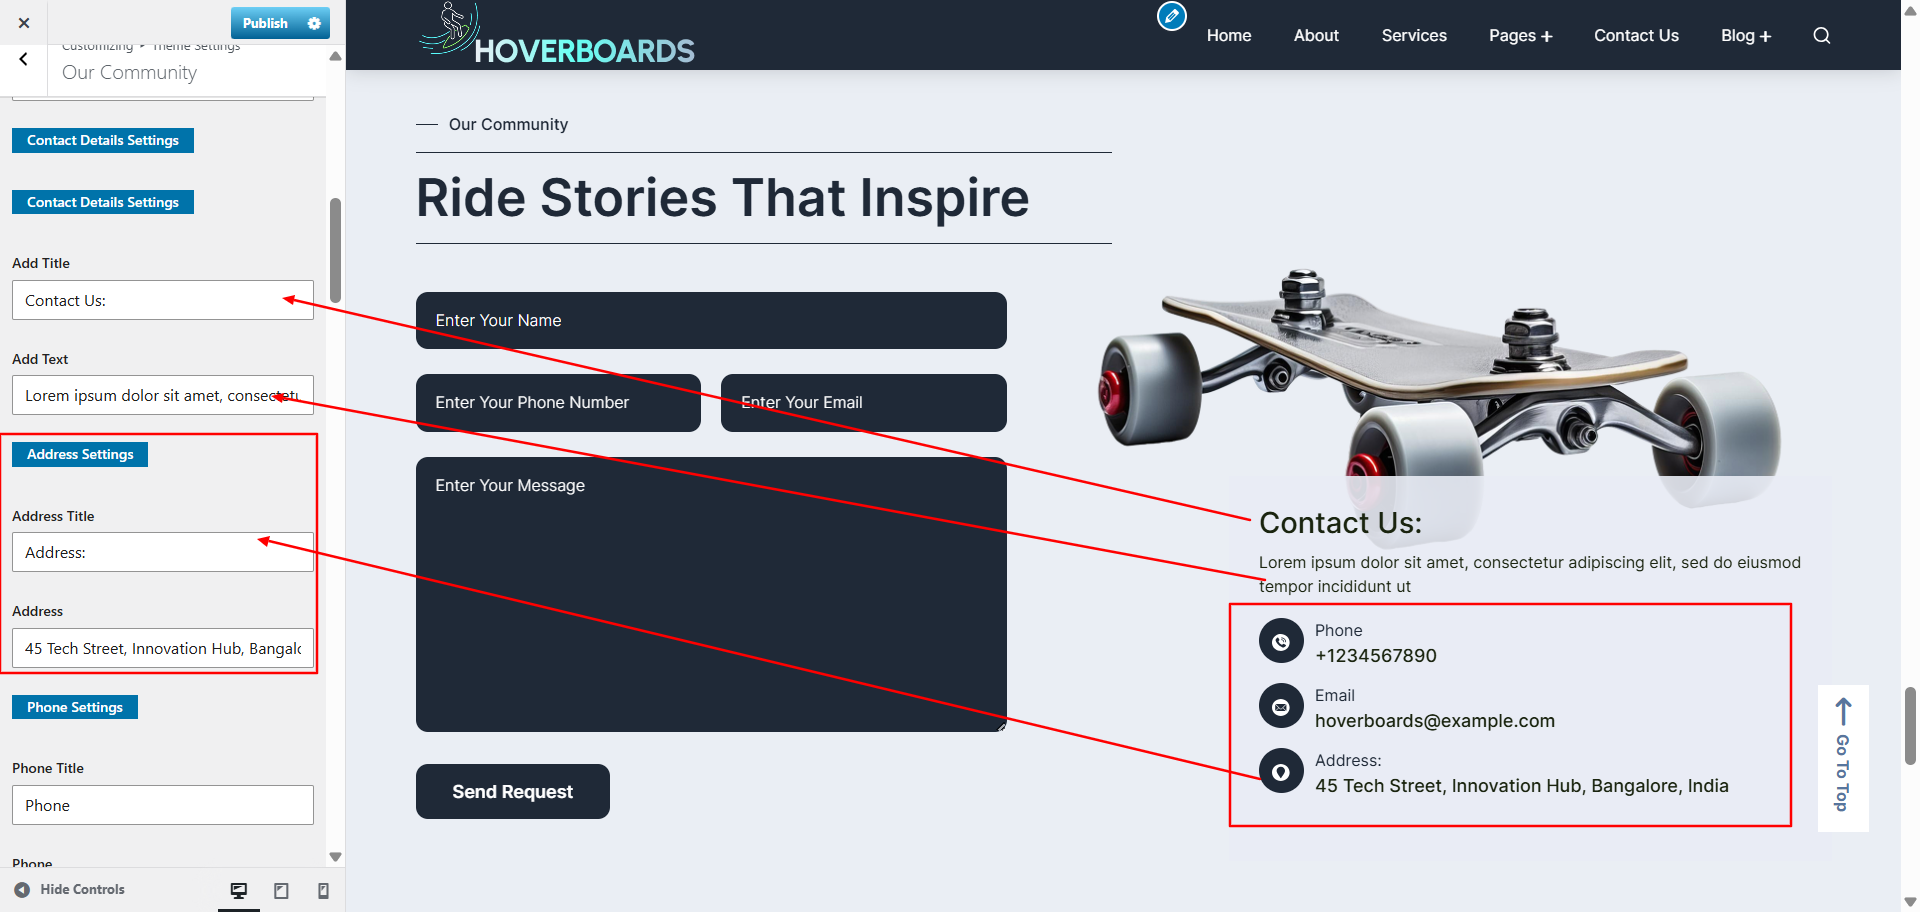
- Update the section heading, description, and adjust the layout as needed.
- Navigate to Dashboard → Contact to manage the form used in this section.
- Edit the demo form provided, or click Add New to create a new form.
- Include fields such as Name, Email Address, and Message. You can also add custom fields depending on your community goals.
- Save the form and copy its shortcode.
- Return to the Our Community settings in the Customizer and paste the shortcode into the designated field.
- Publish your changes to activate the form on the front end.
Once configured, the Our Community section will display the Contact Form 7 form, allowing visitors to connect with you directly. Submissions are handled through the plugin, making it easy to collect and manage responses.
9.14. Configure Blog Section
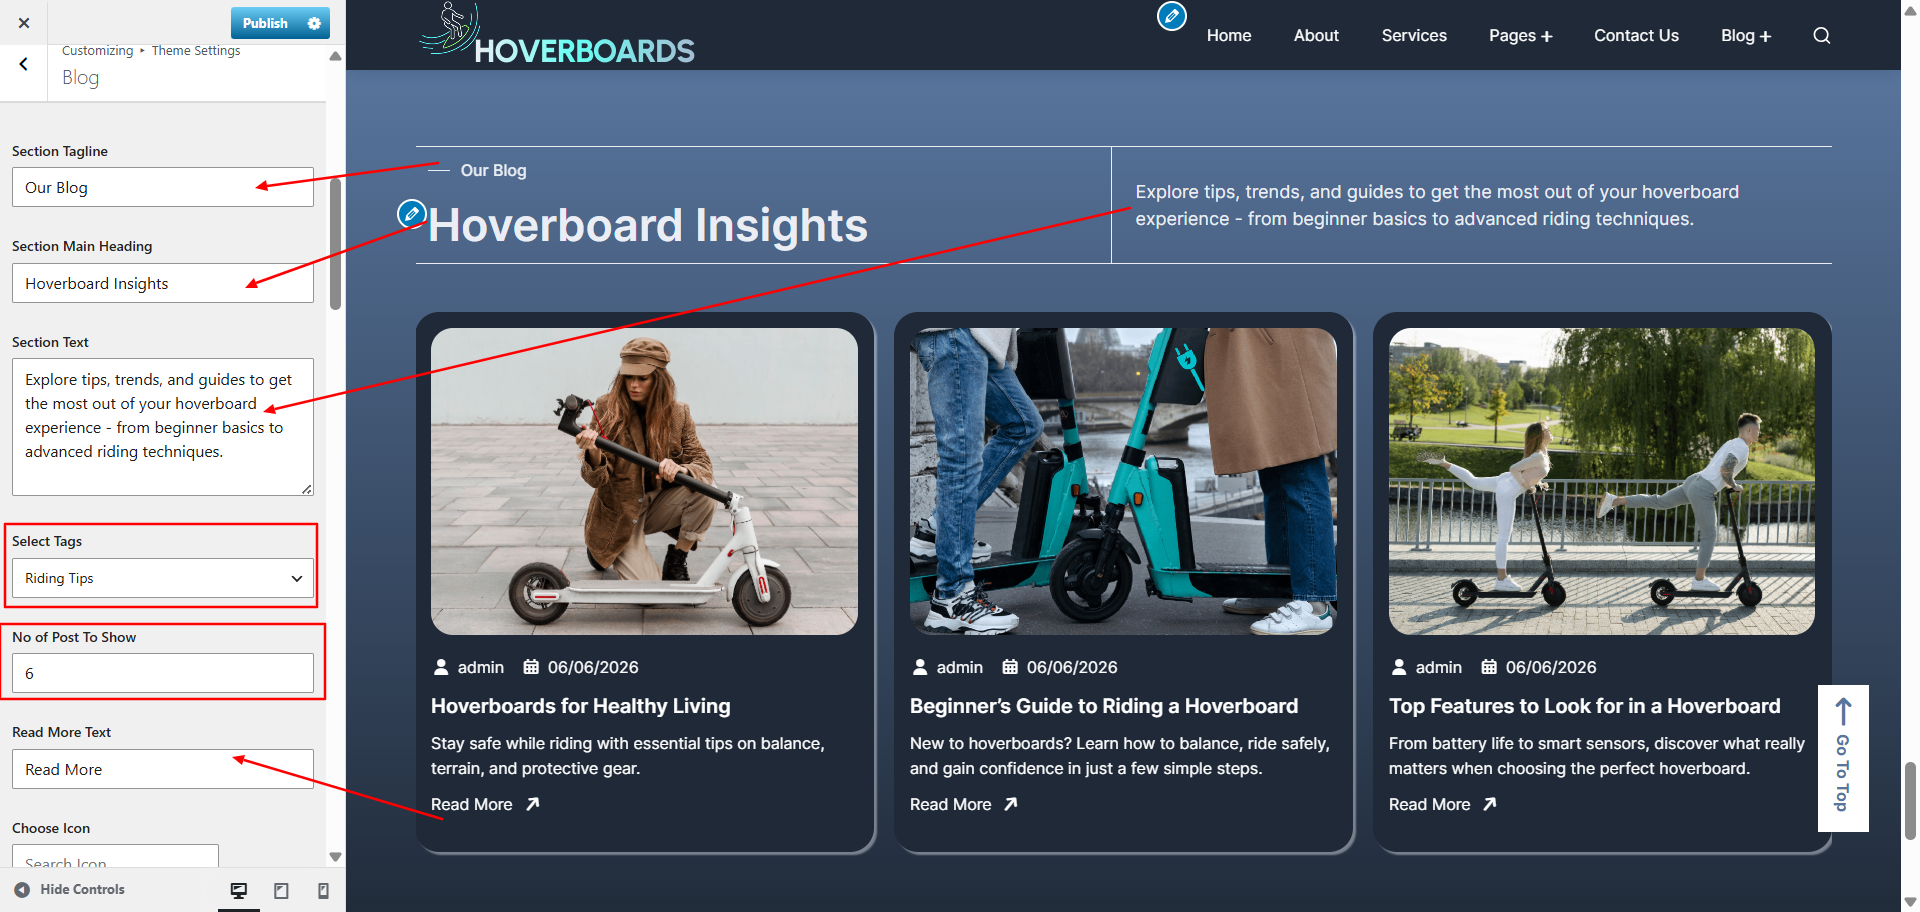
The Blog section allows you to display articles from your site and filter them by tags. This makes it easy to highlight specific topics or categories of content for your visitors.
- Go to Appearance → Customize → Theme Settings → Blog.
- Update the section heading and description to match your site’s theme.
- Choose how many posts you want to display per page or section.
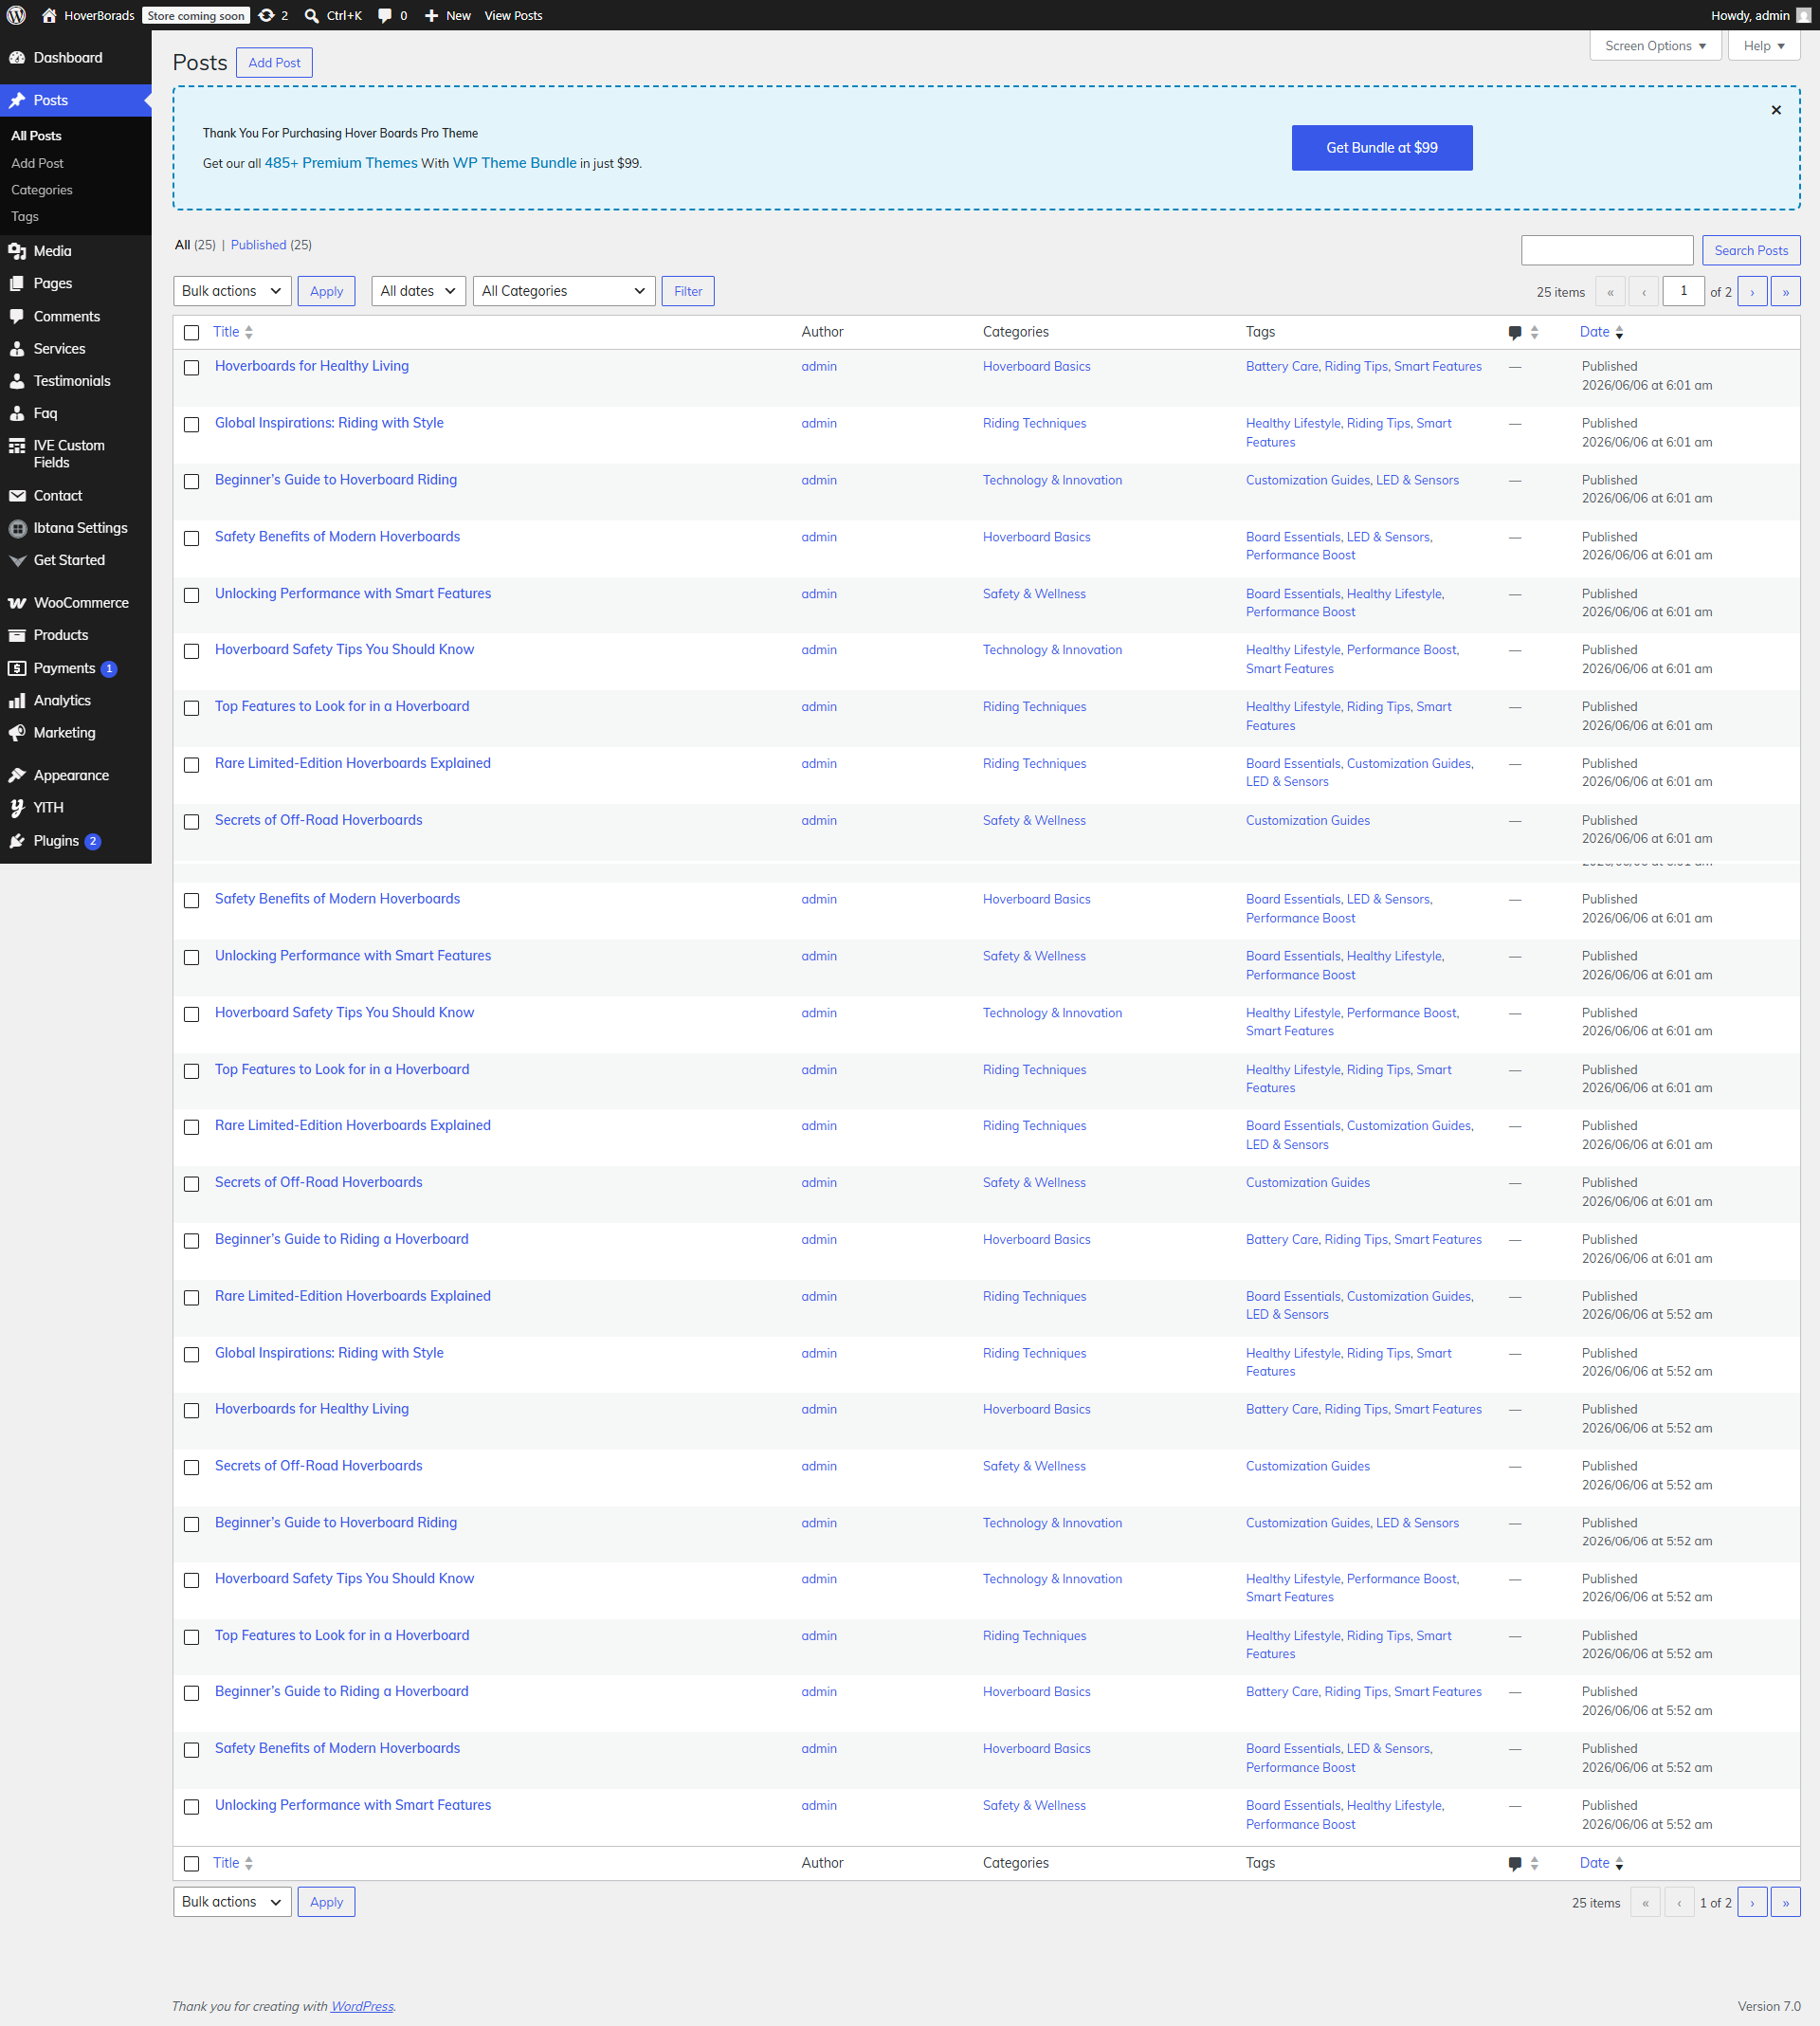
- Navigate to Dashboard → Posts to manage your blog entries.
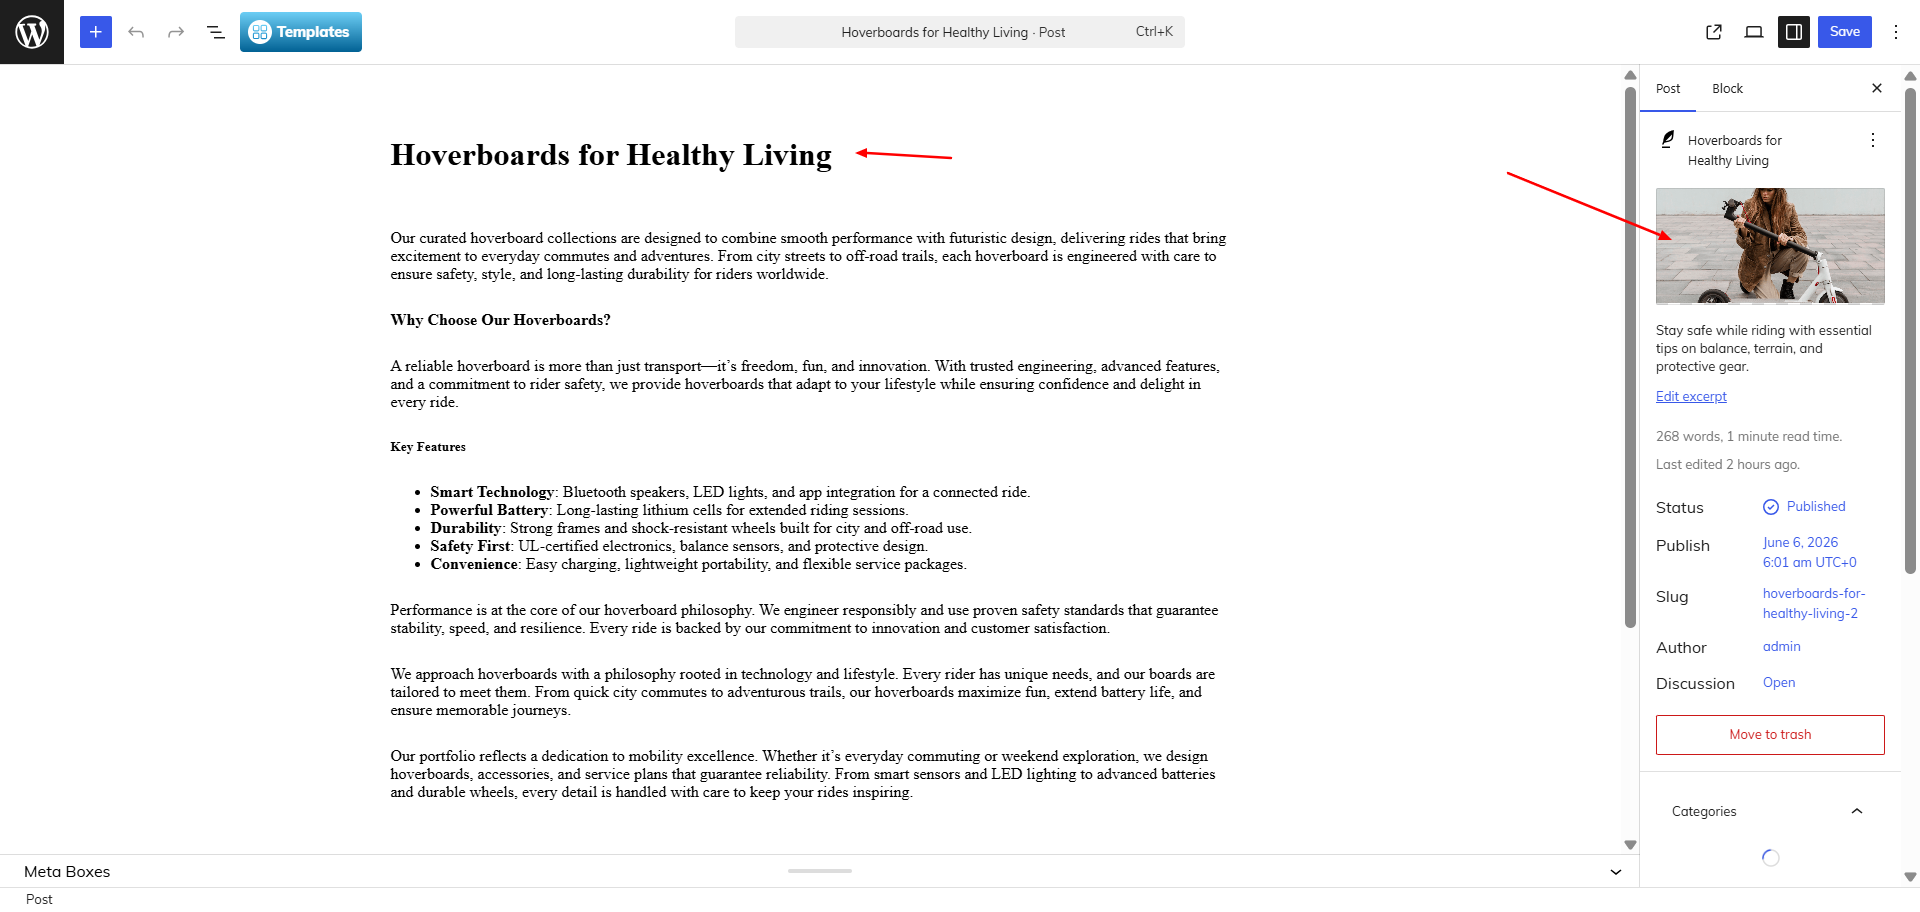
- Edit existing posts or click Add New to create a new one.
- Assign relevant Tags to each post. Tags should be created beforehand under Posts → Tags.
- Save and publish the post. Repeat for all articles you want to include.
- Return to the Blog Posts settings in the Customizer and select the tags you want to filter by.
- Publish your changes to activate the filtered blog post display on the front end.
Once configured, the Blog Posts section will automatically pull articles based on the tags you select. This ensures that only posts with those tags are shown, giving you control over the content highlighted in this section.
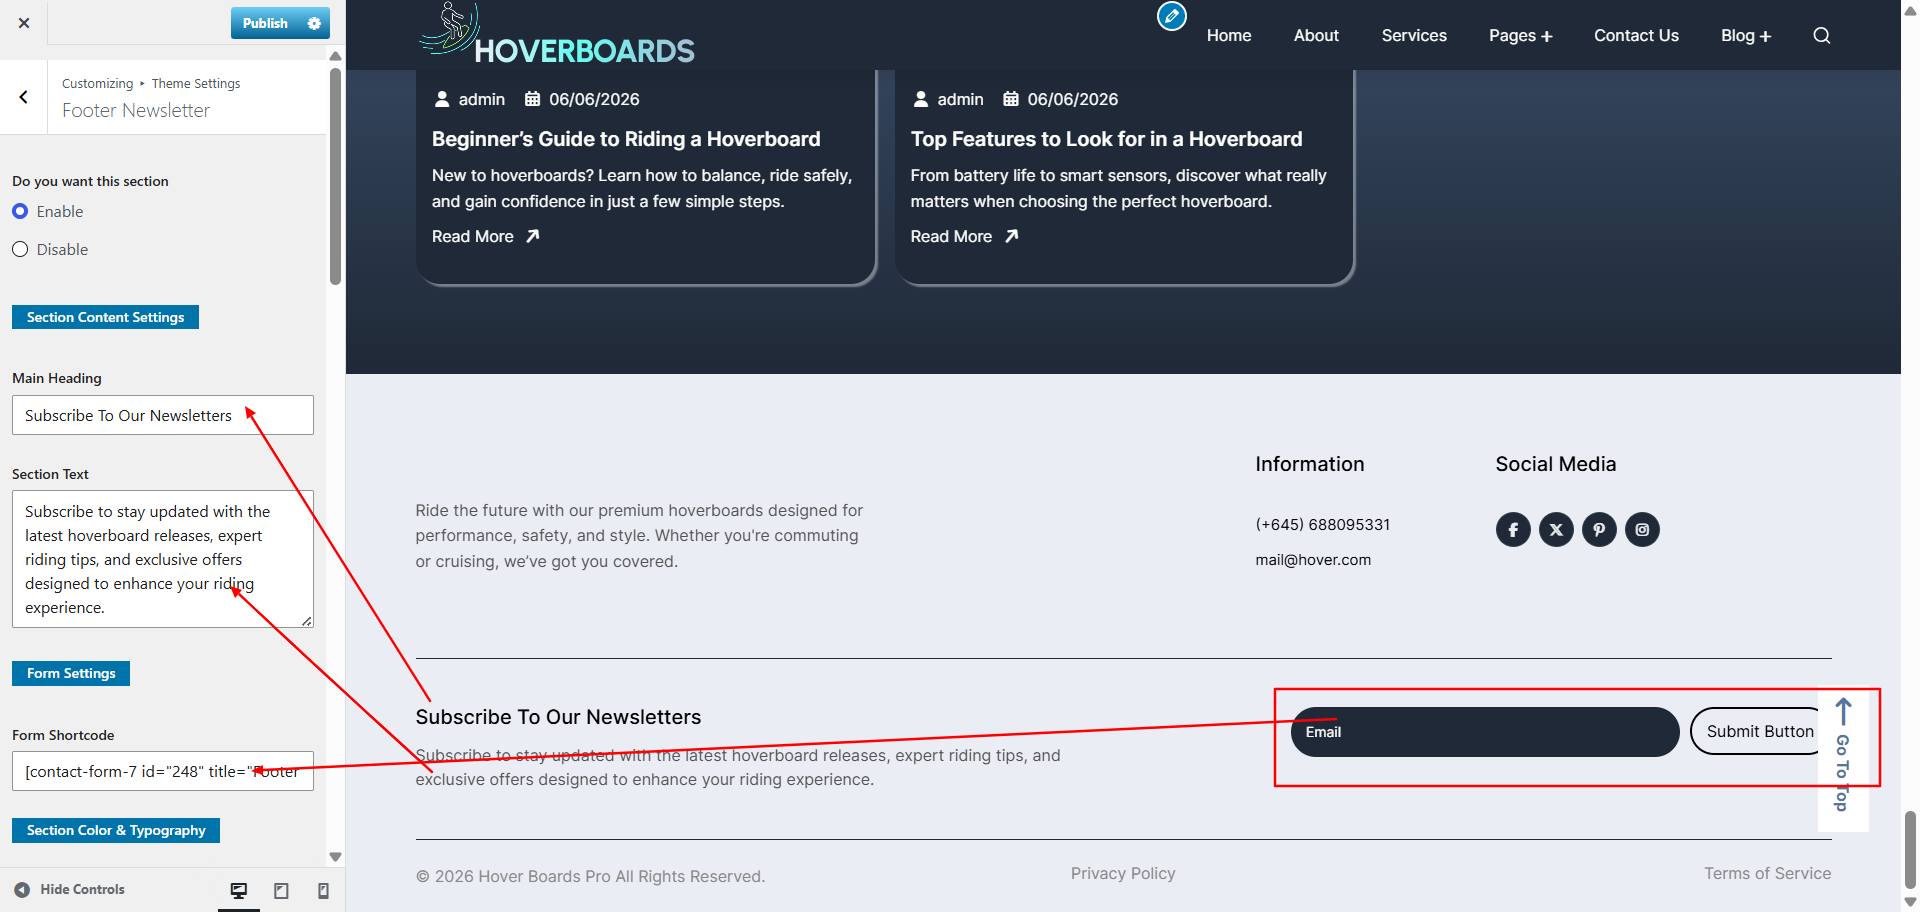
9.11. Configure Footre Newsletter Section
The Footre Newsletter section allows visitors to subscribe to updates directly from your site. This section is powered by Contact Form 7, making it flexible and easy to customize.
- Go to Appearance → Customize → Theme Settings → Footre Newsletter.
- Update the section heading, description, and adjust the layout as needed.
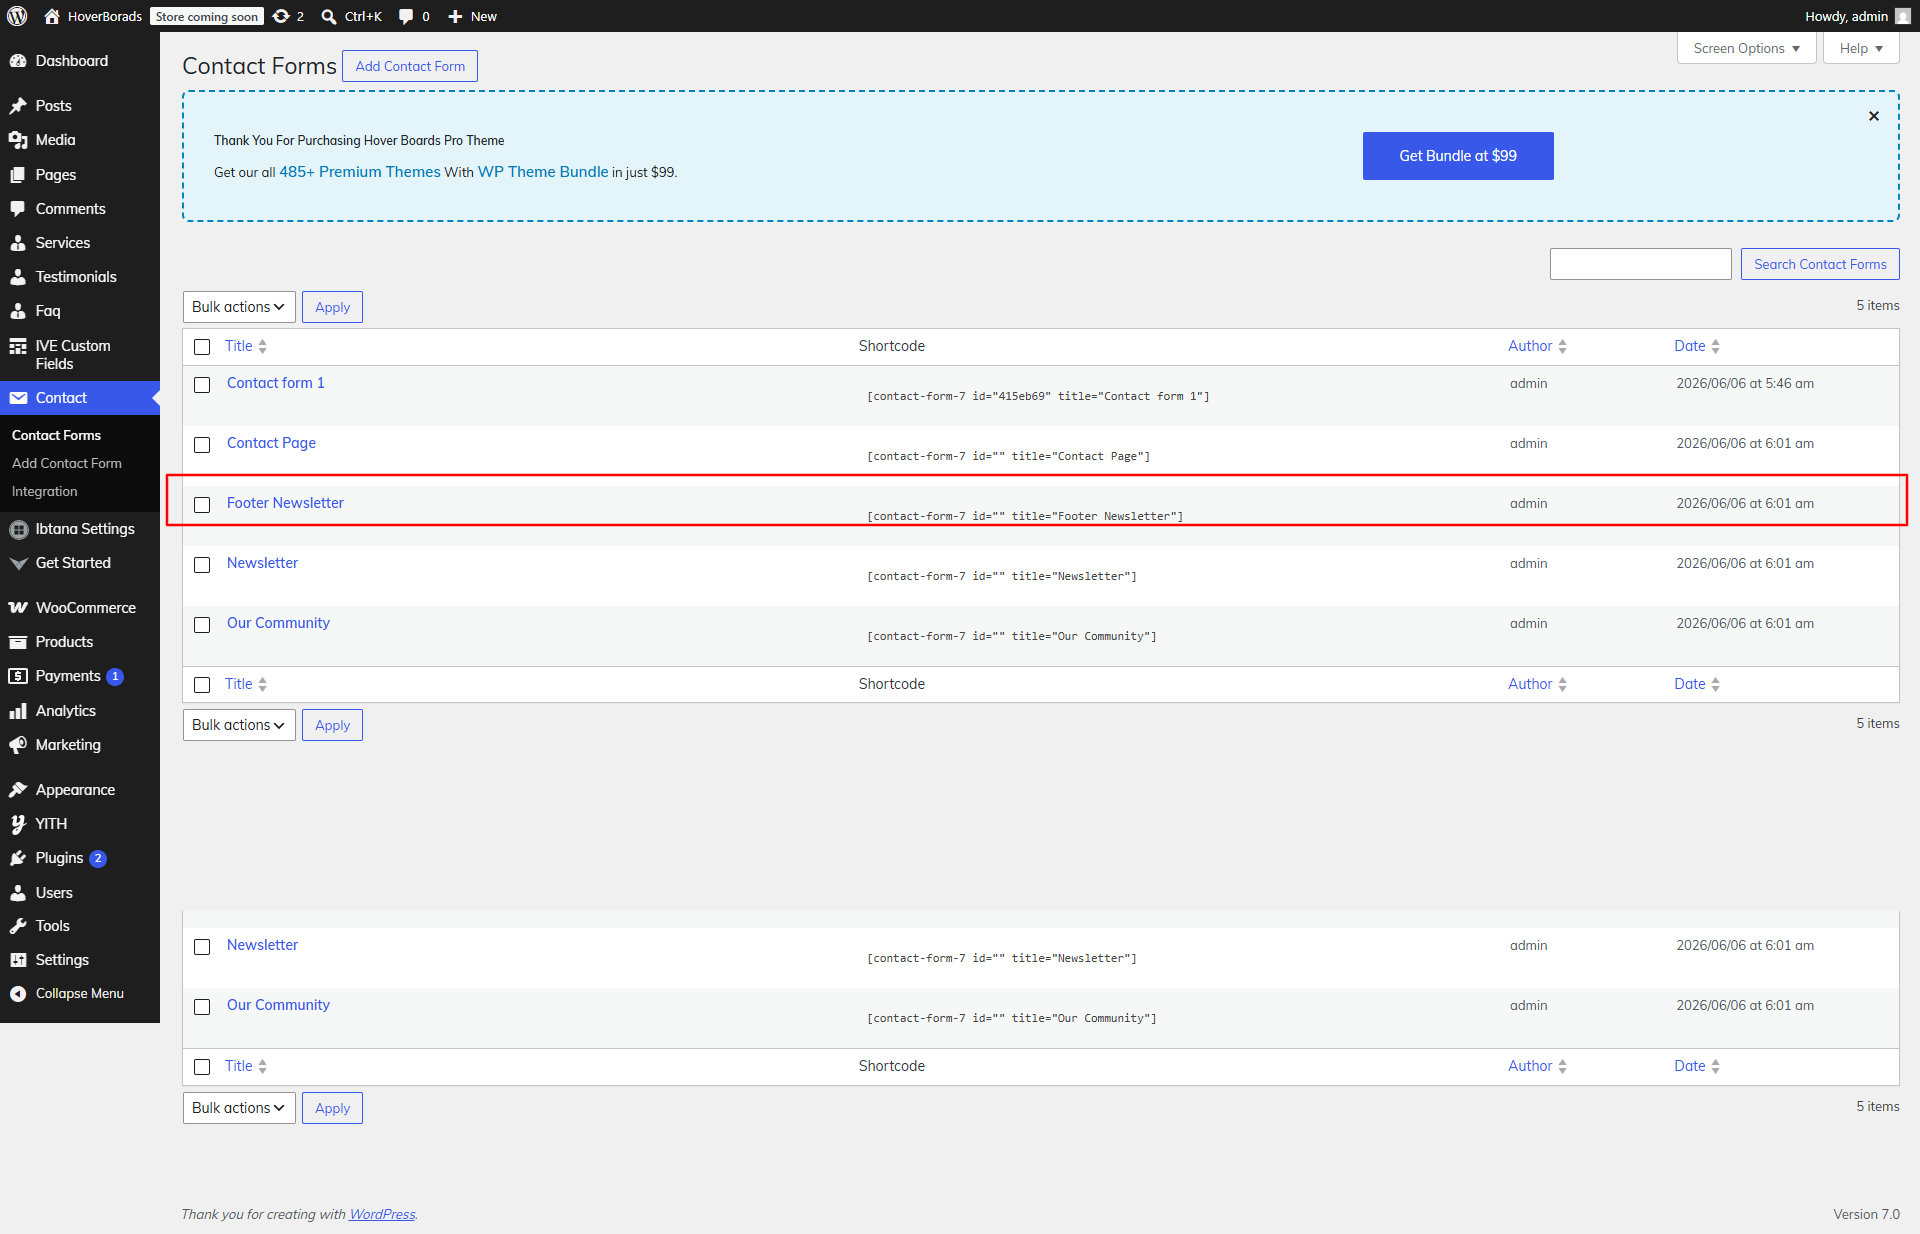
- Navigate to Dashboard → Contact to manage the newsletter form.
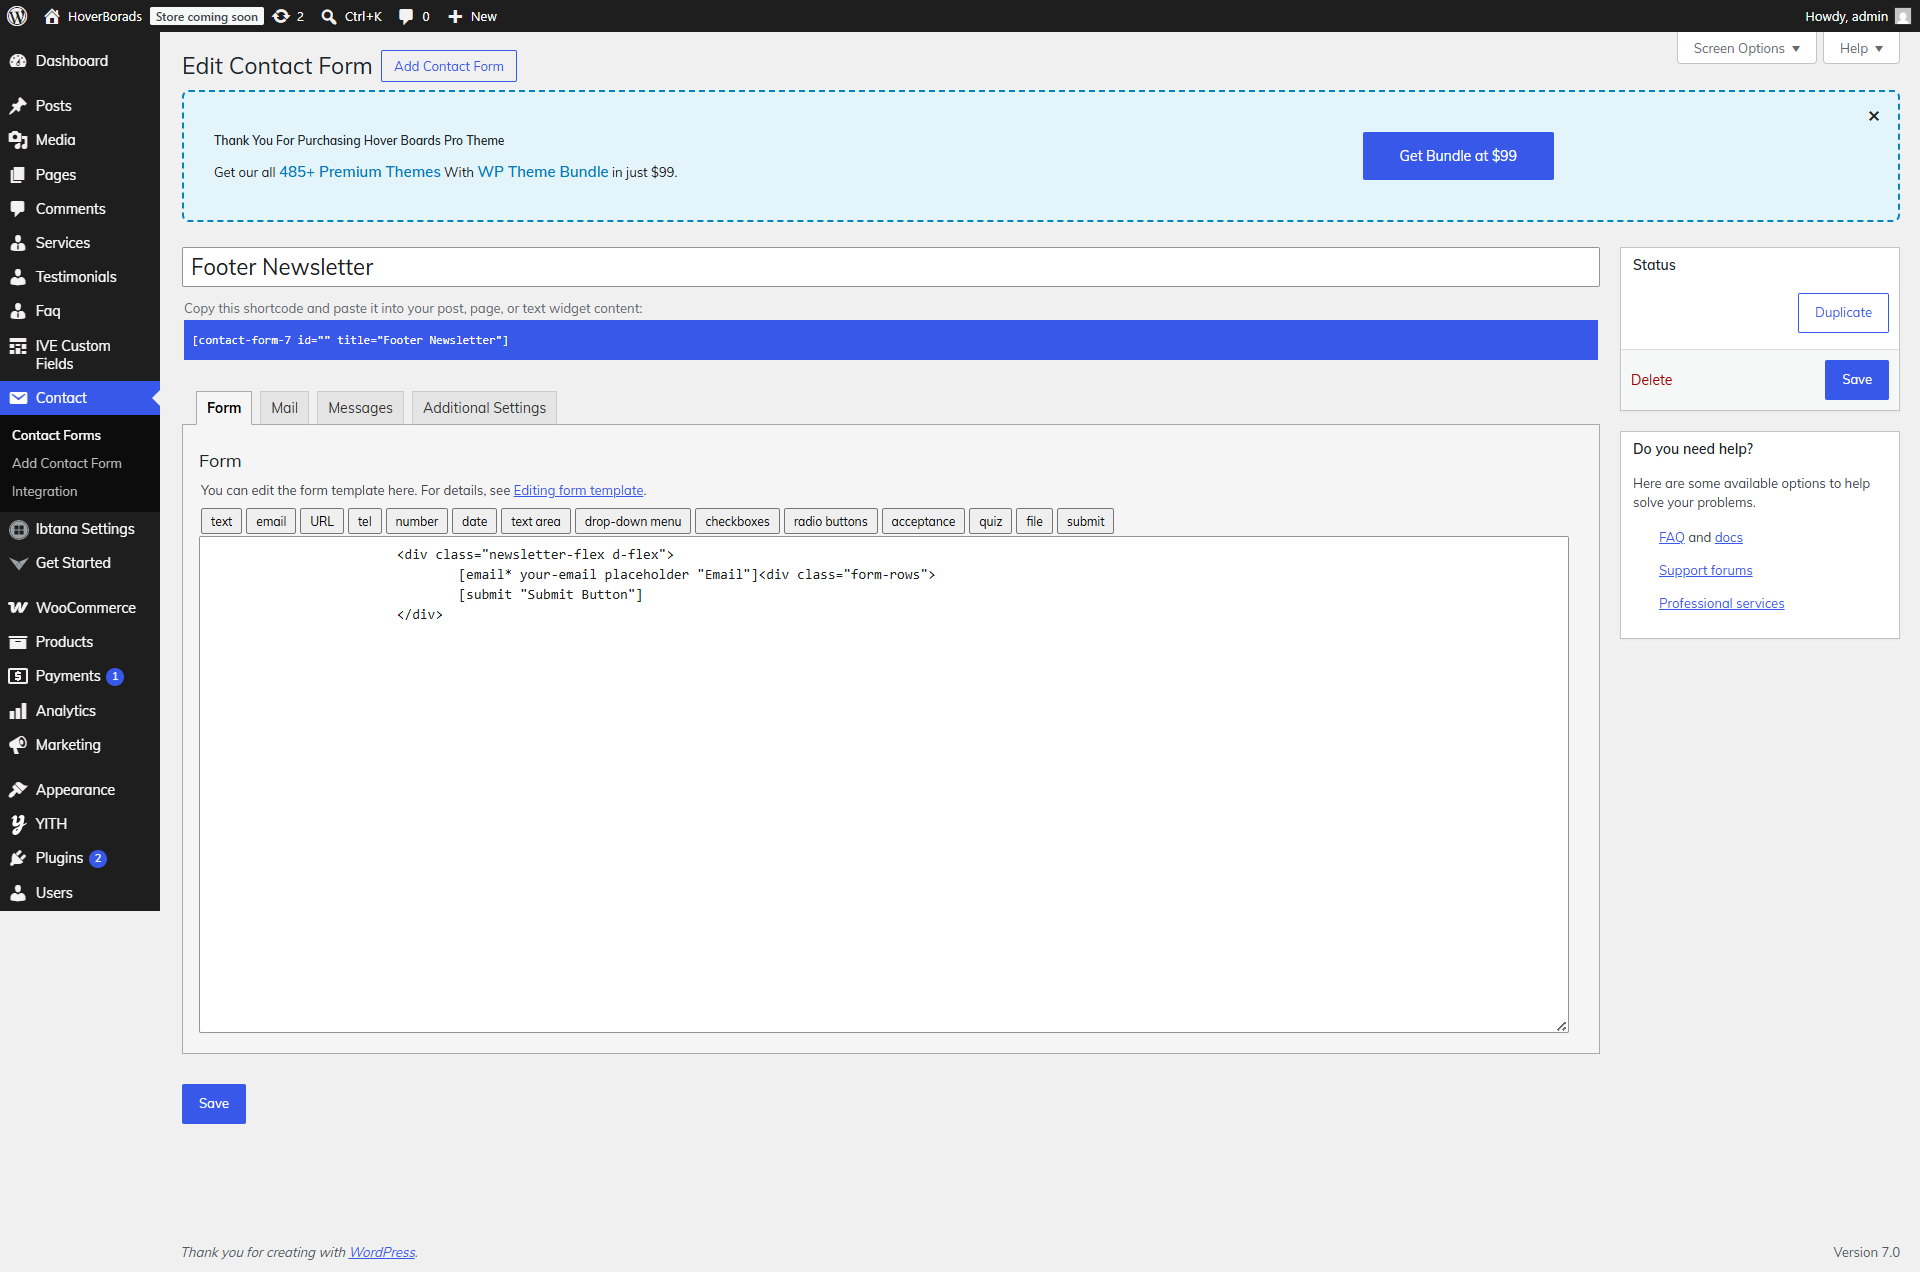
- Edit the demo form provided, or click Add New to create a new newsletter form.
- Include fields such as Email Address (required) and optional fields like
- Save the form and copy its shortcode.
- Return to the Newsletter settings in the Customizer and paste the shortcode into the designated field.
- Publish your changes to activate the newsletter form on the front end.
Once configured, the Newsletter section will display the subscription form created with Contact Form 7. Submissions will be stored and managed through the plugin, allowing you to collect and organize subscriber details easily.
9.14. Setup Footer Widgets Section
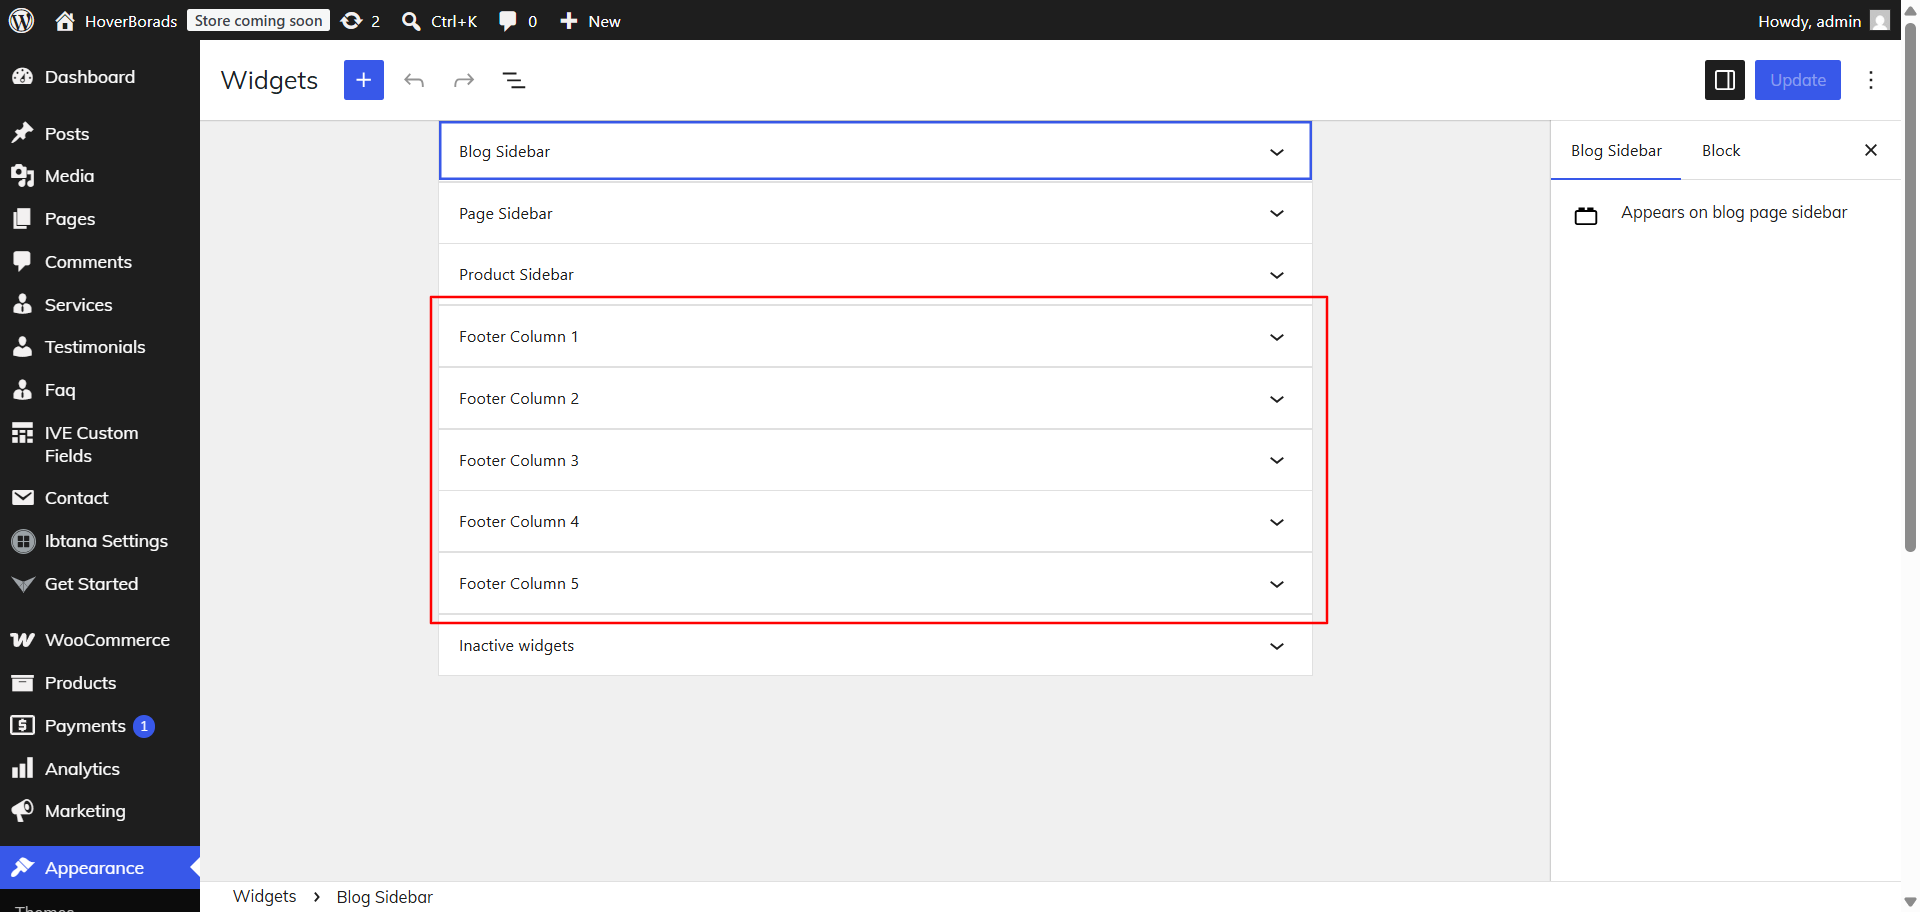
To display the Footer Widgets Section the steps outlined below
Go to Dashboard >> Appearance >> Widgets
Refer video for Setup Footer Widgets:
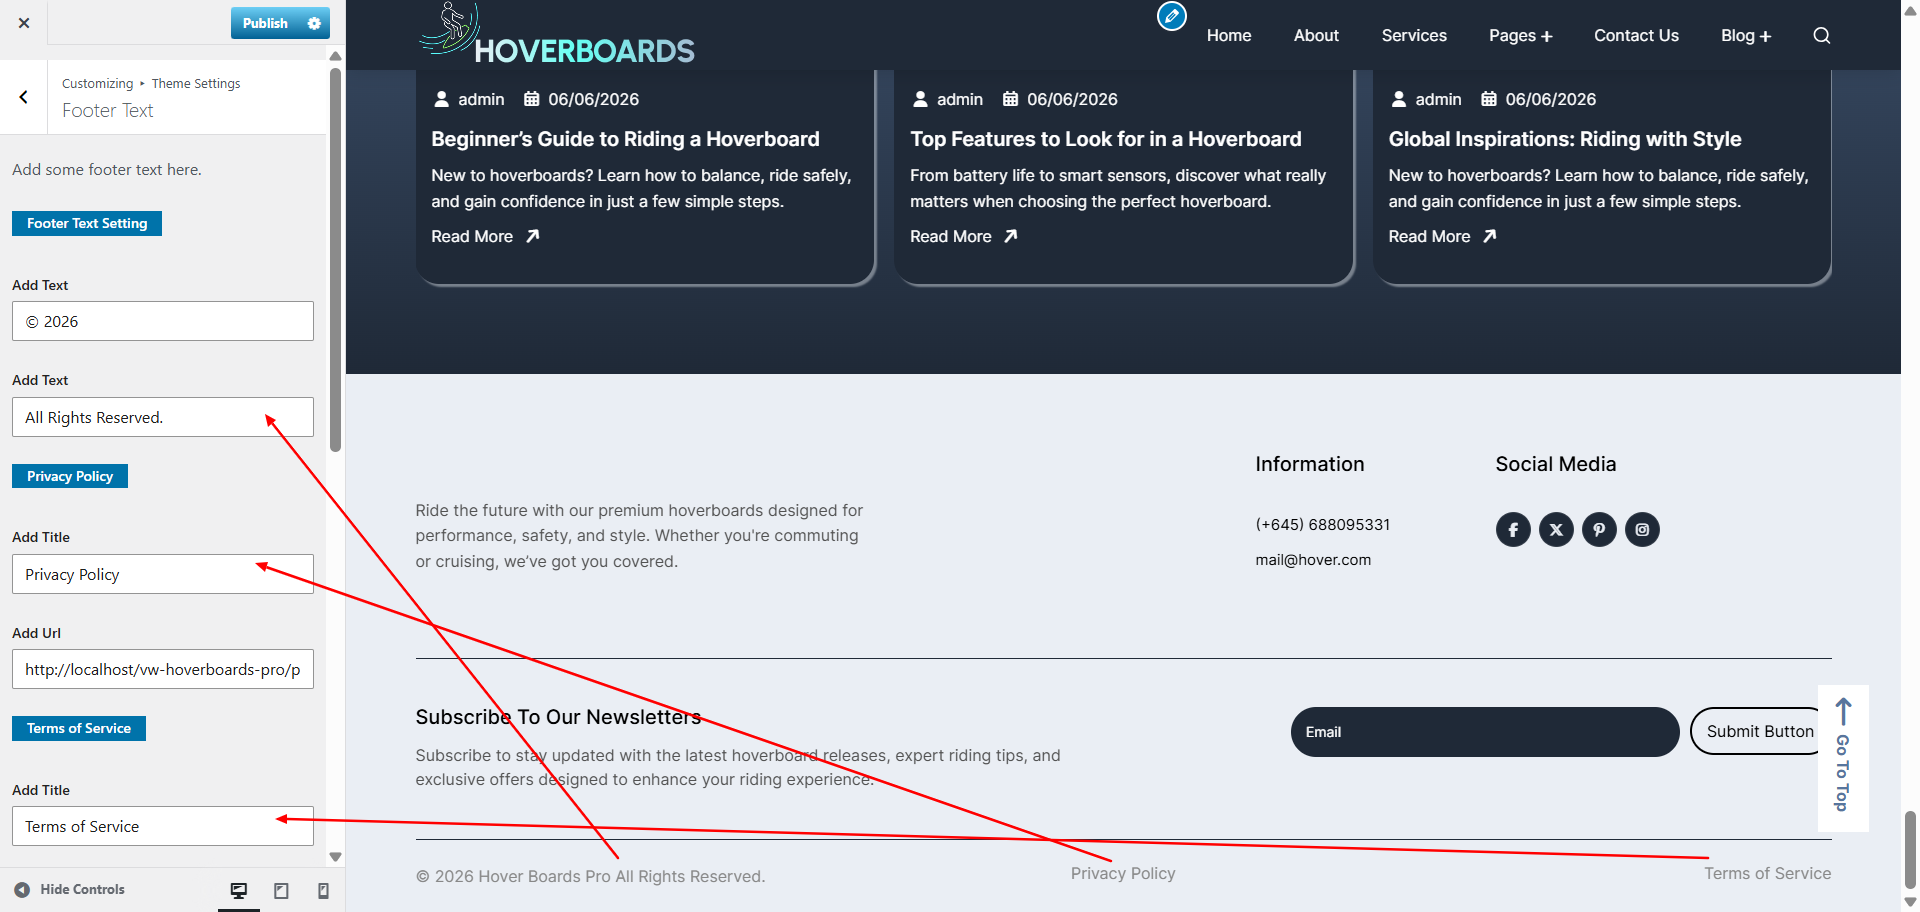
9.15. Setup Footer Text Section
1.Go to Appearance >>VW Theme setting>> Footer Menu.
Refer video for installation of Contact form 7 Plugin:
Refer video for Setup Social Icons:
Refer video for plugin activation:
Setup Navigation
- First of all, create pages from go to Pages >> Add new page.
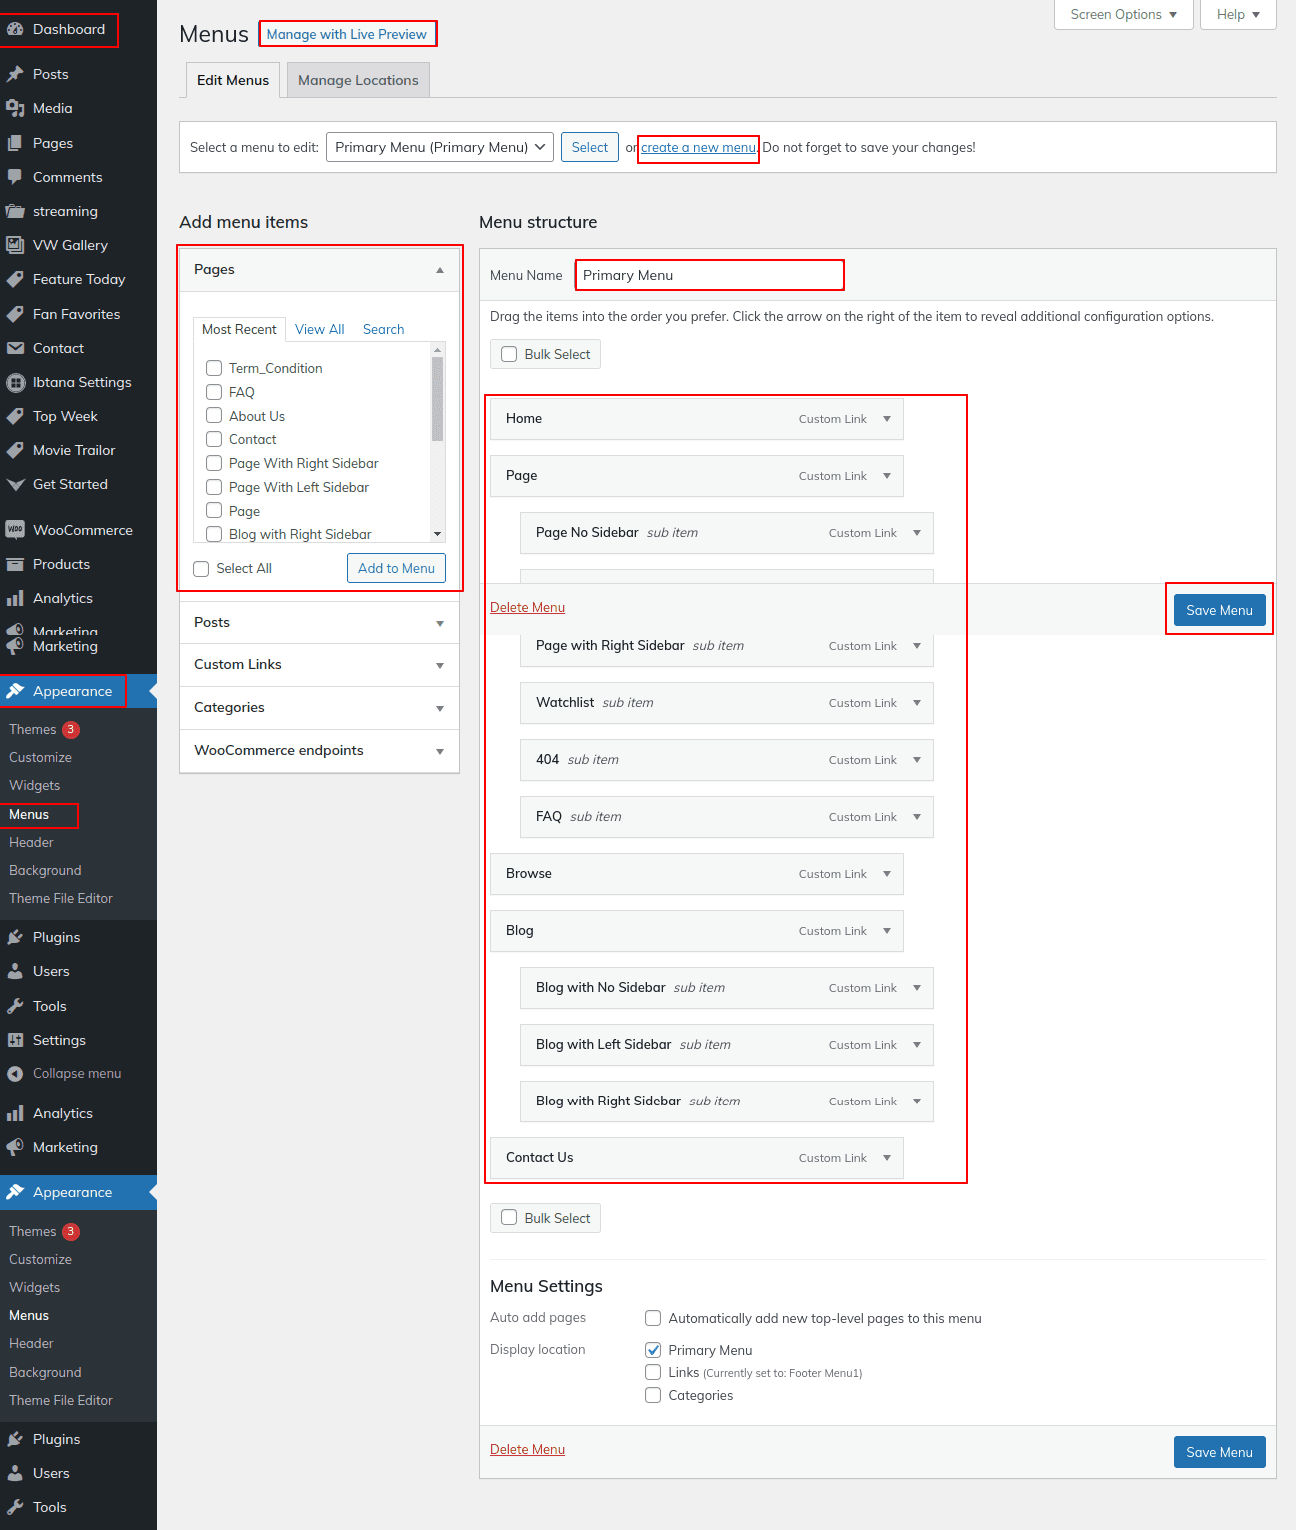
- Go to Appearance >> Menu
- Click on Create a new menu link
- Give a name to your menu in Menu name and click save menu button
- after creating a menu. Pages must be added by checking the appropriate boxes. You can drag and drop the menu list into place after adding it.
- Select menu theme location from the below checkboxes
- If you checked primary menu checkbox then menu will appear on header.
1.To set a template for a new page, navigate to the Dashboard, click on Pages, and then select Add New Page.
Give the page a name, such as "Home," or any other desired label. Next, choose the "home-page" template from the dropdown menu of available templates.
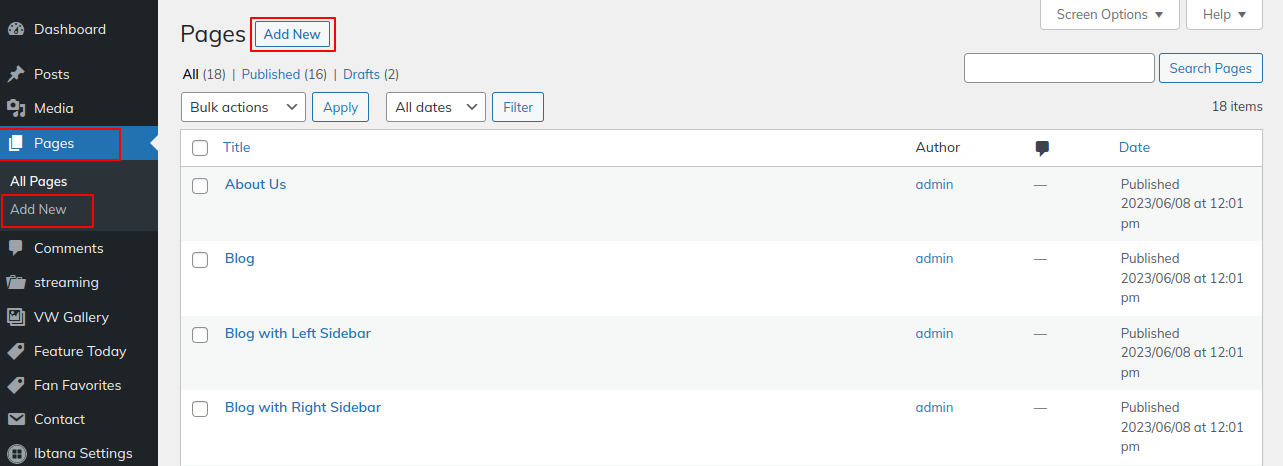
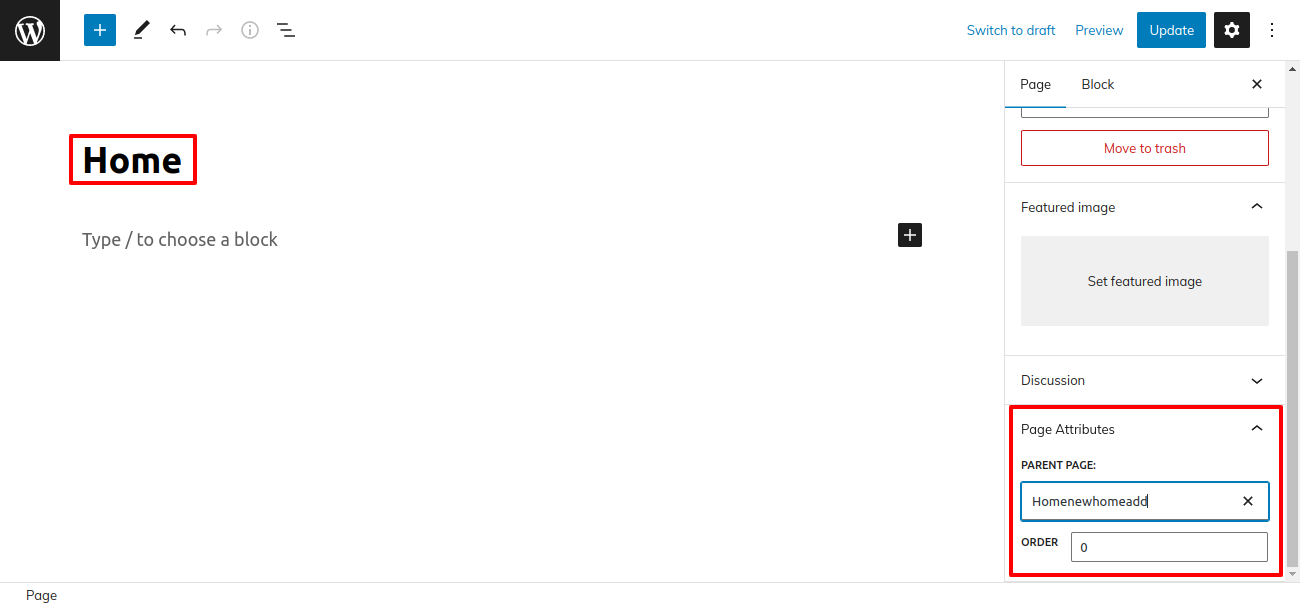
See this screenshot for better understanding.
Go to Dashboard >> Appearance >> Menus.
Refer video for Setup Navigation Menu:
Page Templates and sidebars
Page Templates
- Default Template (the default page template with a right sidebar position)
- Blog with Full Width (a blog templates with one column without sidebar)
- Blog with Left Sidebar (a blog templates with left sidebar position)
- Blog with Right Sidebar (a blog template with right sidebar position)
- Contact (the default Contact template with no sidebar position)
- Home Page (Template to show home page content)
- Page with Left Sidebar (a page templates with left sidebar position)
- Page with Right Sidebar (a page template with right sidebar position)
Post, Categories and Post Formats
Adding category
Review the following article for more information on adding categories: http://codex.wordpress.org/Manage_Categories_SubPanel
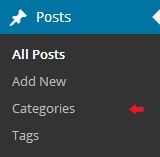
- Log into your WordPress Administration Panel (Dashboard).
- Click the Posts tab.
- With that done, click Categories for blog posts.
- Type in the name of your new category.
- After that, click the Add New Category button.
Creating a Blog post
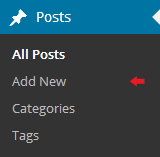
- Log into your WordPress Administration Panel (Dashboard).
- Click the Posts tab.
- Click the Add New tab.
- Type in your post content. For more information on adding posts, please check the following link http://codex.wordpress.org/Posts_Add_New_SubPanel.
Shortcodes
A shortcode is a powerful content building tool http://codex.wordpress.org/Shortcode. Shortcodes are easy to use. First of all, make sure that the editing mode is set to Visual.
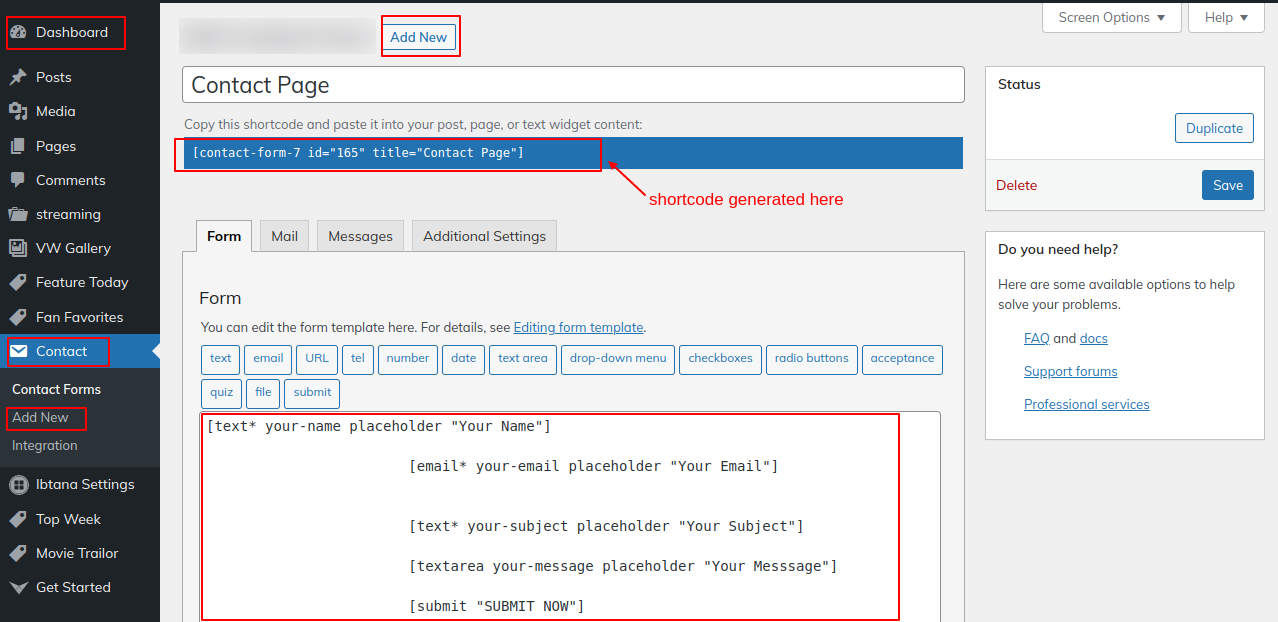
Refer video for Create Pages Using Shortcode:
Custom Widgets

Refer video for Setup Footer: